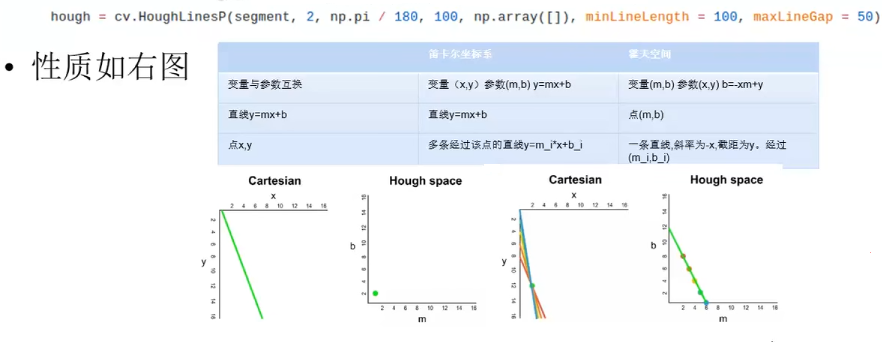
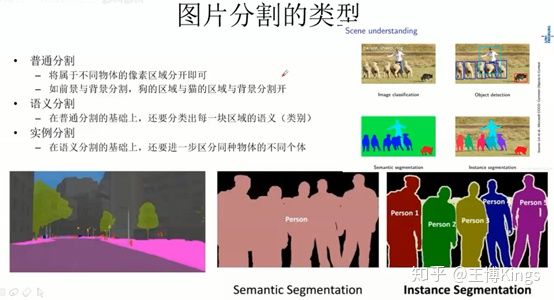
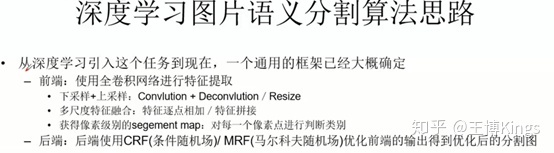
1
2
3
4
5
6
7
8
9
10
11
12
13
14
15
16
17
18
19
20
21
22
23
24
25
26
27
28
29
30
31
32
33
34
35
36
37
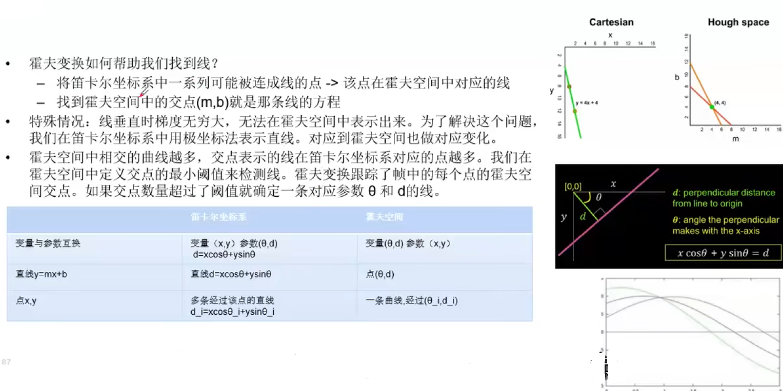
38
39
40
41
42
43
44
45
46
47
48
49
50
51
52
53
54
55
56
57
58
59
60
61
62
63
64
65
66
67
68
69
70
71
72
|
def test_lanenet(image_path, weights_path, use_gpu):
"""
:param image_path:
:param weights_path:
:param use_gpu:
:return:
"""
assert ops.exists(image_path), '{:s} not exist'.format(image_path)
log.info('开始读取图像数据并进行预处理')
t_start = time.time()
image = cv2.imread(image_path, cv2.IMREAD_COLOR)
image_vis = image
image = cv2.resize(image, (512, 256), interpolation=cv2.INTER_LINEAR)
image = image - VGG_MEAN
log.info('图像读取完毕, 耗时: {:.5f}s'.format(time.time() - t_start))
input_tensor = tf.placeholder(dtype=tf.float32, shape=[1, 256, 512, 3], name='input_tensor')
phase_tensor = tf.constant('test', tf.string)
net = lanenet_merge_model.LaneNet(phase=phase_tensor, net_flag='vgg')
binary_seg_ret, instance_seg_ret = net.inference(input_tensor=input_tensor, name='lanenet_model')
cluster = lanenet_cluster.LaneNetCluster()
postprocessor = lanenet_postprocess.LaneNetPoseProcessor()
saver = tf.train.Saver()
if use_gpu:
sess_config = tf.ConfigProto(device_count={'GPU': 1})
else:
sess_config = tf.ConfigProto(device_count={'CPU': 0})
sess_config.gpu_options.per_process_gpu_memory_fraction = CFG.TEST.GPU_MEMORY_FRACTION
sess_config.gpu_options.allow_growth = CFG.TRAIN.TF_ALLOW_GROWTH
sess_config.gpu_options.allocator_type = 'BFC'
sess = tf.Session(config=sess_config)
with sess.as_default():
saver.restore(sess=sess, save_path=weights_path)
t_start = time.time()
binary_seg_image, instance_seg_image = sess.run([binary_seg_ret, instance_seg_ret],
feed_dict={input_tensor: [image]})
t_cost = time.time() - t_start
log.info('单张图像车道线预测耗时: {:.5f}s'.format(t_cost))
binary_seg_image[0] = postprocessor.postprocess(binary_seg_image[0])
mask_image = cluster.get_lane_mask(binary_seg_ret=binary_seg_image[0],
instance_seg_ret=instance_seg_image[0])
for i in range(4):
instance_seg_image[0][:, :, i] = minmax_scale(instance_seg_image[0][:, :, i])
embedding_image = np.array(instance_seg_image[0], np.uint8)
plt.figure('mask_image')
plt.imshow(mask_image[:, :, (2, 1, 0)])
plt.figure('src_image')
plt.imshow(image_vis[:, :, (2, 1, 0)])
plt.figure('instance_image')
plt.imshow(embedding_image[:, :, (2, 1, 0)])
plt.figure('binary_image')
plt.imshow(binary_seg_image[0] * 255, cmap='gray')
plt.show()
sess.close()
return
|