系统安装
超详细树莓派4B安装Ubuntu Server无屏幕_ubuntu server for raspberry 4b-CSDN博客
GitHub - zerotier/ZeroTierOne: A Smart Ethernet Switch for Earth
ROS 安装
ROS——ubuntu 20.04 / 18.04安装 ROS - 腾讯云开发者社区-腾讯云
SLAM Relate
2D SLAM_Cartographer(1)_Google Cartographer安装与测试(demo)_not yet implemented for 2d-CSDN博客
【cartogarpher_ros】二: 官方Demo的介绍与演示 - CloudFlame - 博客园
静态IP配置
编辑
1 | sudo vi /etc/dhcpcd.conf |
1 | #无线 |
sudo reboot
远程登录
1 Ubuntu 系统
- 安装xface4
2 Windows系统
- Xlaunch 配置MultiWindow-> :0 -> AccessControl
- Xming安装path/X0.hosts 增加远程ip?(可以不加)
3 使用
1 | xfce4-session |
CSI摄像头之ffplayer
# Enable Pi Camera with Raspberry Pi 4 Ubuntu 20.10
Install raspi-config for camera enabling
Find the version you want to install
Index of /debian/pool/main/r/raspi-config Edit description archive.raspberrypi.org
Download the deb file
wget http://mirrors.ustc.edu.cn/archive.raspberrypi.org/debian/pool/main/r/raspi-config/raspi-config_20201108_all.deb1
2
3
4
5
6
- Solve the dependency problem
- ```shell
sudo apt install lua5.1 libatopology2 libfftw3-single3
libsamplerate0 alsa-utilsInstall it
sudo dpkg -i raspi-config_20201108_all.deb1
2
3
4
5
6
7
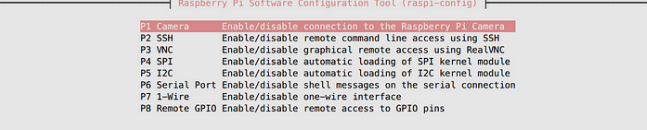
#### Turn On
let’s try to turn on Pi camera in raspi-config~
```shell
sudo raspi-config
Oh sh…
It’ll pop out error message “Your firmwave appears to be out of date (no start_x.elf). Please update”
- Mount on the /boot
df -h #Find your device numbert 查找設備號
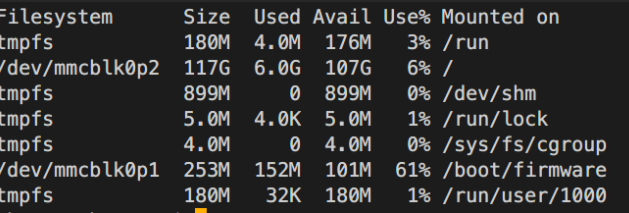
mount /dev/mmcblk0p1 /boot #your may be different 你的可能不一樣
Reboot
Now, you can turn on your Pi camera setting in raspi-config.
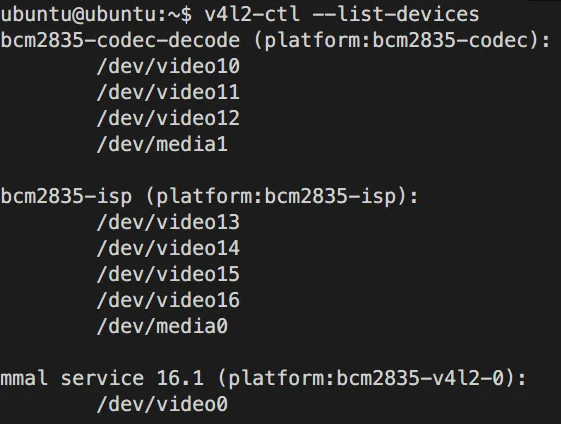
Find your camera
We’ll use this “v4l2-ctl — list-devices”
1 | sudo apt-get install v4l-utils |
Now, Test it !!
1 | sudo apt install ffmpeg |
CSI 摄像头之picamera
要在 Ubuntu 上为 CSI (Camera Serial Interface) 摄像头安装 ROS 驱动,最典型的例子就是树莓派摄像头模块,它使用 CSI 接口与树莓派通信。如果你是在树莓派上使用 CSI 摄像头,那么你可以使用 picamera 库来访问摄像头。如果你是在其他基于 Linux 的系统上使用类似的 CSI 摄像头,那么你需要确保你的系统支持 CSI 接口,并且有相应的驱动程序。
步骤 1: 确认 CSI 摄像头支持
确保你的系统支持 CSI 摄像头,并且摄像头已正确连接到 CSI 接口上。
步骤 2: 安装必要的软件包
安装
picamera库:
如果你使用的是树莓派,picamera库应该已经预装在树莓派操作系统中。如果不是,则需要安装picamera库:Bash
深色版本
1
pip3 install picamera
安装 ROS 相关软件包:
确保 ROS 已经安装在你的系统上。如果你还没有安装 ROS Noetic,请参考之前的指导安装 ROS Noetic。安装
image_transport和camera_info_manager:
这些软件包提供了发布图像数据和管理摄像头信息的能力。Bash
深色版本
1
sudo apt install ros-noetic-image-transport ros-noetic-camera-info-manager
步骤 3: 编写 ROS 节点
为了将摄像头数据发布为 ROS 消息,你需要编写一个 ROS 节点来捕获图像并发布。以下是一个简单的示例,说明如何使用 picamera 库和 ROS 来实现这一目标。
示例代码:发布摄像头图像
创建 ROS 工作空间:
Bash
深色版本
1
2
3mkdir -p ~/catkin_ws/src
cd ~/catkin_ws
catkin_make创建 ROS 包:
Bash
深色版本
1
2
3cd ~/catkin_ws/src
catkin_create_pkg csi_camera_driver rospy picamera
cd csi_camera_driver编写 ROS 节点:
在src目录下创建一个名为camera_node.py的文件,并添加以下内容:Python
深色版本
1
2
3
4
5
6
7
8
9
10
11
12
13
14
15
16
17
18
19
20
21
22
23
24
25
26
27
28
29
30
31
32
33
34
35
36#!/usr/bin/env python
import rospy
from sensor_msgs.msg import Image
from cv_bridge import CvBridge, CvBridgeError
from picamera.array import PiRGBArray
from picamera import PiCamera
import cv2
def talker():
pub = rospy.Publisher('/csi_camera/image_raw', Image, queue_size=10)
rospy.init_node('csi_camera_driver', anonymous=True)
rate = rospy.Rate(10) # 10 Hz
camera = PiCamera()
camera.resolution = (640, 480)
camera.framerate = 10
rawCapture = PiRGBArray(camera, size=(640, 480))
bridge = CvBridge()
for frame in camera.capture_continuous(rawCapture, format="bgr", use_video_port=True):
image = frame.array
try:
ros_image = bridge.cv2_to_imgmsg(image, "bgr8")
pub.publish(ros_image)
except CvBridgeError as e:
print(e)
rawCapture.truncate(0)
rate.sleep()
if __name__ == '__main__':
try:
talker()
except rospy.ROSInterruptException:
pass编译 ROS 包:
Bash
深色版本
1
2cd ~/catkin_ws
catkin_make运行 ROS 节点:
Bash
深色版本
1
2source devel/setup.bash
rosrun csi_camera_driver camera_node.py
步骤 4: 查看图像
安装
image_view:
如果你还没有安装image_view,可以使用以下命令安装:Bash
深色版本
1
sudo apt install ros-noetic-image-view
查看图像:
在另一个终端窗口中运行image_view节点来查看图像:Bash
深色版本
1
rosrun image_view image_view image:=/csi_camera/image_raw
故障排除
如果你遇到任何问题,可以尝试以下步骤:
检查摄像头是否正确连接:确保摄像头已经正确插入 CSI 接口。
检查权限:确保你的用户有权限访问摄像头设备。
查看日志:查看系统的日志文件,如
/var/log/syslog,以获取更多关于错误的信息。检查树莓派的配置:确保在
/boot/config.txt中开启了摄像头支持。
如果你需要更具体的帮助,请提供更多关于你的系统配置和遇到的具体问题的信息。
ROS+rplidar A1
配置
1 | sudo apt-get install ros-noetic-rplidar-ros |
运行(old Fail)
1 | roscore |
lsusb
Bus 001 Device 003: ID 10c4:ea60 Silicon Labs CP210x UART Bridge
RUN
运行成功(雷达对电源要求高,笔记本电源不行)
1 | 1 core server start |