Simon Shi的小站

人工智能,机器学习, 强化学习,大模型,自动驾驶

0%

BUG Analysis

undefined reference to

编译链接错误,

  • 新增的.cpp没有加入makefile

  • 没有指定对应的库(.o/.a/.so)

  • 连接库参数的顺序不对 在默认情况下,对于-l 使用库的要求是越是基础的库越要写在后面,无论是静态还动态

  • gcc/ld 版本不匹配 gcc/ld的版本的兼容性问题,由于gcc2 到 gcc3大版本的兼容性存在问题(其实gcc3.2到3.4也一定程度上存在这样的问题) 当在高版本机器上使用低版本的机器就会导致这样的错误, 这个问题比较常见在32位的环境上, 另外就在32位环境不小心使用了64位的库或者反过来64位环境使用了32位的库.

  • C/C++相互依赖和链接 gcc和g++编译结果的混用需要保证能够extern “C” 两边都可以使用的接口,在我们的64位环境中gcc链接g++的库还需要加上 -lstdc++,具体见前文对于混合编译的说明

  • 运行期报错 这个问题基本上是由于程序使用了dlopen方式载入.so, 但.so没有把所有需要的库都链接上,具体参加上文中对于静态库和动态库混合使用的说明

Linux进程分析

https://blog.csdn.net/ktigerhero3/article/details/80004315

https://cloud.tencent.com/developer/article/1701569

手动释放Linux内存https://www.cnblogs.com/jackhub/p/3736877.html

https://blog.csdn.net/wwd0501/article/details/100041808

https://blog.csdn.net/shuihupo/article/details/80905641

contab定时任务

https://www.cnblogs.com/aminxu/p/5993769.html

coredump

SIGNAL

1
man 7 signal

Linux supports the standard signals listed below. Several signal numbers are architecture-dependent, as indicated in the “Value” column. (Where three values are given, the first one is usually valid for alpha and sparc, the
middle one for x86, arm, and most other architectures, and the last one for mips. (Values for parisc are not shown; see the Linux kernel source for signal numbering on that architecture.) A dash (-) denotes that a signal is
absent on the corresponding architecture.

   First the signals described in the original POSIX.1-1990 standard.

   Signal     Value     Action   Comment
   ──────────────────────────────────────────────────────────────────────
   SIGHUP        1       Term    Hangup detected on controlling terminal
                                 or death of controlling process
   SIGINT        2       Term    Interrupt from keyboard
   SIGQUIT       3       Core    Quit from keyboard
   SIGILL        4       Core    Illegal Instruction
   SIGABRT       6       Core    Abort signal from abort(3)
   SIGFPE        8       Core    Floating-point exception
   SIGKILL       9       Term    Kill signal
   SIGSEGV      11       Core    Invalid memory reference
   SIGPIPE      13       Term    Broken pipe: write to pipe with no
                                 readers; see pipe(7)
   SIGALRM      14       Term    Timer signal from alarm(2)
   SIGTERM      15       Term    Termination signal
   SIGUSR1   30,10,16    Term    User-defined signal 1
   SIGUSR2   31,12,17    Term    User-defined signal 2
   SIGCHLD   20,17,18    Ign     Child stopped or terminated
   SIGCONT   19,18,25    Cont    Continue if stopped
   SIGSTOP   17,19,23    Stop    Stop process
   SIGTSTP   18,20,24    Stop    Stop typed at terminal
   SIGTTIN   21,21,26    Stop    Terminal input for background process
   SIGTTOU   22,22,27    Stop    Terminal output for background process

   The signals SIGKILL and SIGSTOP cannot be caught, blocked, or ignored.

ref: https://blog.csdn.net/wanxuexiang/article/details/88382733

dmesg

1
2
dmesg
dmesg -T

gdb调试

1
2
3
4
r
bt
l // list code
watch
1
2
3
4
5
6
7
bt
where

f 1
disassemble

shell echo free@plt |c++filt

LOGS:

问题:torch cudnn Destory ini.c:138 Backtrace stopped: frame did not

1
2
3
4
5
6
7
8
9
10
11
12
(gdb) bt
#0 0x00007f8891fed9fe in ?? () from /usr/local/cuda-10.0/lib64/libcudart.so.10.0
#1 0x00007f8891ff296b in ?? () from /usr/local/cuda-10.0/lib64/libcudart.so.10.0
#2 0x00007f889201f8e0 in cudaStreamDestroy () from /usr/local/cuda-10.0/lib64/libcudart.so.10.0
#3 0x00007f88a24f563d in cudnnDestroy () from /data/include/libtorch/lib/libtorch.so
#4 0x00007f8898d8fa15 in at::cuda::(anonymous namespace)::DeviceThreadHandlePool<cudnnContext*, &at::native::(anonymous namespace)::createCuDNNHandle, &at::native::(anonymous namespace)::destroyCuDNNHandle>::~Devi
from /data/include/libtorch/lib/libtorch.so
#5 0x00007f8891681735 in __cxa_finalize (d=0x7f88d7684000) at cxa_finalize.c:83
#6 0x00007f8893de4d43 in __do_global_dtors_aux () from /data/include/libtorch/lib/libtorch.so
#7 0x00007ffed7d4bbb0 in ?? ()
#8 0x00007f88dc13bd13 in _dl_fini () at dl-fini.c:138
Backtrace stopped: frame did not save the PC

解决:

  • SO库ld加载torch.so

  • 主程序不需要再次ld了,不然就会上面报错

问题C++】symbol lookup error :undefined reference to找不到

解决:

  • 1、import *.h文件 没有声明定义

  • 2、声明定义的函数参数定义与cpp实现不一致,比如参数多了const的修饰(编译可以通过)

Debug

core dump 生成

1 调试

1
2
3
4
gdb exe_file core-file

(gdb) l
46 in ../sysdeps/unix/sysv/linux/raise.c

2、bt 查看

1
2
3
4
5
6
7
8
9
10
11
12
13
14
15
16
17
18
19
20
21
22
23
24
25
26
27
28
29
30
31
32
(gdb) bt
#0 __GI_raise (sig=sig@entry=6) at ../sysdeps/unix/sysv/linux/raise.c:51
#1 0x00007f056317e801 in __GI_abort () at abort.c:79
#2 0x00007f05631c7897 in __libc_message (action=action@entry=do_abort, fmt=fmt@entry=0x7f05632f4b9a "%s\n") at ../sysdeps/posix/libc_fatal.c:181
#3 0x00007f05631ce90a in malloc_printerr (str=str@entry=0x7f05632f2d88 "free(): invalid pointer") at malloc.c:5350
#4 0x00007f05631d5e1c in _int_free (have_lock=0, p=0x7f0400000013, av=0x7f0563529c40 <main_arena>) at malloc.c:4157
#5 __GI___libc_free (mem=0x7f0400000023) at malloc.c:3124
#6 0x00007f0562c055a0 in __gnu_cxx::new_allocator<int>::deallocate (this=0x7f0454019258, __p=0x7f0400000023) at /usr/include/c++/7/ext/new_allocator.h:125
#7 0x00007f0562c0531a in std::allocator_traits<std::allocator<int> >::deallocate (__a=..., __p=0x7f0400000023, __n=18446709159920402432) at /usr/include/c++/7/bits/alloc_traits.h:462
#8 0x00007f0562c04f08 in std::_Vector_base<int, std::allocator<int> >::_M_deallocate (this=0x7f0454019258, __p=0x7f0400000023, __n=18446709159920402432)
at /usr/include/c++/7/bits/stl_vector.h:180
#9 0x00007f0562c06cd5 in std::_Vector_base<int, std::allocator<int> >::~_Vector_base (this=0x7f0454019258, __in_chrg=<optimized out>) at /usr/include/c++/7/bits/stl_vector.h:162
#10 0x00007f0562c06b15 in std::vector<int, std::allocator<int> >::~vector (this=0x7f0454019258, __in_chrg=<optimized out>) at /usr/include/c++/7/bits/stl_vector.h:435
#11 0x00007f0562c4cf02 in __gnu_cxx::new_allocator<std::vector<int, std::allocator<int> > >::destroy<std::vector<int, std::allocator<int> > > (this=0x7f0493fd45b0, __p=0x7f0454019258)
at /usr/include/c++/7/ext/new_allocator.h:140
#12 0x00007f0562c4b29e in std::allocator_traits<std::allocator<std::vector<int, std::allocator<int> > > >::destroy<std::vector<int, std::allocator<int> > > (__a=..., __p=0x7f0454019258)
at /usr/include/c++/7/bits/alloc_traits.h:487
#13 0x00007f0562c497bb in std::vector<std::vector<int, std::allocator<int> >, std::allocator<std::vector<int, std::allocator<int> > > >::pop_back (this=0x7f0493fd45b0)
at /usr/include/c++/7/bits/stl_vector.h:979
#14 0x00007f0562c53d82 in ddzmove_sg::MoveGener::gen_type_1_single (this=0x7f0493fd4710, cards=0x7f0493fd4b00, result=std::vector of length -1, capacity 1 = {...}, is_start=true)
at /data/shixx/games/DDZ-QS-Server/ai_server_sanguo_call/src/move_utils_sg.cpp:532
#15 0x00007f0562c537cf in ddzmove_sg::MoveGener::gen_moves (this=0x7f0493fd4710, cards=0x7f0493fd4b00, outed_3dai_num=2, horse=std::vector of length 1, capacity 1 = {...},
result=std::vector of length -1, capacity 1 = {...}) at /data/shixx/games/DDZ-QS-Server/ai_server_sanguo_call/src/move_utils_sg.cpp:465
#16 0x00007f0562c5879e in ddzmove_sg::get_legal_card_play_actions[abi:cxx11](ddzmove_sg::MoveGener, int*, int*, int, int, std::vector<int, std::allocator<int> >, std::vector<std::vector<int, std::allocator<int> >, std::allocator<std::vector<int, std::allocator<int> > > >&, bool, int) (mg=..., rival_move_cards=0x7f0493fd4b50, next_hands=0x7f0493fd4b00, hero_id=106,
outed_3dai_num=2, horse=std::vector of length 1, capacity 1 = {...}, avail_moves=std::vector of length -1, capacity 1 = {...}, ignorePass=false, round_id=973329)
at /data/shixx/games/DDZ-QS-Server/ai_server_sanguo_call/src/move_utils_sg.cpp:1217
#17 0x00007f0562c5f613 in TorchServer::getPTOut (this=0x2f25ec0, result=std::vector of length 0, capacity 0, heroes=0x7f045401ff50, skill=0x7f0454006590, horse=0x7f0454019290,
all_cards=0x7f0493fd68c0, bottom=0x7f0493fd6870, mingpai=0x7f0454002b20, remain_num=0x7f04540016f0, out_history=0x7f0493fd69a0, cur_turn=21, my_seat=1, dz_seat=1, aitype=0, ailevel=5,
round_id=973329, topk=3, ignorePass=false) at /data/shixx/games/DDZ-QS-Server/ai_server_sanguo_call/src/torch_server.cpp:323
#18 0x00007f0562cbbfdc in getPTOut (action=0x7f0493fda410, action_num=0x7f0493fda2e0, cards=0x7f047c3332a0, remain_num=0x7f04540016f0, bottom=0x7f045400f460, bottom_num=3,
mingpai=0x7f0454002b20, out_history=0x7f0454033990, heroes=0x7f045401ff50, skill=0x7f0454006590, horse=0x7f0454019290, call_history=0x7f045400d1c0, cur_turn=21, my_seat=1, dz_seat=1,
first_bid_seat=-1, aitype=0, ailevel=5, round_id=973329) at /data/shixx/games/DDZ-QS-Server/ai_server_sanguo_call/src/torch_so.cpp:114

3 查看出错的栈信息

frame + (gdb) info args

1
2
3
4
5
6
7
8
9
10
11
(gdb) frame
(gdb) f 14
#14 0x00007f0562c53d82 in ddzmove_sg::MoveGener::gen_type_1_single (this=0x7f0493fd4710, cards=0x7f0493fd4b00, result=std::vector of length -1, capacity 1 = {...}, is_start=true)
at /data/shixx/games/DDZ-QS-Server/ai_server_sanguo_call/src/move_utils_sg.cpp:532
532 /data/shixx/games/DDZ-QS-Server/ai_server_sanguo_call/src/move_utils_sg.cpp: No such file or directory.
(gdb) info args
this = 0x7f0493fd4710
cards = 0x7f0493fd4b00
result = std::vector of length -1, capacity 1 = {std::vector of length 1, capacity 1 = {1409472400}, std::vector of length -6, capacity -1073741833 = {
<error reading variable result (Cannot access memory at address 0x25)>
is_start = true

4 查看参数数据

已知cards是一个数组(17位)

1
2
3
4
5
6
7
8
9
(gdb) print cards
$1 = (int *) 0x7f0493fd4b00
(gdb) print cards[0]
$2 = 0
(gdb) print cards[1]
$3 = 0
...
(gdb) print cards[17]
$18 = 2

将Pytorch卷积层权重转到Tensorflow中

上面刚刚说了在Pytorch的卷积层中,kernel weights存储格式是[kernel_number, kernel_channel, kernel_height, kernel_width],但在Tensorflow的卷积层中kernel weights存储格式是[kernel_height, kernel_width, kernel_channel, kernel_number]。还有就是在卷积层中如果使用了bias那么bias weights是不需要处理的,因为卷积的bias weights只有一个维度,所以Pytorch和Tensorflow中存储的格式是一样的(后面测试也能验证这个结论)。 在下面代码中:

  • 分别使用Pytorch和Tensorflow的Keras模块创建了卷积层
  • 获取Pytorch创建卷积层的kernel weight以及bias weight
  • 使用numpy对kernel weight的进行transpose处理
  • 将转换后的权重载入到tensorflow的卷积层中
  • 将之前创建的数据分别传入Pytorch和Tensorflow的卷积层中进行正向传播
  • 再使用numpy对Pytorch得到的结果进行transpose处理(保证和tensorflow输出的结果Tensor格式一致)
  • 对比两者输出的结果是否一致
1
2
3
4
5
6
7
8
9
10
11
12
13
14
15
16
17
18
19
20
21
22
23
24
25
26
27
28
29
30
31
32
33
34
35
36
37
38
39
def conv_test(torch_image, tf_image):
"""
测试转换权重后pytorch的卷积层和tensorflow的卷积层输出是否一致
:param torch_image:
:param tf_image:
:return:
"""
# 创建pytorch卷积层
torch_conv = nn.Conv2d(in_channels=3, out_channels=32, kernel_size=3, padding=1)
# [kernel_number, kernel_channel, kernel_height, kernel_width]
# 卷积层的weights
torch_conv_weight = torch_conv.weight
# 卷积层的bias
torch_conv_bias = torch_conv.bias

# 创建tensorflow卷积层
tf_conv = tf.keras.layers.Conv2D(filters=32, kernel_size=3, padding='same')
tf_conv.build([1, 5, 5, 3])
# 将pytorch的卷积层权重进行转换并载入tf的卷积层中
# to [kernel_height, kernel_width, kernel_channel, kernel_number]
value = np.transpose(torch_conv_weight.detach().numpy(), (2, 3, 1, 0)).astype(np.float32)
tf_conv.set_weights([value, torch_conv_bias.detach().numpy()])

# 计算pytorch卷积层的输出
# [B, C, H, W]
v1 = torch_conv(torch_image).detach().numpy()
v1 = np.squeeze(v1, axis=0)
# [H, W, C]
v1 = np.transpose(v1, (1, 2, 0))

# 计算tensorflow卷积层的输出
# [B, H, W, C]
v2 = tf_conv(tf_image).numpy()
# [H, W, C]
v2 = np.squeeze(v2, axis=0)

# 检查pytorch和tensorflow的输出结果是否一致
np.testing.assert_allclose(v1, v2, rtol=1e-03, atol=1e-05)
print("convolution layer test is great!")

将Pytorch DW卷积层权重转到Tensorflow中

在Pytorch的dw卷积层中,dw kernel weights存储格式是[kernel_number, kernel_channel, kernel_height, kernel_width],但在Tensorflow的dw卷积层中dw kernel weights存储格式是[kernel_height, kernel_width, kernel_number, kernel_channel](注意这里最后两个维度和卷积层有些差异)。同样在dw卷积层中如果使用了bias那么dw bias weights是不需要处理的。
在下面代码中:

  • 分别使用Pytorch和Tensorflow的Keras模块创建了dw卷积层

  • 获取Pytorch创建dw卷积层的dw kernel weight以及dw bias weight

  • 使用numpy对dw kernel weight的进行transpose处理

  • 将转换后的权重载入到tensorflow的dw卷积层中

  • 将之前创建的数据分别传入Pytorch和Tensorflow的dw卷积层中进行正向传播

  • 再使用numpy对Pytorch得到的结果进行transpose处理(保证和tensorflow输出的结果Tensor格式一致)

  • 对比两者输出的结果是否一致

1
2
3
4
5
6
7
8
9
10
11
12
13
14
15
16
17
18
19
20
21
22
23
24
25
26
27
28
29
30
31
32
33
34
35
36
37
38
39
def dw_conv_test(torch_image, tf_image):
"""
测试转换权重后pytorch的dw卷积层和tensorflow的dw卷积层输出是否一致
:param torch_image:
:param tf_image:
:return:
"""
# 创建pytorch的dw卷积层
torch_conv = nn.Conv2d(in_channels=3, out_channels=3, kernel_size=3, padding=1, groups=3)
# [kernel_number, kernel_channel, kernel_height, kernel_width]
# dw卷积层的weights
torch_conv_weight = torch_conv.weight
# dw卷积层的bias
torch_conv_bias = torch_conv.bias

# 创建tensorflow的dw卷积层
tf_conv = tf.keras.layers.DepthwiseConv2D(kernel_size=3, padding='same')
tf_conv.build([1, 5, 5, 3])
# 将pytorch的dw卷积层权重进行转换并载入tf的dw卷积层中
# to [kernel_height, kernel_width, kernel_number, kernel_channel]
value = np.transpose(torch_conv_weight.detach().numpy(), (2, 3, 0, 1)).astype(np.float32)
tf_conv.set_weights([value, torch_conv_bias.detach().numpy()])

# 计算pytorch卷积层的输出
# [B, C, H, W]
v1 = torch_conv(torch_image).detach().numpy()
v1 = np.squeeze(v1, axis=0)
# [H, W, C]
v1 = np.transpose(v1, (1, 2, 0))

# 计算tensorflow卷积层的输出
# [B, H, W, C]
v2 = tf_conv(tf_image).numpy()
# [H, W, C]
v2 = np.squeeze(v2, axis=0)

# 检查pytorch和tensorflow的输出结果是否一致
np.testing.assert_allclose(v1, v2, rtol=1e-03, atol=1e-05)
print("depthwise convolution layer test is great!")

将Pytorch BN层权重转到Tensorflow中

BatchNorm中涉及4个参数:gamma,beta,mean,var。由于这四个参数的shape都是一维的,所以只要找到对应权重名称关系就行了,不需要对数据进行转换。
在Pytorch中,这四个参数的名称分别对应weight,bias,running_mean,running_var
在Tensorflow中,分别对应gamma,beta,moving_mean,moving_variance
在下面代码中:

  • 分别使用Pytorch和Tensorflow的Keras模块创建了bn层(注意,epsilon要保持一致)
  • 随机初始化Pytorch创建bn层的权重信息(默认初始化weight都是1,bias都是0)
  • 获取Pytorch随机初始化后bn的weight,bias,running_mean以及running_var
  • 将对应的权重载入到tensorflow的bn层中
  • 将之前创建的数据分别传入Pytorch和Tensorflow的bn层中进行正向传播
  • 再使用numpy对Pytorch得到的结果进行transpose处理(保证和tensorflow输出的结果Tensor格式一致)
  • 对比两者输出的结果是否一致
1
2
3
4
5
6
7
8
9
10
11
12
13
14
15
16
17
18
19
20
21
22
23
24
25
26
27
28
29
30
31
32
33
34
35
36
37
38
39
40
41
42
43
44
45
46
47
48
49
def bn_test(torch_image, tf_image):
"""
测试转换权重后pytorch的bn层和tensorflow的bn层输出是否一致
:param torch_image:
:param tf_image:
:return:
"""
# 创建pytorch的bn层
torch_bn = nn.BatchNorm2d(num_features=3, eps=1e-5)
# 随机初始化bn的参数
nn.init.uniform_(torch_bn.weight, a=1, b=5)
nn.init.uniform_(torch_bn.bias, a=0.05, b=0.1)
nn.init.uniform_(torch_bn.running_mean, a=0.05, b=0.1)
nn.init.uniform_(torch_bn.running_var, a=1, b=5)
# bn的weights
torch_bn_weight = torch_bn.weight
# bn的bias
torch_bn_bias = torch_bn.bias
# bn的running_mean
torch_bn_mean = torch_bn.running_mean
# bn的running_var
torch_bn_var = torch_bn.running_var

# 创建tensorflow的bn层
tf_bn = tf.keras.layers.BatchNormalization(epsilon=1e-5)
tf_bn.build([1, 5, 5, 3])
# 将pytorch的bn权重载入tf的bn中
tf_bn.set_weights([torch_bn_weight.detach().numpy(),
torch_bn_bias.detach().numpy(),
torch_bn_mean.detach().numpy(),
torch_bn_var.detach().numpy()])

# 计算pytorch bn的输出
# [B, C, H, W]
torch_bn.eval()
v1 = torch_bn(torch_image).detach().numpy()
v1 = np.squeeze(v1, axis=0)
# [H, W, C]
v1 = np.transpose(v1, (1, 2, 0))

# 计算tensorflow bn的输出
# [B, H, W, C]
v2 = tf_bn(tf_image, training=False).numpy()
# [H, W, C]
v2 = np.squeeze(v2, axis=0)

# 检查pytorch和tensorflow的输出结果是否一致
np.testing.assert_allclose(v1, v2, rtol=1e-03, atol=1e-04)
print("bn layer test is great!")

将Pytorch全连接层权重转到Tensorflow中

在全连接层中涉及两个参数:输入节点个数,和输出节点个数。转换权重时只用转换fc weight即可,fc bias不用做任何处理。 在下面代码中:

  • 对输入的特征矩阵在height以及width维度上进行全局平均池化
  • 分别使用Pytorch和Tensorflow的Keras模块创建了fc层
  • 获取Pytorch创建fc层的fc weight以及fc bias
  • 使用numpy对fc weight的进行transpose处理
  • 将转换后的权重载入到tensorflow的fc层中
  • 将之前创建的数据分别传入Pytorch和Tensorflow的卷积层中进行正向传播
  • 对比两者输出的结果是否一致
1
2
3
4
5
6
7
8
9
10
11
12
13
14
15
16
17
18
19
20
21
22
23
24
25
26
27
28
29
30
31
32
33
34
35
36
37
38
39
40
41
def fc_test(torch_image, tf_image):
"""
测试转换权重后pytorch的fc层和tensorflow的fc层输出是否一致
:param torch_image:
:param tf_image:
:return:
"""

# mean height and width dim
torch_image = torch.mean(torch_image, dim=[2, 3])
tf_image = np.mean(tf_image, axis=(1, 2))

# 创建pytorch的fc卷积层
torch_fc = nn.Linear(in_features=3, out_features=5)
# [output_units, input_units]
# fc层的weights
torch_fc_weight = torch_fc.weight
# fc层的bias
torch_fc_bias = torch_fc.bias

# 创建tensorflow的fc层
tf_fc = tf.keras.layers.Dense(units=5)
tf_fc.build([1, 3])
# 将pytorch的fc层权重进行转换并载入tf的fc层中
# to [input_units, output_units]
value = np.transpose(torch_fc_weight.detach().numpy(), (1, 0)).astype(np.float32)
tf_fc.set_weights([value, torch_fc_bias.detach().numpy()])

# 计算pytorch fc的输出
# [B, C]
v1 = torch_fc(torch_image).detach().numpy()
v1 = np.squeeze(v1, axis=0)

# 计算tensorflow fc的输出
# [C, B]
v2 = tf_fc(tf_image).numpy()
v2 = np.squeeze(v2, axis=0)

# 检查pytorch和tensorflow的输出结果是否一致
np.testing.assert_allclose(v1, v2, rtol=1e-03, atol=1e-05)
print("fc layer test is great!")

完整代码

1
2
3
4
5
6
7
8
9
10
11
12
13
14
15
16
17
18
19
20
21
22
23
24
25
26
27
28
29
30
31
32
33
34
35
36
37
38
39
40
41
42
43
44
45
46
47
48
49
50
51
52
53
54
55
56
57
58
59
60
61
62
63
64
65
66
67
68
69
70
71
72
73
74
75
76
77
78
79
80
81
82
83
84
85
86
87
88
89
90
91
92
93
94
95
96
97
98
99
100
101
102
103
104
105
106
107
108
109
110
111
112
113
114
115
116
117
118
119
120
121
122
123
124
125
126
127
128
129
130
131
132
133
134
135
136
137
138
139
140
141
142
143
144
145
146
147
148
149
150
151
152
153
154
155
156
157
158
159
160
161
162
163
164
165
166
167
168
169
170
171
172
173
174
175
176
177
178
179
180
181
182
183
184
185
186
187
188
189
190
191
192
193
194
195
196
197
198
import tensorflow as tf
import torch
from torch import nn
import numpy as np


def conv_test(torch_image, tf_image):
"""
测试转换权重后pytorch的卷积层和tensorflow的卷积层输出是否一致
:param torch_image:
:param tf_image:
:return:
"""
# 创建pytorch卷积层
torch_conv = nn.Conv2d(in_channels=3, out_channels=32, kernel_size=3, padding=1)
# [kernel_number, kernel_channel, kernel_height, kernel_width]
# 卷积层的weights
torch_conv_weight = torch_conv.weight
# 卷积层的bias
torch_conv_bias = torch_conv.bias

# 创建tensorflow卷积层
tf_conv = tf.keras.layers.Conv2D(filters=32, kernel_size=3, padding='same')
tf_conv.build([1, 5, 5, 3])
# 将pytorch的卷积层权重进行转换并载入tf的卷积层中
# to [kernel_height, kernel_width, kernel_channel, kernel_number]
value = np.transpose(torch_conv_weight.detach().numpy(), (2, 3, 1, 0)).astype(np.float32)
tf_conv.set_weights([value, torch_conv_bias.detach().numpy()])

# 计算pytorch卷积层的输出
# [B, C, H, W]
v1 = torch_conv(torch_image).detach().numpy()
v1 = np.squeeze(v1, axis=0)
# [H, W, C]
v1 = np.transpose(v1, (1, 2, 0))

# 计算tensorflow卷积层的输出
# [B, H, W, C]
v2 = tf_conv(tf_image).numpy()
# [H, W, C]
v2 = np.squeeze(v2, axis=0)

# 检查pytorch和tensorflow的输出结果是否一致
np.testing.assert_allclose(v1, v2, rtol=1e-03, atol=1e-05)
print("convolution layer test is great!")


def dw_conv_test(torch_image, tf_image):
"""
测试转换权重后pytorch的dw卷积层和tensorflow的dw卷积层输出是否一致
:param torch_image:
:param tf_image:
:return:
"""
# 创建pytorch的dw卷积层
torch_conv = nn.Conv2d(in_channels=3, out_channels=3, kernel_size=3, padding=1, groups=3)
# [kernel_number, kernel_channel, kernel_height, kernel_width]
# dw卷积层的weights
torch_conv_weight = torch_conv.weight
# dw卷积层的bias
torch_conv_bias = torch_conv.bias

# 创建tensorflow的dw卷积层
tf_conv = tf.keras.layers.DepthwiseConv2D(kernel_size=3, padding='same')
tf_conv.build([1, 5, 5, 3])
# 将pytorch的dw卷积层权重进行转换并载入tf的dw卷积层中
# to [kernel_height, kernel_width, kernel_number, kernel_channel]
value = np.transpose(torch_conv_weight.detach().numpy(), (2, 3, 0, 1)).astype(np.float32)
tf_conv.set_weights([value, torch_conv_bias.detach().numpy()])

# 计算pytorch卷积层的输出
# [B, C, H, W]
v1 = torch_conv(torch_image).detach().numpy()
v1 = np.squeeze(v1, axis=0)
# [H, W, C]
v1 = np.transpose(v1, (1, 2, 0))

# 计算tensorflow卷积层的输出
# [B, H, W, C]
v2 = tf_conv(tf_image).numpy()
# [H, W, C]
v2 = np.squeeze(v2, axis=0)

# 检查pytorch和tensorflow的输出结果是否一致
np.testing.assert_allclose(v1, v2, rtol=1e-03, atol=1e-05)
print("depthwise convolution layer test is great!")


def bn_test(torch_image, tf_image):
"""
测试转换权重后pytorch的bn层和tensorflow的bn层输出是否一致
:param torch_image:
:param tf_image:
:return:
"""
# 创建pytorch的bn层
torch_bn = nn.BatchNorm2d(num_features=3, eps=1e-5)
# 随机初始化bn的参数
nn.init.uniform_(torch_bn.weight, a=1, b=5)
nn.init.uniform_(torch_bn.bias, a=0.05, b=0.1)
nn.init.uniform_(torch_bn.running_mean, a=0.05, b=0.1)
nn.init.uniform_(torch_bn.running_var, a=1, b=5)
# bn的weights
torch_bn_weight = torch_bn.weight
# bn的bias
torch_bn_bias = torch_bn.bias
# bn的running_mean
torch_bn_mean = torch_bn.running_mean
# bn的running_var
torch_bn_var = torch_bn.running_var

# 创建tensorflow的bn层
tf_bn = tf.keras.layers.BatchNormalization(epsilon=1e-5)
tf_bn.build([1, 5, 5, 3])
# 将pytorch的bn权重载入tf的bn中
tf_bn.set_weights([torch_bn_weight.detach().numpy(),
torch_bn_bias.detach().numpy(),
torch_bn_mean.detach().numpy(),
torch_bn_var.detach().numpy()])

# 计算pytorch bn的输出
# [B, C, H, W]
torch_bn.eval()
v1 = torch_bn(torch_image).detach().numpy()
v1 = np.squeeze(v1, axis=0)
# [H, W, C]
v1 = np.transpose(v1, (1, 2, 0))

# 计算tensorflow bn的输出
# [B, H, W, C]
v2 = tf_bn(tf_image, training=False).numpy()
# [H, W, C]
v2 = np.squeeze(v2, axis=0)

# 检查pytorch和tensorflow的输出结果是否一致
np.testing.assert_allclose(v1, v2, rtol=1e-03, atol=1e-04)
print("bn layer test is great!")


def fc_test(torch_image, tf_image):
"""
测试转换权重后pytorch的fc层和tensorflow的fc层输出是否一致
:param torch_image:
:param tf_image:
:return:
"""

# mean height and width dim
torch_image = torch.mean(torch_image, dim=[2, 3])
tf_image = np.mean(tf_image, axis=(1, 2))

# 创建pytorch的fc卷积层
torch_fc = nn.Linear(in_features=3, out_features=5)
# [output_units, input_units]
# fc层的weights
torch_fc_weight = torch_fc.weight
# fc层的bias
torch_fc_bias = torch_fc.bias

# 创建tensorflow的fc层
tf_fc = tf.keras.layers.Dense(units=5)
tf_fc.build([1, 3])
# 将pytorch的fc层权重进行转换并载入tf的fc层中
# to [input_units, output_units]
value = np.transpose(torch_fc_weight.detach().numpy(), (1, 0)).astype(np.float32)
tf_fc.set_weights([value, torch_fc_bias.detach().numpy()])

# 计算pytorch fc的输出
# [B, C]
v1 = torch_fc(torch_image).detach().numpy()
v1 = np.squeeze(v1, axis=0)

# 计算tensorflow fc的输出
# [C, B]
v2 = tf_fc(tf_image).numpy()
v2 = np.squeeze(v2, axis=0)

# 检查pytorch和tensorflow的输出结果是否一致
np.testing.assert_allclose(v1, v2, rtol=1e-03, atol=1e-05)
print("fc layer test is great!")


def main():
image = np.random.rand(5, 5, 3)
torch_image = np.transpose(image, (2, 0, 1)).astype(np.float32)
# [B, C, H, W]
torch_image = torch.unsqueeze(torch.as_tensor(torch_image), dim=0)
# [B, H, W, C]
tf_image = np.expand_dims(image, axis=0)

conv_test(torch_image, tf_image)
dw_conv_test(torch_image, tf_image)
bn_test(torch_image, tf_image)
fc_test(torch_image, tf_image)


if __name__ == '__main__':
main()

REF

Pytorch与Tensorflow权重互转_太阳花的小绿豆的博客-CSDN博客

基础架构

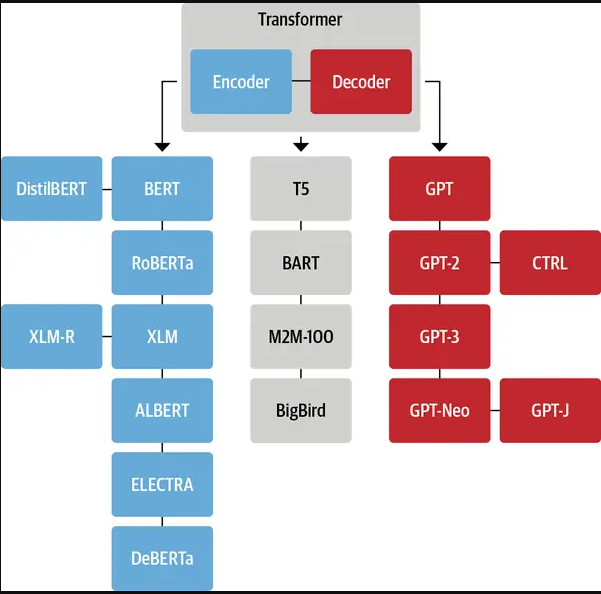
纯 Encoder 模型(例如 BERT),又称自编码 (auto-encoding) Transformer 模型;适用于只需要理解输入语义的任务,例如句子分类、命名实体识别;

  • 纯 Decoder 模型(例如 GPT),又称自回归 (auto-regressive) Transformer 模型;适用于生成式任务,例如文本生成;

  • Encoder-Decoder 模型(例如 BART、T5),又称 Seq2Seq (sequence-to-sequence) Transformer 模型。适用于需要基于输入的生成式任务,例如翻译、摘要。

一个完整的AI应用包含了4个重要的环节:

第一个环节是关于大语言模型(LLM),这是大家在AI体系中接触最多的部分;
第二个环节是与模型相关的Embedding;
第三个环节是向量数据库;
最后一个环节是Promote Engineer(AI提示词(Prompt))。

基础模块

Embeddding

Mutil-Head Attention

Feed Forward

Add & Norm

模型seq2seq

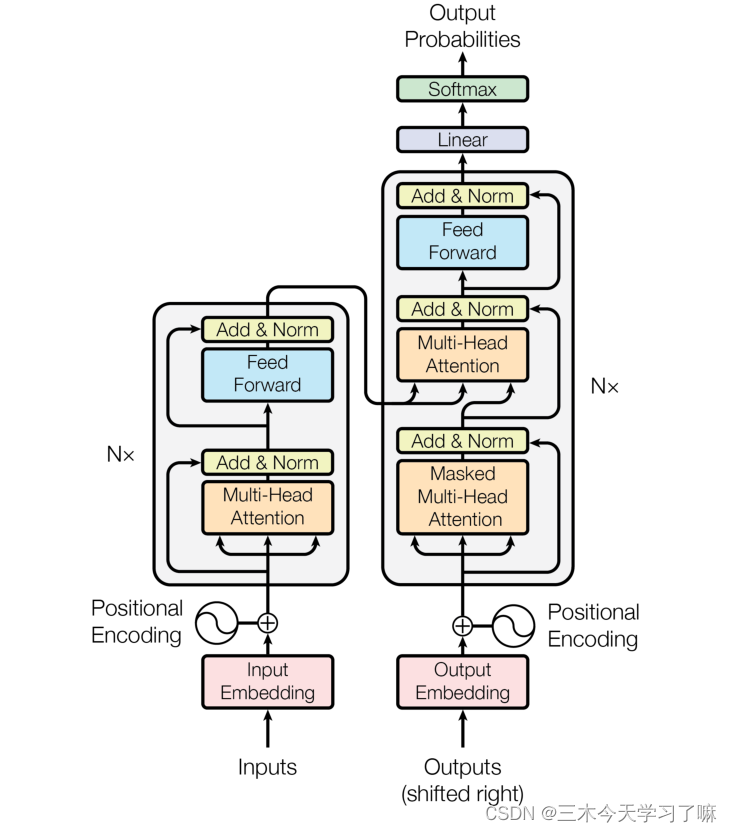
  • Transformer

-输入部分、输出部分、编码器部分、解码器部分。

\

输入部分

文本嵌入层的作用:
无论是源文本嵌入还是目标文本嵌入,都是为了将文本中词汇的数字表示转变为向量表示,希望在这样的高维空间捕捉词汇间的关系。
位置编码器的作用:
因为在Transformer的编码器结构中,并没有针对词汇位置信息的处理,因此需要在Embedding层后加入位置编码器,将词汇位置不同可能会产生不同语义的信息加入到词嵌入张量中,以弥补位置信息的缺失。

编码器部分

由N个编码器层堆叠而成
每个编码器层由两个子层连接结构组成
第一个子层连接结构包括一个多头自注意力子层和规范化层以及一个残差连接
第二个子层连接结构包括一个前馈全连接子层和规范化层以及一个残差连接

Prompt

02Prompt基本组成部分

基于Prompt的格式化结果输出与正则表达式提取Prompt设计是大语言模型互动的关键,它可以显著影响模型的输出结果质量。一个合理设计的Prompt应当包含以下四个元素:

**1.指令(Instruction):**这是Prompt中最关键的部分。指令直接告诉模型用户希望执行的具体任务。

**2.输入数据(Input Data):**输入数据是模型需要处理的具体信息。

**3.背景信息(Context):**背景信息为模型提供了执行任务所需的环境信息或附加细节。

**4.输出指示器(Output Indicator):**输出指示器定义了模型输出的期望类型或格式。

参考资料

【Transformer】架构解析_transformer架构_三木今天学习了嘛的博客-CSDN博客
# 基于向量数据库的文档语义搜索实战【Qdrant】

[TOC]

参考资料:验证Pass,其它博客都丢三落四

1、环境配置

  • IDE工具安装(VS studio为例)
  • MINGW g++64位版本安装
    • path环境配置
  • python(64位版本)环境目录

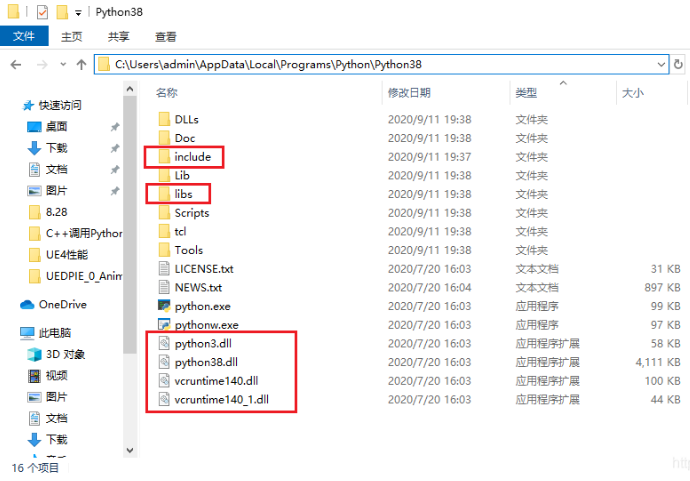
image-20220415182151759

include文件夹
里面是一些C语言代码头文件。其中将存放着供C语言调用的函数的定义。

libs文件夹
里面是一些 .lib 文件。
关于存放的内容: .lib 可能存着函数具体的实现,也可能是存着索引 dll 中函数实现的信息。由于这里的 .lib 文件相对较小,而且目录里有 dll ,所以存放的内容我想是后者。

dll文件
存着函数的具体实现

2、创建项目

VS Studio 建立一个C++控制台应用

3)配置路径

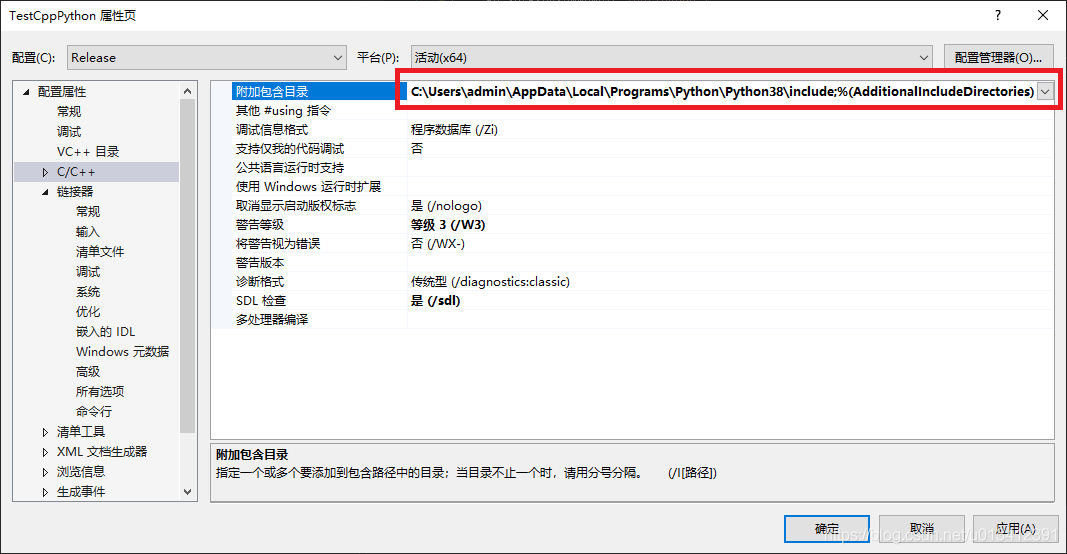
include文件夹 加入 :项目右键设置—>【C/C++】附加包含目录 (头文件目录):

在这里插入图片描述

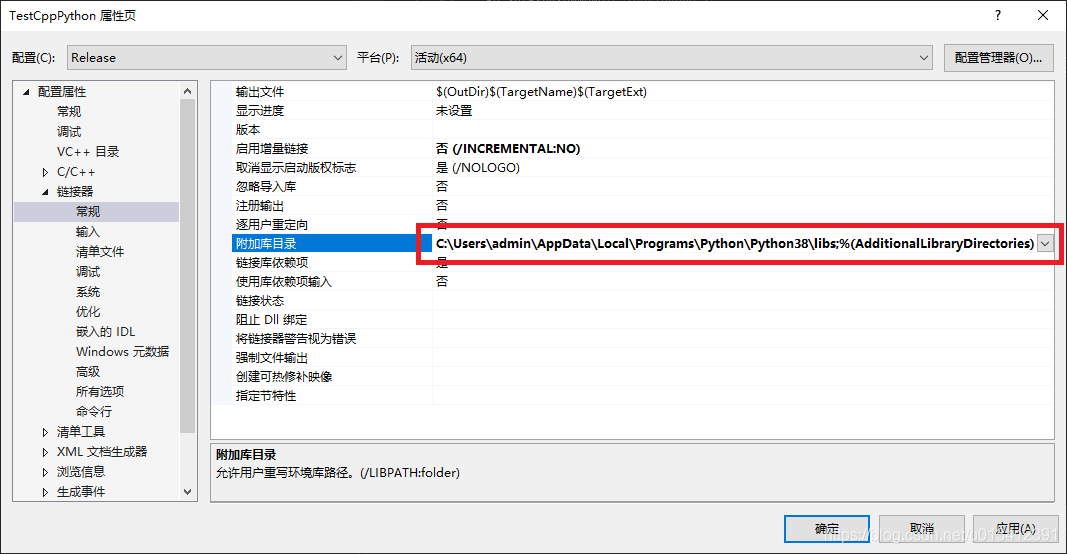
libs文件夹 加入:链接器–常规–附加库目录 :

在这里插入图片描述

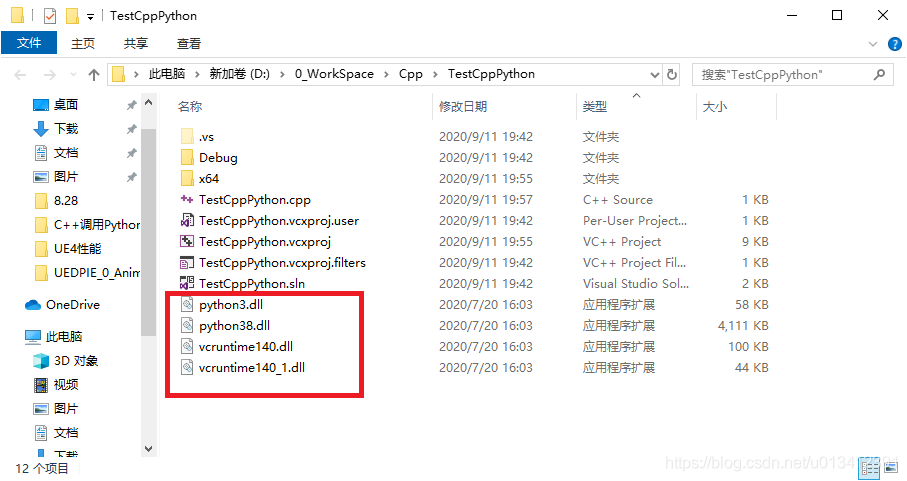
将所有 dll 拷贝到工程目录下:【其它资料都没这一步,导致花费很多时间在此问题排查上】

loading-ag-10331

4、项目运行

1
2
3
4
5
6
7
8
9
10
11
12
#include <Python.h>
int main()
{
//程序名:
Py_SetProgramName(L"TestYaksue");
//初始化
Py_Initialize();
//运行一个语句
PyRun_SimpleString("print('Hello World in Python!')\n");
Py_Finalize();
return 0;
}

问题解决:c++ 调用python,numpy报错

Conda环境

现象:

pyCharm下python可以正常运行。

c++调用python文件报错:

1
from numpy.core._multiarray_umath import ( ImportError: DLL load failed: 找

排查

​ 进入到conda环境,pip list 可以看到一个numpy,conda可以看到两个numpy,怀疑此问题

​ pip uninstal numpy, 卸载两次,才能卸载完成。

最终验证,c++调用python正常,🤡

参考资料:

QT和cmake工程中实现c++调用python具体实现,环境配置以及常见问题

VS Code配置Python开发环境(最简单的步骤教程)

Contents:

[TOC]

排列

GO 排列组合

组合

todo

lower_bound

头文件:algorithm

 lower_bound()返回值是一个迭代器,返回指向大于等于key的第一个值的位置;没找到就返回last位置

对象:有序数组或容器

1
2
3
4
5
6
7
8
9
10
#include <algorithm>
#include <iostream>
using namespace std;
int main()
{
int a[]={1,2,3,4,5,7,8,9};
printf("%d",lower_bound(a,a+8,6) - a); // a = a.begin()

return 0;
}

输出为 5

Table

版本

https://download.pytorch.org/whl/torch_stable.html

torch torchvision
cu90 0.3.0, 0.3.1, 0.4.0, 0.4.1,
1.0.[01], 1.1.1
cu91 0.3.1, 0.4.0
cu92 0.4.1,
1.2.0, 1.3.[01], 1.4.0, 1.5.[01], 1.6.0, 1.7.[01]
cu100 1.3.0, 1.4.0, 1.5.0 0.4.1, 0.4.2, 0.4.3
0.5.0
cu101 1.3.0, 1.3.1, 1.4.0, 1.5.0, 1.5.1
1.6.0, 1.7.0, 1.7.1, 1.8.0, 1.8.1
cu102 1.5.0–1.12.1
cu110 1.7.0,1.7.1
cu111 1.8.[01], 1.9.[01] ,1.10.[012]
cu113 1.10, 1.11, 1.12,
cu115 1.11
cu116 1.12, 1.13,
cu117 1.13, 2.0.0, 2.0.1
cu118 2.0.0, 2.0.1, 2.1.0, 2.1.1, 2.1.2, 2.2.0, 2.2.1
cu121 2.1.[012], 2.2.[01]

LibTorch

Conda

pytorch CUDA
1.5.1_cu92 conda install pytorch==1.5.1 torchvision==0.6.1 cudatoolkit=9.2 -c pytorch
1.5.1_cu101 conda install pytorch==1.5.1 torchvision==0.6.1 cudatoolkit=10.1 -c pytorch
1.5.1_CPU conda install pytorch==1.5.1 torchvision==0.6.1 cpuonly -c pytorch
1.10.1_cu102 conda install pytorch==1.10.1 torchvision==0.11.2 torchaudio==0.10.1 cudatoolkit=10.2 -c pytorch
1.8.0_cu111_docker docker pull pytorch/pytorch:1.8.0-cuda11.1-cudnn8-devel
1.8.0_cu111 conda install pytorch==1.8.0 torchvision==0.9.0 torchaudio==0.8.0 cudatoolkit=11.1 -c pytorch -c conda-forge -
2.1.2_cu118 conda install pytorch==2.1.2 torchvision==0.16.2 torchaudio==2.1.2 cudatoolkit=11.8 -c pytorch -c nvidia
conda install pytorch==2.1.2 torchvision==0.16.2 torchaudio==2.1.2 pytorch-cuda=11.8 -c pytorch -c nvidia
2.2.1_cu118

pytorch-lightning

安装pytorch-lightning时一定注意自己的torch是pip安装还是conda安装,pytorch_lightning 安装方式要与torch的安装方式保持一致,否则也会导致你的torch版本被替换。

conda install pytorch-lightning -c conda-forge

Pip

CUDA 11.8 pip3 install torch torchvision torchaudio –index-url https://download.pytorch.org/whl/cu118
CPU pip3 install torch torchvision torchaudio –index-url https://download.pytorch.org/whl/cpu
CUDA-92 https://download.pytorch.org/whl/cu92

版本关系

pytorch xformers differusers transformers
torch==2.2.2 0.0.25.post1
torch==2.2.1 0.0.25 4.36.2

网络搭建

1
2
3
4
5
6
7
8
9
10
11
12
13
14
15
# Actor-Critic网络
class ActorCritic(nn.Module):
def __init__(self, input_shape, n_actions):
super(ActorCritic, self).__init__()
self.fc1 = nn.Linear(input_shape, 128)
self.fc2 = nn.Linear(128, 128)
self.actor = nn.Linear(128, n_actions)
self.critic = nn.Linear(128, 1)

def forward(self, x): ##服用前两层,增加稳定性
x = F.relu(self.fc1(x))
x = F.relu(self.fc2(x))
actor_output = F.softmax(self.actor(x), dim=-1)
critic_output = self.critic(x)
return actor_output, critic_output

采样过程

1
2
3
4
5
6
7
8
9
10
11
for i in range(1000):                  ##1000个episode
state = env.reset()
done = False
total_reward = 0

while not done: ##一个episode内部,我们可以看到,只采样一条就更新了
action = ac.get_action(state)
next_state, reward, done, info = env.step(action)
ac.update(state, action, reward, next_state, done)
state = next_state
total_reward += reward

训练过程 Actor-Critic

1
2
3
4
5
6
7
8
9
10
11
12
13
14
15
16
17
18
19
20
21
22
def update(self, state, action, reward, next_state, done):
state = torch.FloatTensor(state).unsqueeze(0)
next_state = torch.FloatTensor(next_state).unsqueeze(0)
action = torch.LongTensor([action])
reward = torch.FloatTensor([reward])
done = torch.FloatTensor([int(done)])

# 计算Q值
_, next_state_value = self.actor_critic(next_state)
_, state_value = self.actor_critic(state)
q_value = reward + self.gamma * next_state_value * (1 - done) ##计算Q

# 计算actor和critic的loss
log_prob, _ = self.actor_critic(state)
actor_loss = -(log_prob[0][action] * q_value).mean()
critic_loss = F.mse_loss(state_value, q_value.detach()) #拟合V,用TD
loss = actor_loss + critic_loss

# 更新actor和critic的参数
self.optimizer.zero_grad()
loss.backward()
self.optimizer.step()

训练A2C (优势AC算法)

1
2
3
4
5
6
7
8
9
10
11
12
13
14
15
16
17
18
19
20
21
22
def update(self, state, action, reward, next_state, done):
state = torch.FloatTensor(state).unsqueeze(0)
next_state = torch.FloatTensor(next_state).unsqueeze(0)
action = torch.LongTensor([action])
reward = torch.FloatTensor([reward])
done = torch.FloatTensor([int(done)])

# 计算advantage
_, next_state_value = self.actor_critic(next_state)
_, state_value = self.actor_critic(state)
advantage = reward + self.gamma * next_state_value * (1 - done) - state_value

# 计算actor和critic的loss
log_prob, _ = self.actor_critic(state)
actor_loss = -(log_prob[0][action] * advantage).mean()
critic_loss = advantage.pow(2).mean()
loss = actor_loss + critic_loss

# 更新actor和critic的参数
self.optimizer.zero_grad()
loss.backward()
self.optimizer.step()

Contents:

[TOC]

参考:

介绍

Boost是一个功能强大、构造精巧、跨平台、开源并且完全免费的C++程序库,有着“C++‘准’标准库”的美誉,值得每位C++程序员学习使用。内容涵盖字符串处理、正则表达式、容器与数据结构、并发编程、函数式编程、泛型编程、设计模式实现等许多领域。

功能

含有的功能类有:

  • 字符串和文本处理库
  • 容器库
  • 迭代器库
  • 算法库
  • 函数对象和高阶编程库
  • 泛型编程库
  • 模板元编程
  • 预处理元编程库
  • 并发编程库
  • 数学和数字库
  • 排错和测试库
  • 数据结构库
  • 图像处理库
  • 输入输出库
  • 跨语言混合编程库
  • 内存管理库
  • 解析库
  • 编程接口库
  • 综合类库
  • 编译器问题的变通方案库

图像质量评估(Image Quality Assessment,IQA)

全参考图像质量评估(Full Reference-IQA,FR-IQA)、

半参考图像质量评估(Reduced Reference-IQA, RR-IQA)

无参考图像质量评估(No Reference-IQA, NR-IQA),

NR-IQA也称为盲参考图像质量评估(Blind IQA, BIQA)。

FR-IQA

常用于评估编解码算法性能、图像增强算法性能等场景

均方误差(MSE)、峰值信噪比(PSNR)、结构相似性(SSIM)

MSE

PSNR

SSIM

局部归一化亮度系数(MSCN)

RR-IQA

半参考图像质量评估以原始图像的部分信息,或从原始图像中提取的特征作为参考,难度介于全参考和无参考图像质量评估之间。

NR-IQA

自然场景统计方法(Natural Scene Statistic, NSS)

方法

BRISQUE 2012

《No-Reference Image Quality Assessment in the Spatial Domain》

libsvm,聚类方法

BLNDER

BLNDER [4]考虑到了不同网络层对图像质量相关特征的敏感程度不同,从预训练好的VGG网络中提取多个网络层的特征表示来分别训练SVR并预测每层特征的质量评分,最后取各层得分的平均值作为输入图像最终的质量评分(如图4所示)。

图4. BLNDER从预训练网络的多个层提取特征

DIQA [7]、BIECON[8]等方法结合了已有的全参考方法,在参考图像存在的情况下为图像块生成新的标签,当然这就引入了参考图像的限制。

RankIQA 2017

GitHub - xialeiliu/RankIQA: ICCV 2017

GitHub - YunanZhu/Pytorch-TestRankIQA

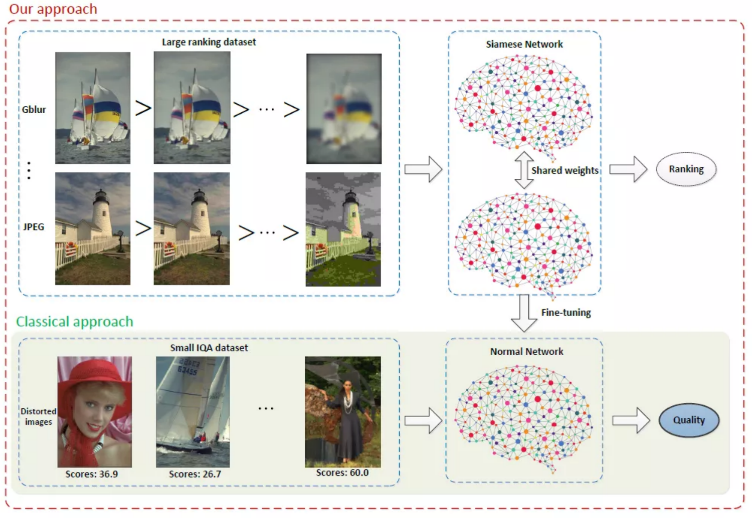
RankIQA [9]通过人工生成不同程度的失真图像来扩充数据集,虽然没有确定的质量得分标签,但可以根据失真程度对图像进行排序,从中抽取两张图像质量相对高低已知的图像构成图像对,来训练一个双生网络,最后取单路网络在小规模数据集上进行微调(如图5所示)。

之前的模型主要都是从提取特征和网络方面做改进,并没有考虑数据集图像少的问题。而RankIQA正是从数据预处理出发,取得了NR-IQA最好效果。

HIQA

HIQA[10]则借助GAN来扩充参考图像,让无参考图像评估跨越了没有原始图像作参照的鸿沟,如图6所示。通过GAN生成失真图像的参考图像,并与失真图像计算差值图,作为质量回归网络的输入来预测失真图像的质量,极大地提升了无参考图像质量评估模型的性能。

DIQA 2018

Deep CNN-Based Blind Image Quality Predictor

CLRIQA 2019

GitHub - GZHU-Image-Lab/CLRIQA: Controllable List-wise Ranking for Universal No-reference Image Quality Assessment

Contrique 2021

GitHub - pavancm/CONTRIQUE: Official implementation

Image Quality Assessment using Contrastive Learning

task-amenability

半监督训练方法

参考资料:

https://zhuanlan.zhihu.com/p/32553977

https://github.com/HuiZeng/BIQA_Toolbox

本行业相关

知物由学 | 告别挑花眼,AI算法如何筛选低质量图片?_网易易盾

开源社区

图像质量检测_CV_MulanAI实验室

https://modelscope.cn/models/damo/cv_vgg19_facial-expression-recognition_fer/summary

Image Quality Assessment | Papers With Code

问题5 so(3), se(3)的区别?如何在算法中使用?

  • SE(3):特殊欧式群
  • se(3):特殊欧式群的李代数
  • SO(3): 三维特殊正交群
  • so(3): 三维特殊正交群的李代数
  • T(3):三维移动群
  • R: 旋转矩阵

李代数:李群单位元处的切空间;

SO(3) 和T(3) 都是SE(3)的李子群
SO3——>log——>so3, 3×1 vector
SE3——>log——>se3, 6×1 vector
so3——>exp——>SO3, 3×3 matrix
se3——>exp——>SE3, 4×4 matrix

SO(3)代表旋转运动

SE3代表刚体变换运动(旋转+平移)

机器人学关于SE(3)、se(3)、SO(3)、so(3)的理解_OverCome-的博客-CSDN博客_se3 so3

# SLAM论文写作经验 | 小白、跨专业、无人指导、一年多从零到发顶会,他如何做到?

ORB-SLAM2:(二)Monocular/Stereo/RGB-D数据集_南山种豆的博客-CSDN博客

第4周课件-全网最详细的ORB-SLAM2精讲_orbslam讲解_他人是一面镜子,保持谦虚的态度的博客-CSDN博客

1. 理解地图点里成员变量的物理意义。

2. 掌握BOW的原理及应用(重要)。

3. 掌握关键帧跟踪原理(重要)。

4. 理解图优化原理,理解g2o的使用方法(重要)。

计算机视觉life的店铺 (第5期) ORB-SLAM2源码解析:视觉SLAM必备基础

GitHub - electech6/ORB_SLAM2_detailed_comments: Detailed comments for ORB-SLAM2 with trouble-shooting, key formula derivation, and diagrammatic drawing

最小二乘问题

# 最小二乘问题的四种解法——牛顿法,梯度下降法,高斯牛顿法和列文伯格-马夸特法的区别和联系

相机

内参:

如果一部相机的分辨率变为原来的两倍,而其他地方不发生变化,它的内参会如何变化?

分辨率*2 ====> (u,v)*2 ====> (fx,fy,cx,cy)*2