无人驾驶(12)基于强化学习的自动驾驶系统
无人驾驶(8)无人车定位系统(SLAM)
Content
[TOC]
定位技术简介
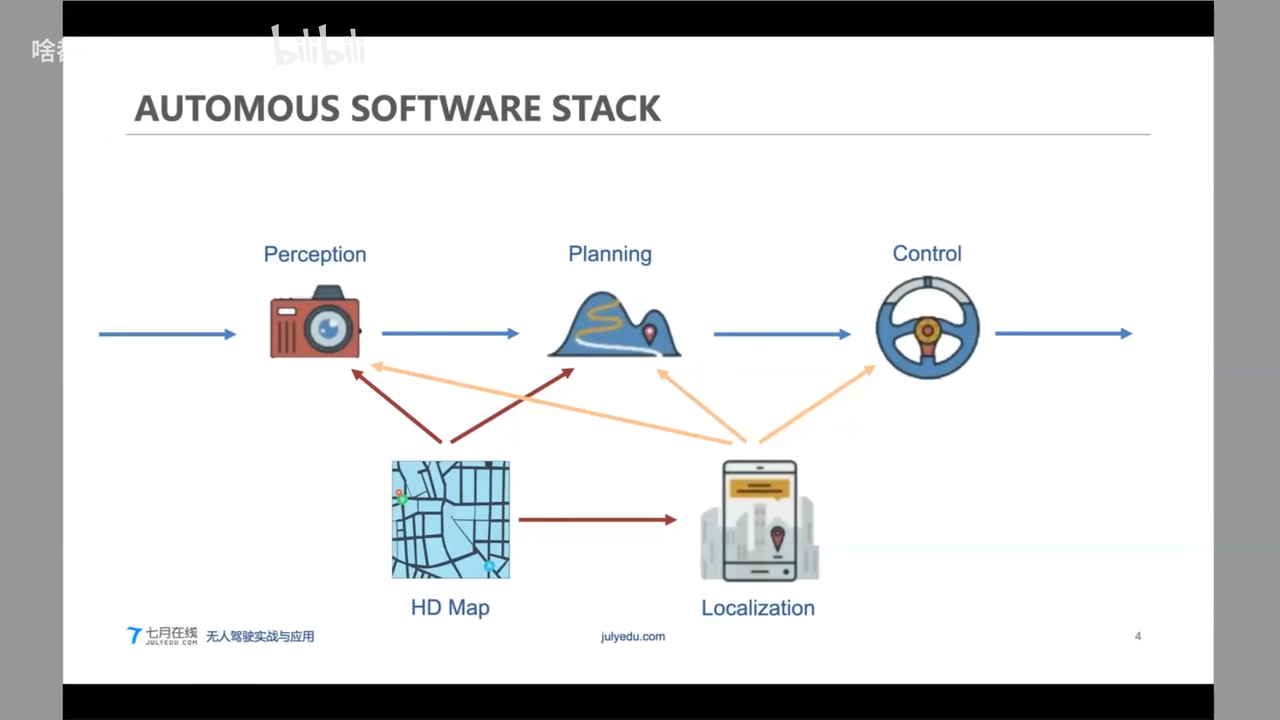
定位+高精度地图:提供当前位置的静态环境感知( 车道线/交通指示牌/红绿灯/柱子/建筑物/等)
定位+动态物体感知:将感知到的动态物体正确放入静态环境
定位获取位置姿态:用于路径规划/决策
定位技术分类
- 场景:室内(房间,车库,仓库等)室外()
- 基于感知模式
- outside-in: 接收的外界信号包含位置相关信息/ GNSS UWB WIFI Lidar Hdmap Camera-marker(室外街景门牌室内 maker)磁条加marker(规划都做了)扫地机本身贴marker加顶部相机 / (适合测量方程)
- inside-out:通过自身观察和感受获取位置信息 / IMU magnetometer SLAM VR中的墙面贴marker建图 / (适合状态方程)
- 基于计算方法
- 基于信号的定位: GNSS UWB WIFI/几何关系
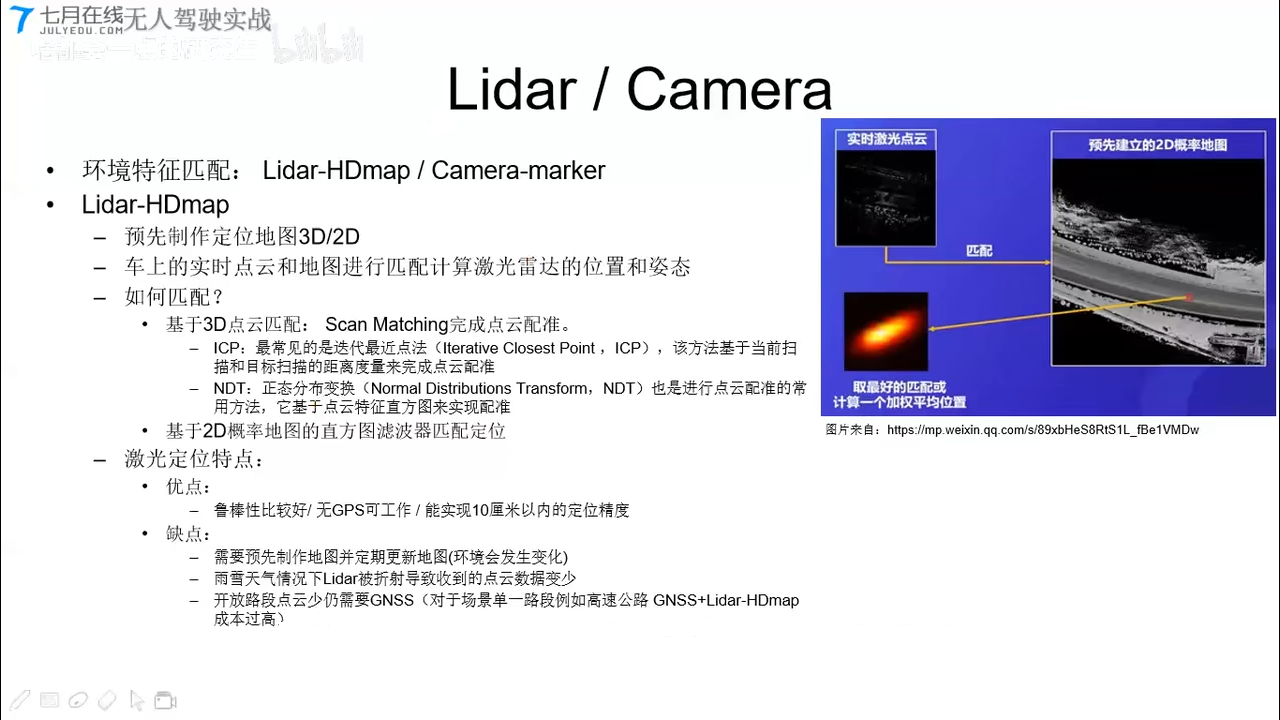
- 环境特征匹配: Lidar-HDmap Camera-marker Radar / 需要建图,观测特征与数据库的特征匹配得到当前位姿态
- 航迹推算:IMUodometry(轮子里程计/视觉里程计SLAM)/根据之前的位姿推断当前的位姿
定位系统的融合
- 原理:不同源传感器信息通过滤波器(KF, EKF, UKF, PF等)进行融合
- 典型融合方式:
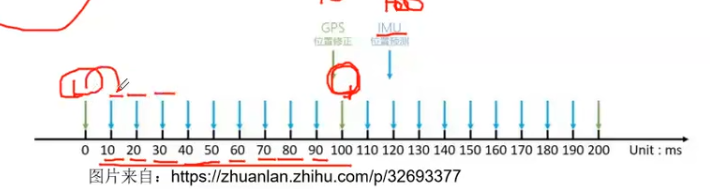
- IMU + GNSS :高频率累积误差+低频率高精度 无人机/无人车/导弹/室外
- GNSS + Lidar-HDMAP/Camera-marker:适合开放环境+适合密集特征环境 无人车/室内外
- VIO(SLAM+IMU+GNSS) 无人机/无人车/室内外
- IMU + magnetometer 矫正角度(互补滤波/MadgwickAHRS) 无人机/无人车/室内外
单个定位技术
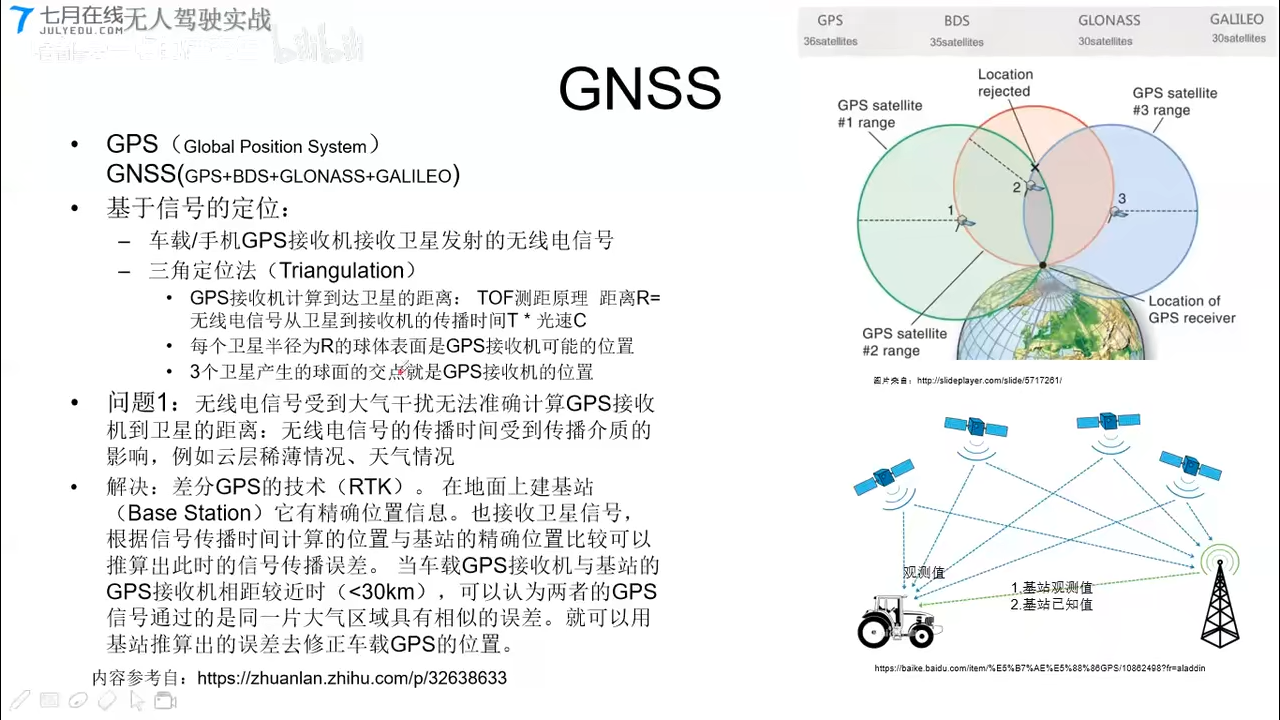
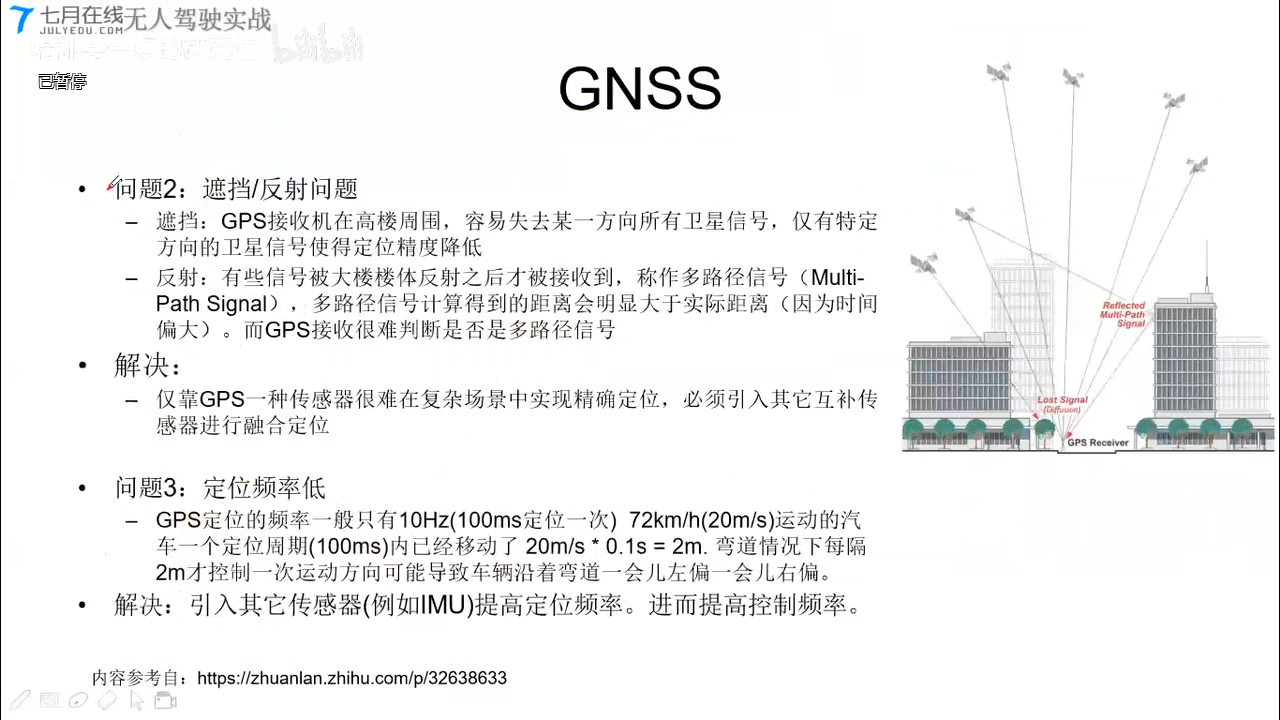
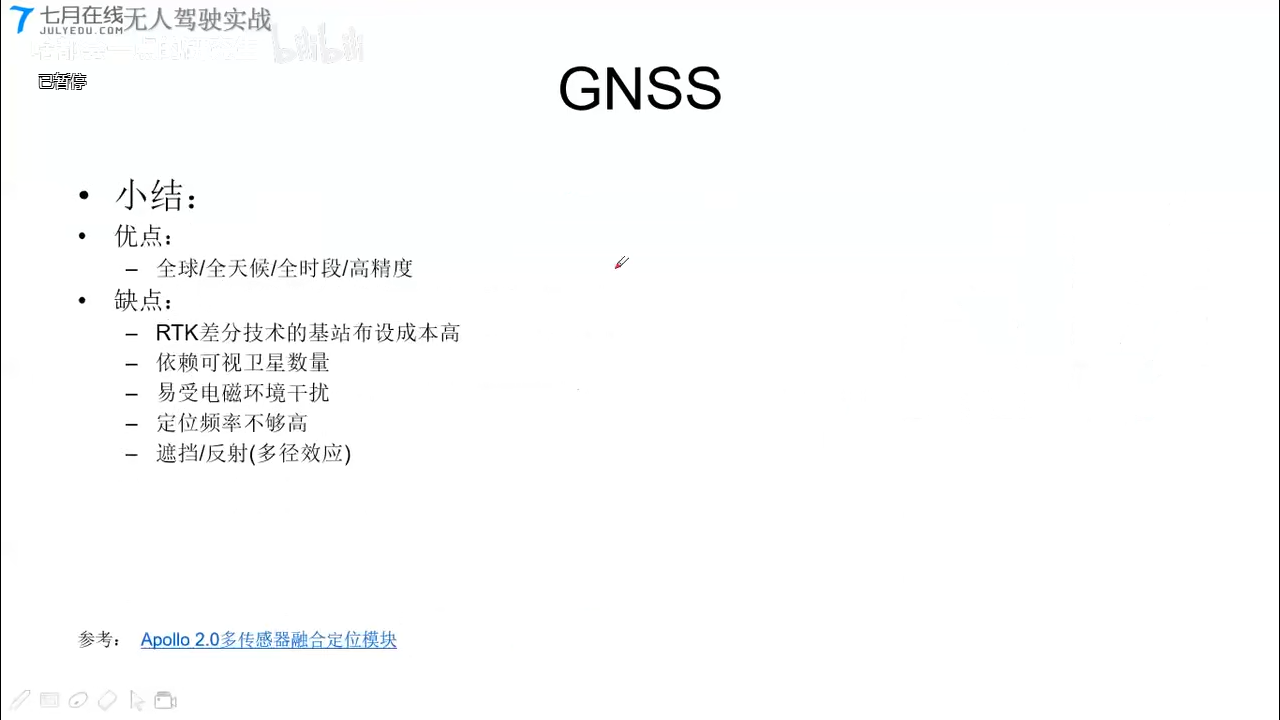
GNSS
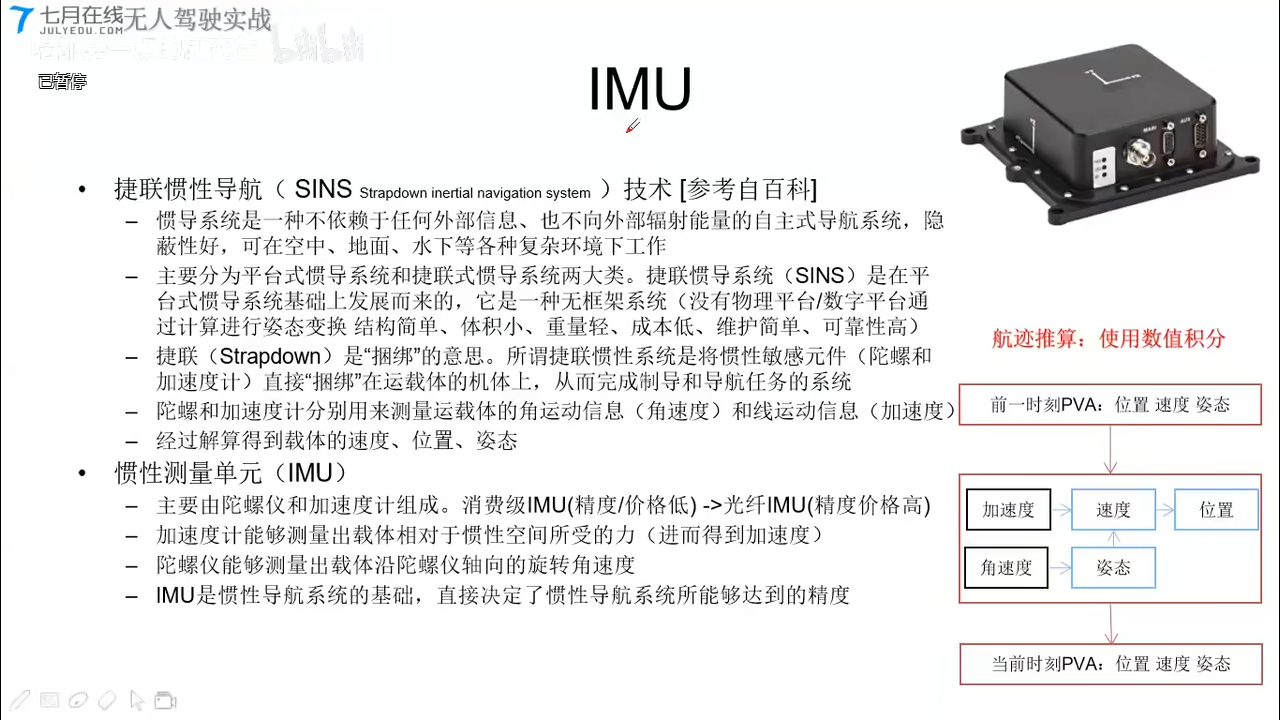
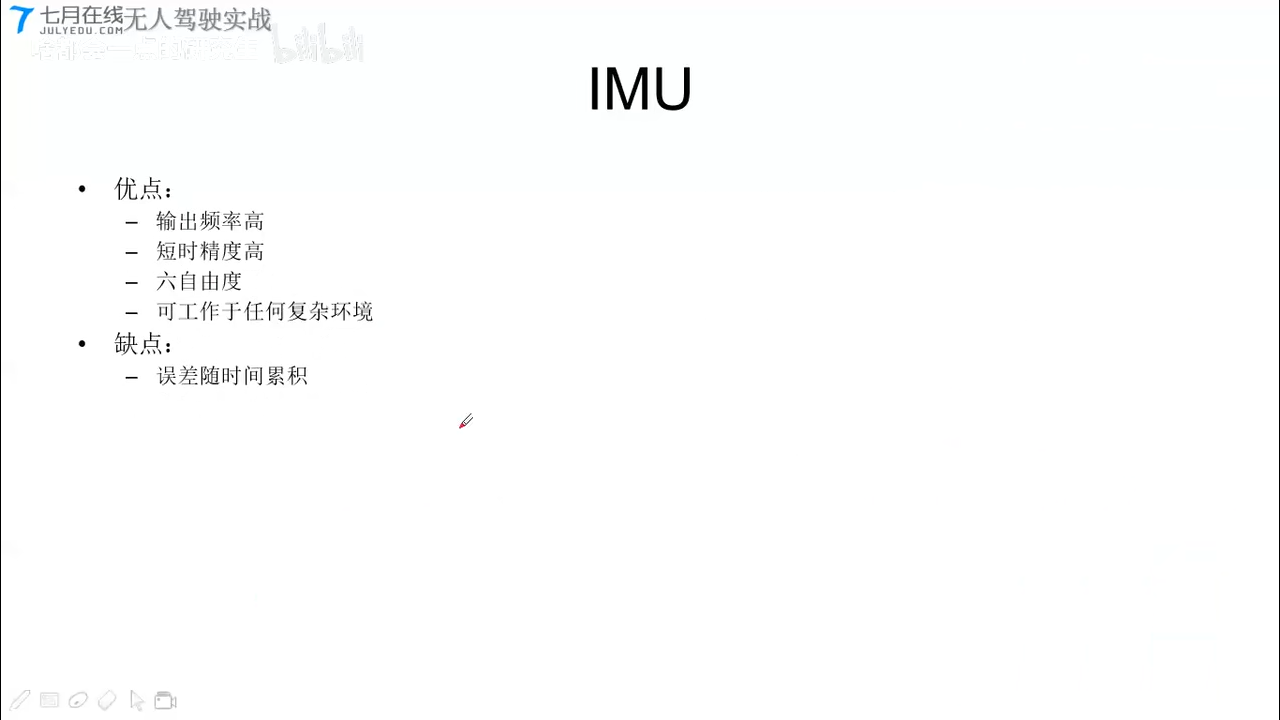
IMU
Lidar / Camera
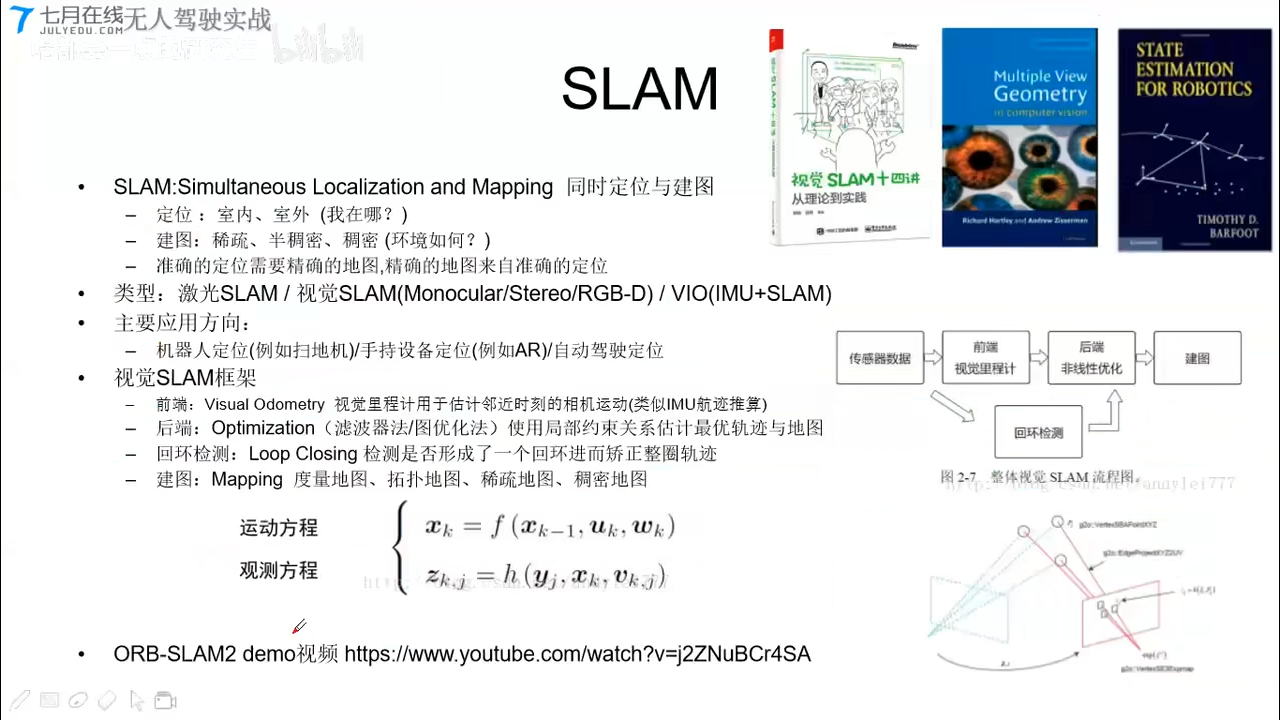
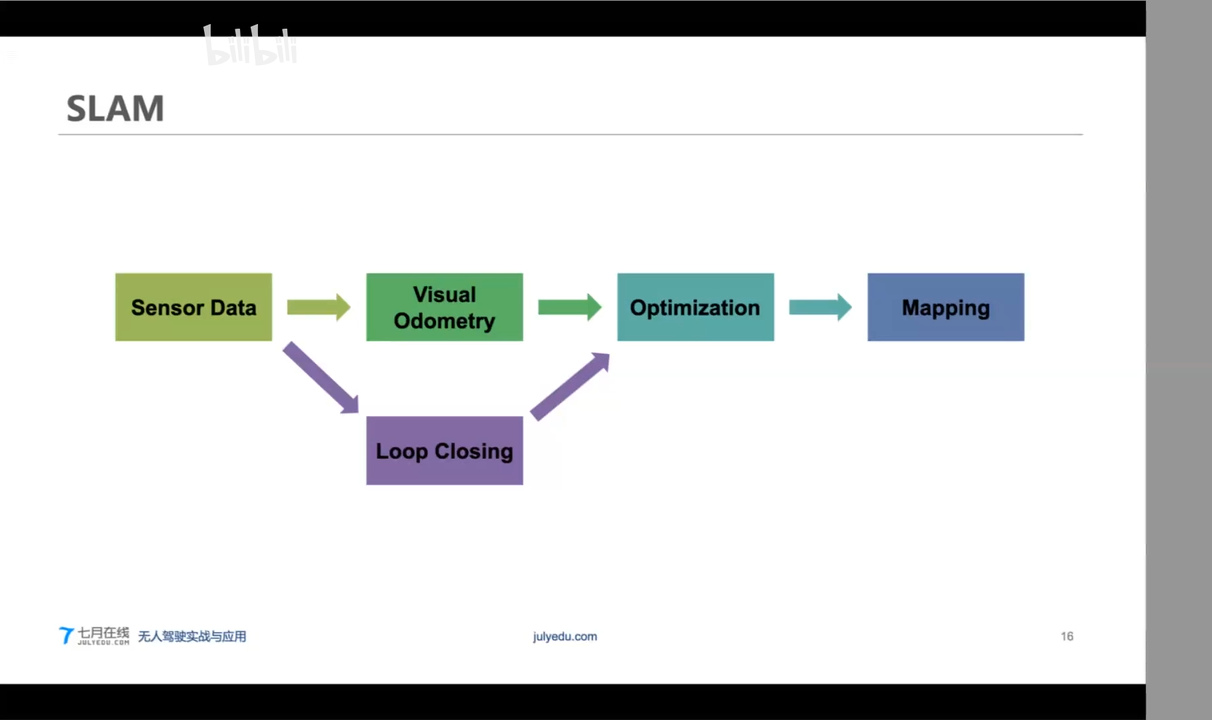
SLAM
定位融合技术
定位系统的融合
- 原理:不同源传感器信息通过滤波器(KF, EKF, UKF, PF等)进行融合
- 典型融合方式:
- IMU + GNSS :高频率累积误差+低频率高精度 无人机/无人车/导弹/室外
- GNSS + Lidar-HDMAP/Camera-marker:适合开放环境+适合密集特征环境 无人车/室内外
- VIO(SLAM+IMU+GNSS) 无人机/无人车/室内外
- IMU + magnetometer 矫正角度(互补滤波/MadgwickAHRS) 无人机/无人车/室内外
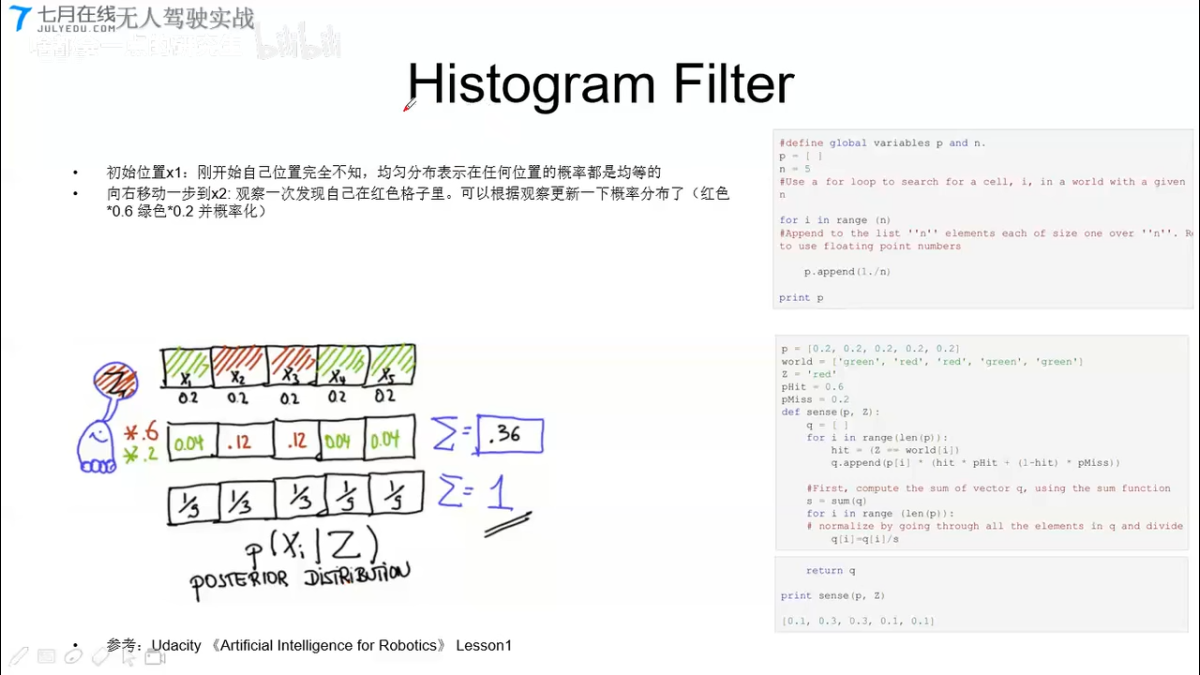
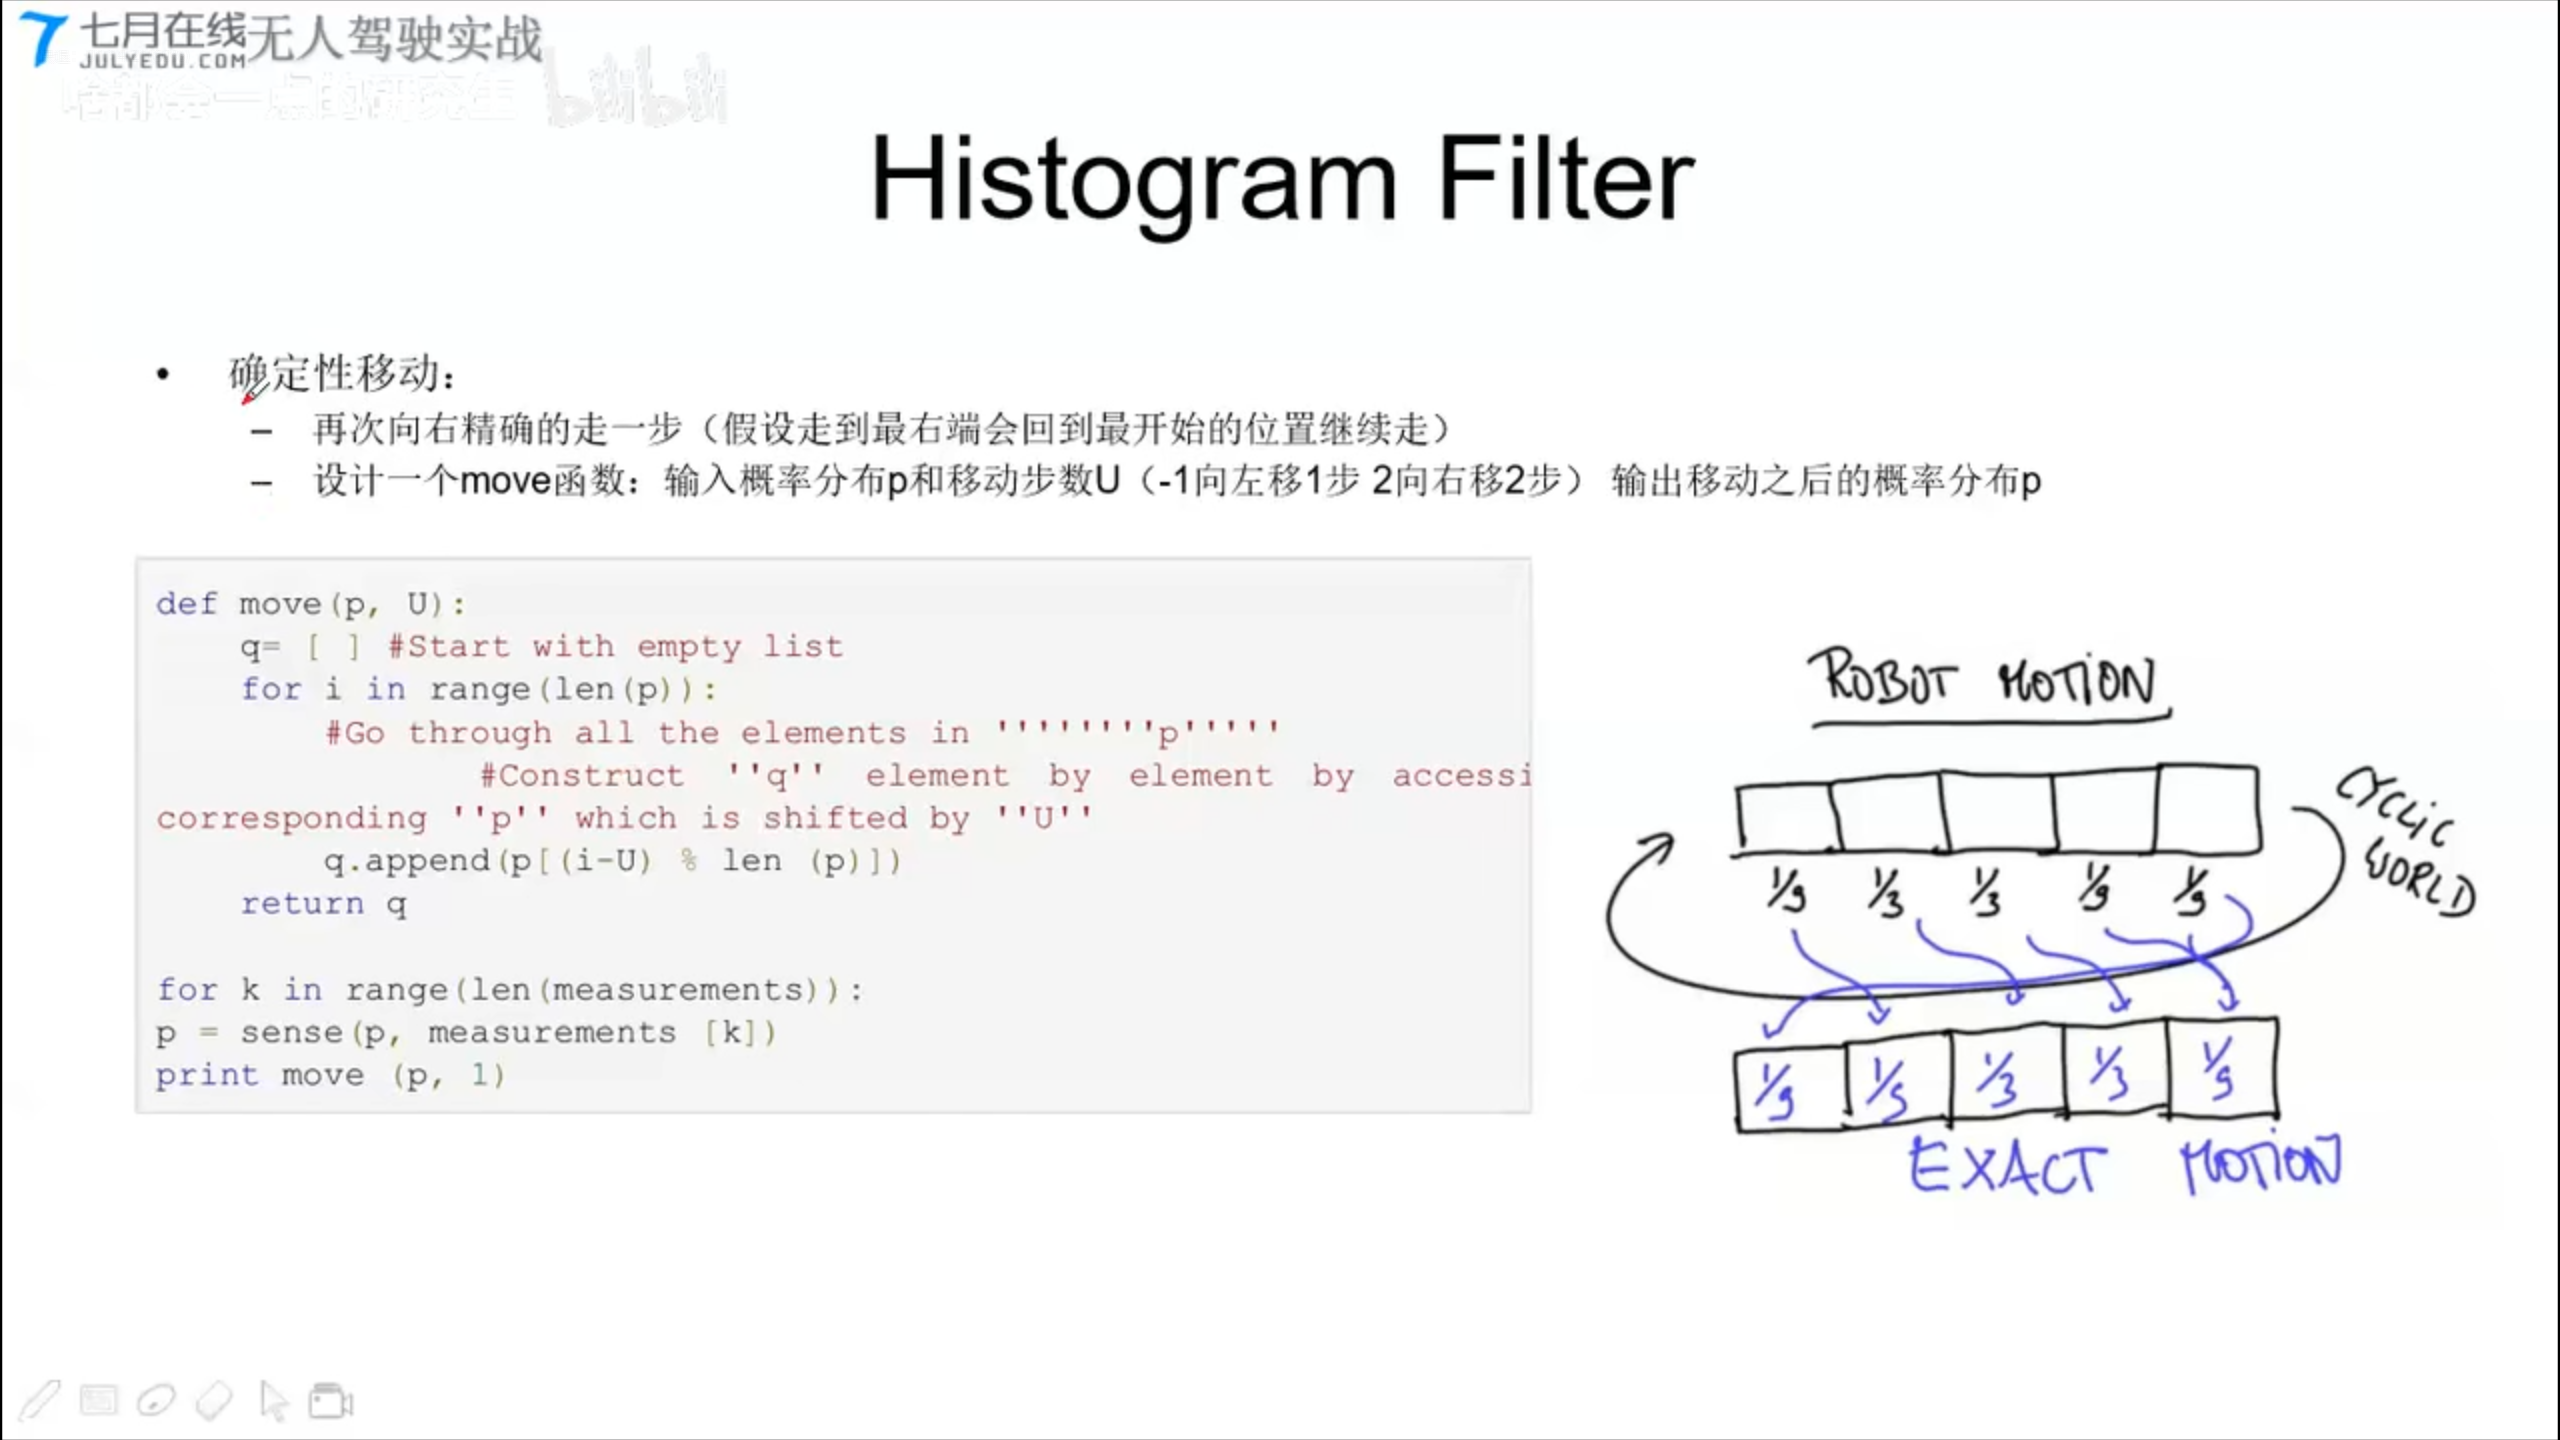
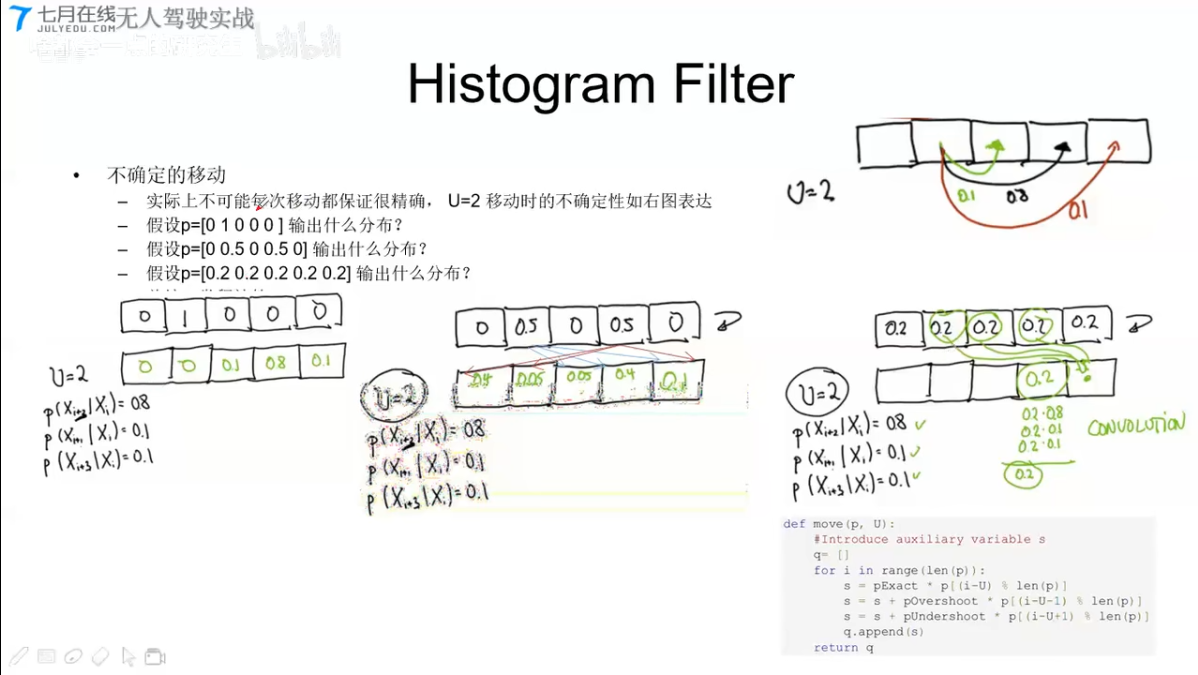
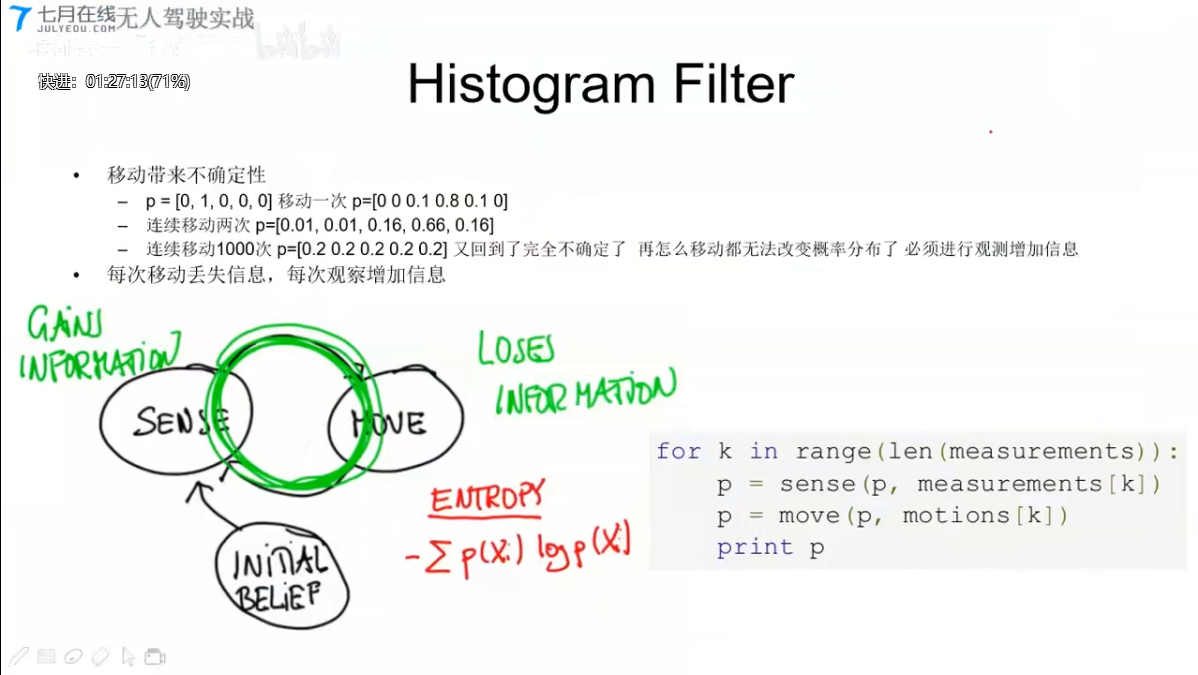
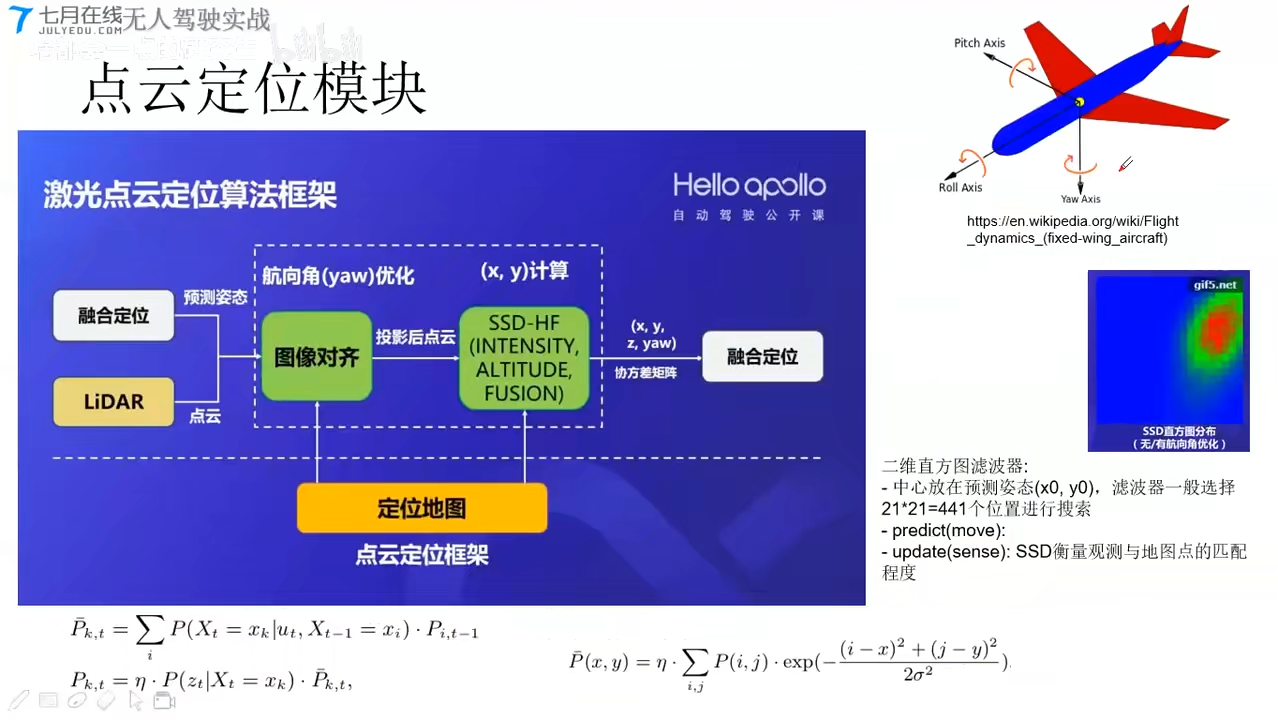
Histogram Filter
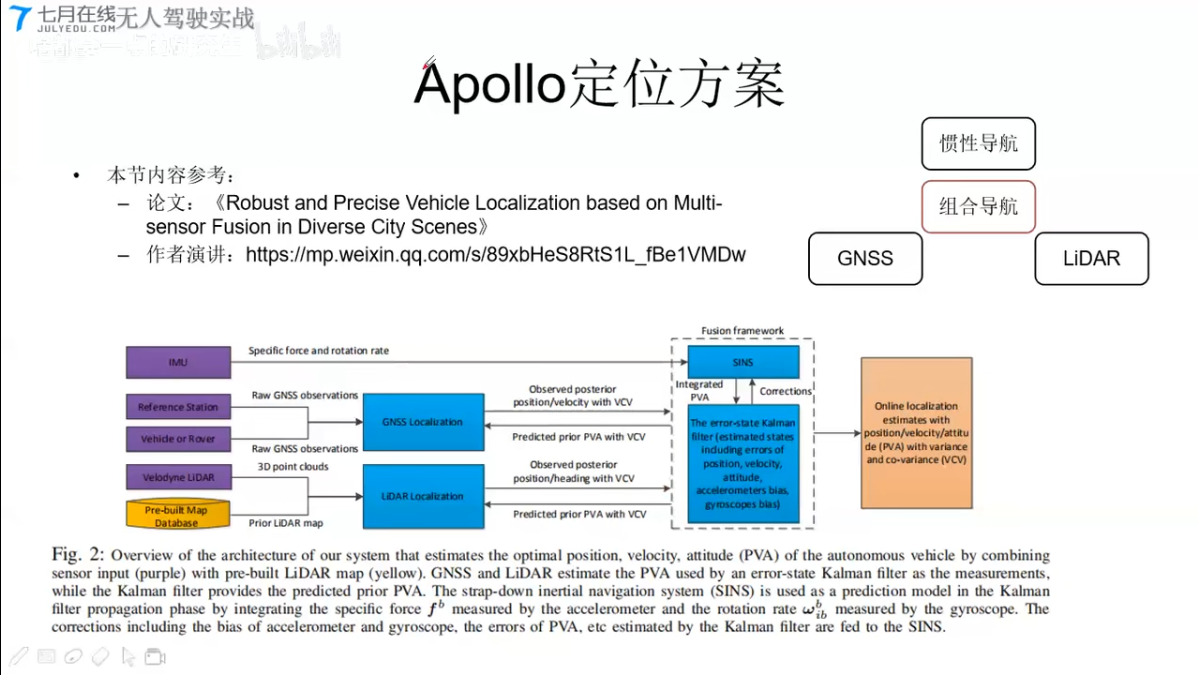
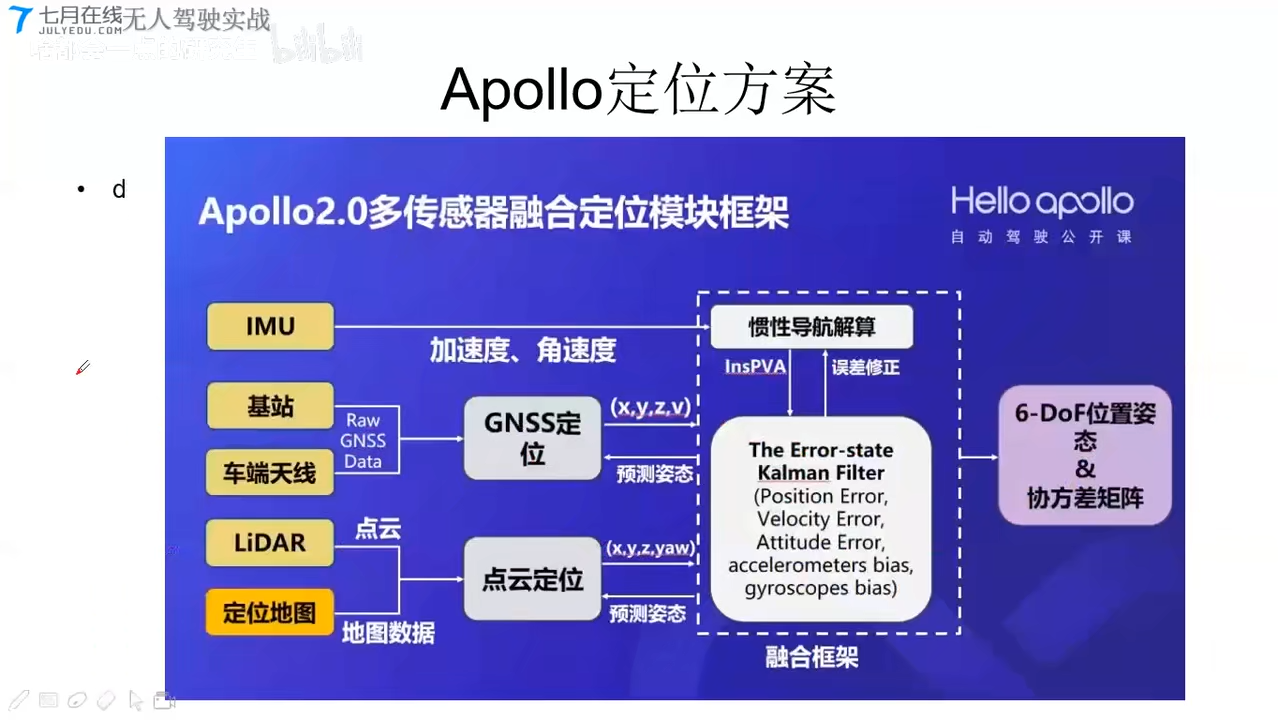
Apollo定位方案
开源项目
无人驾驶(7)高精地图V2X HD MAP
[TOC]
王博Kings:无人驾驶系列知识入门到提高7-高精度地图 V2X HD MAP
CSDN self_drive car_学习笔记–第7课:HD MAP高精地图 & V2X
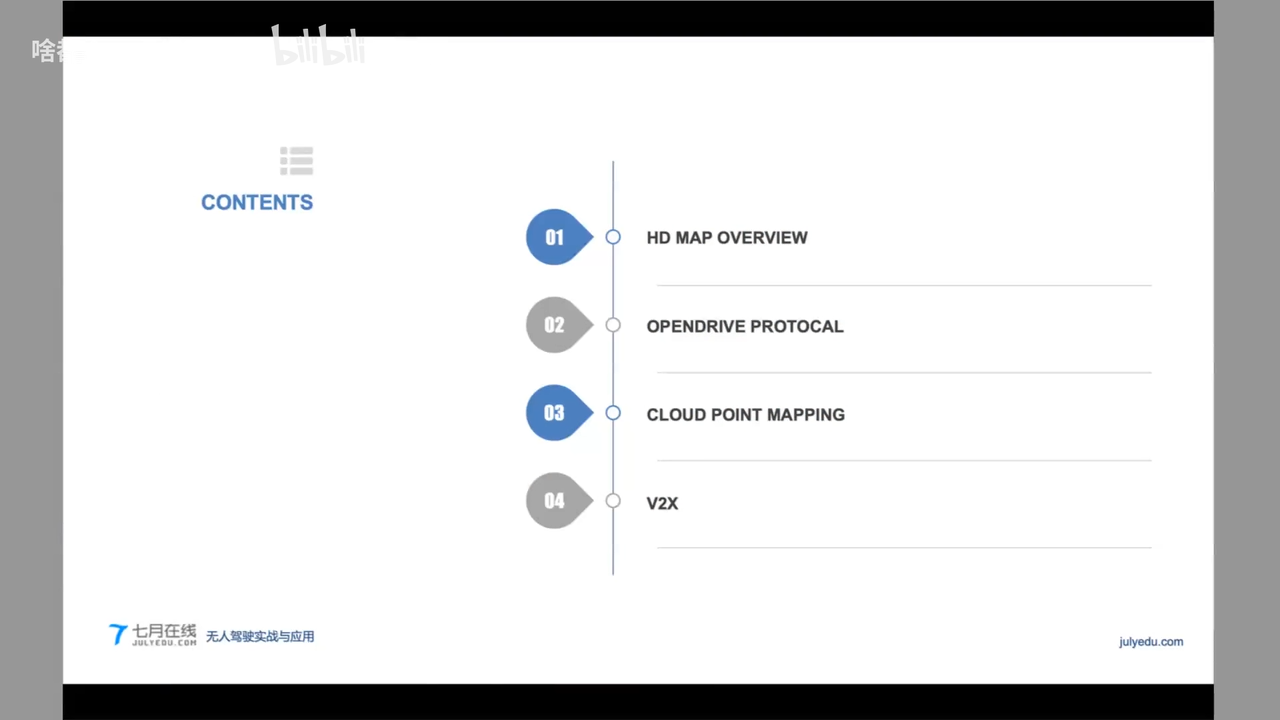
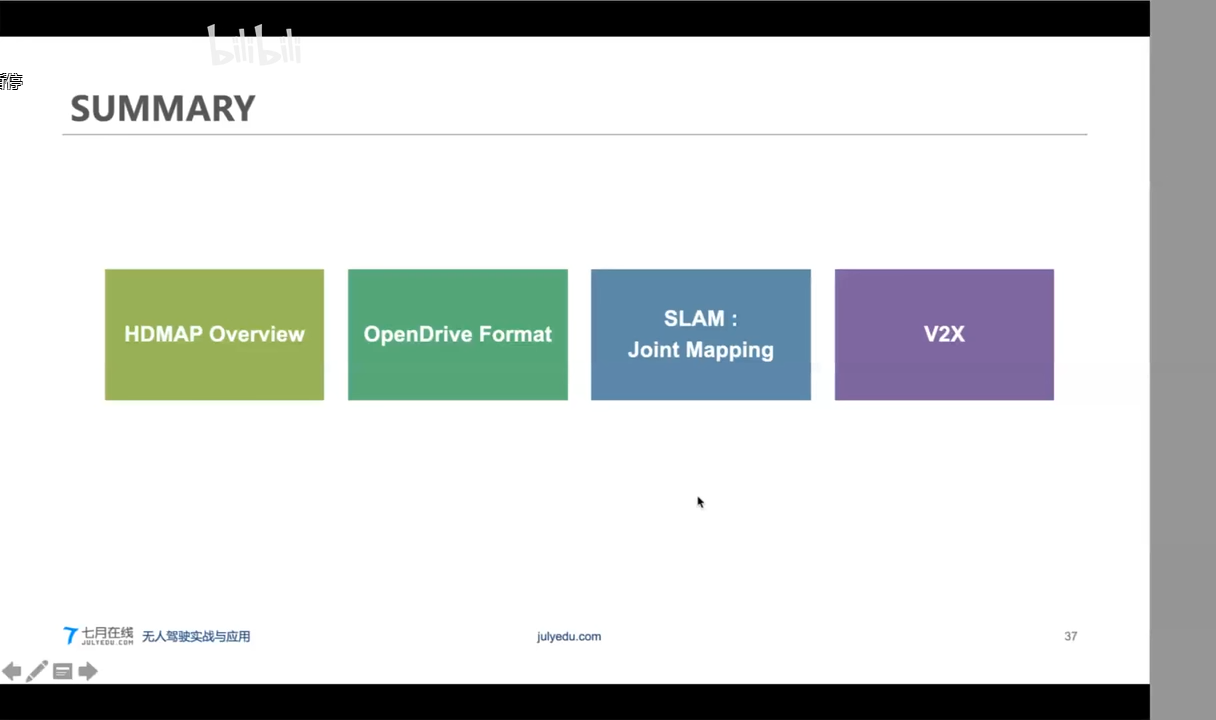
1. OverView
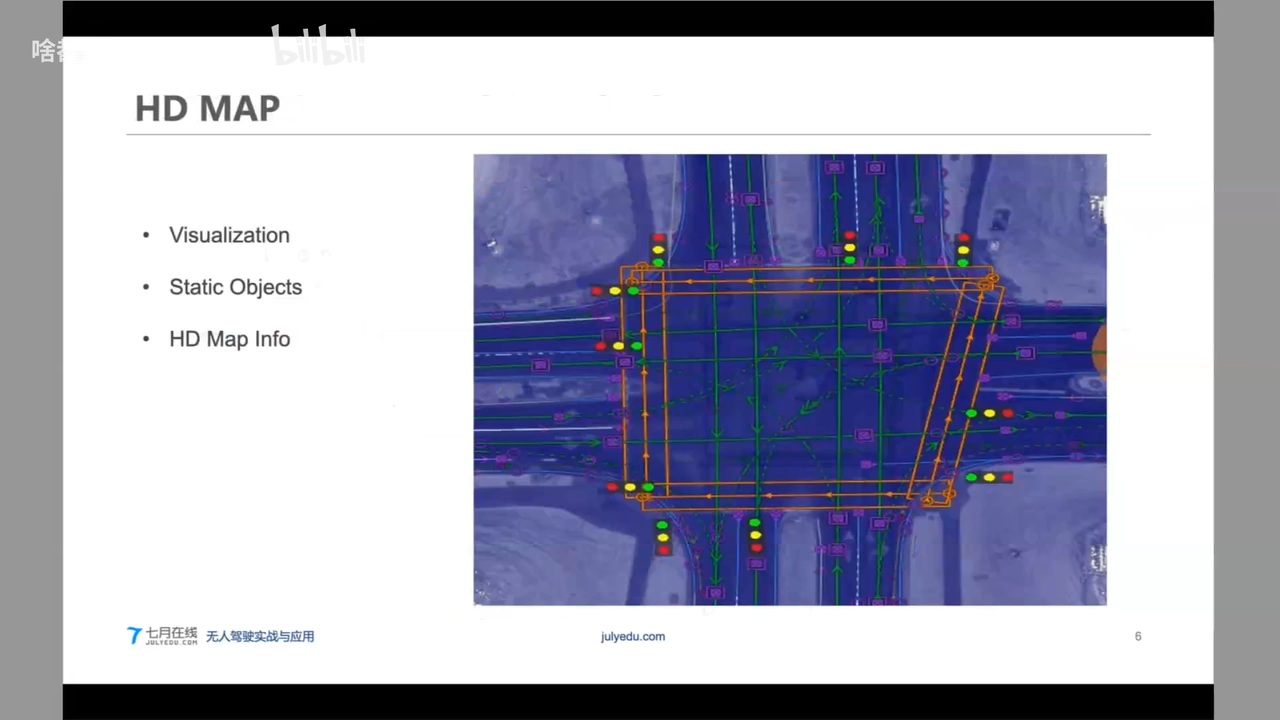
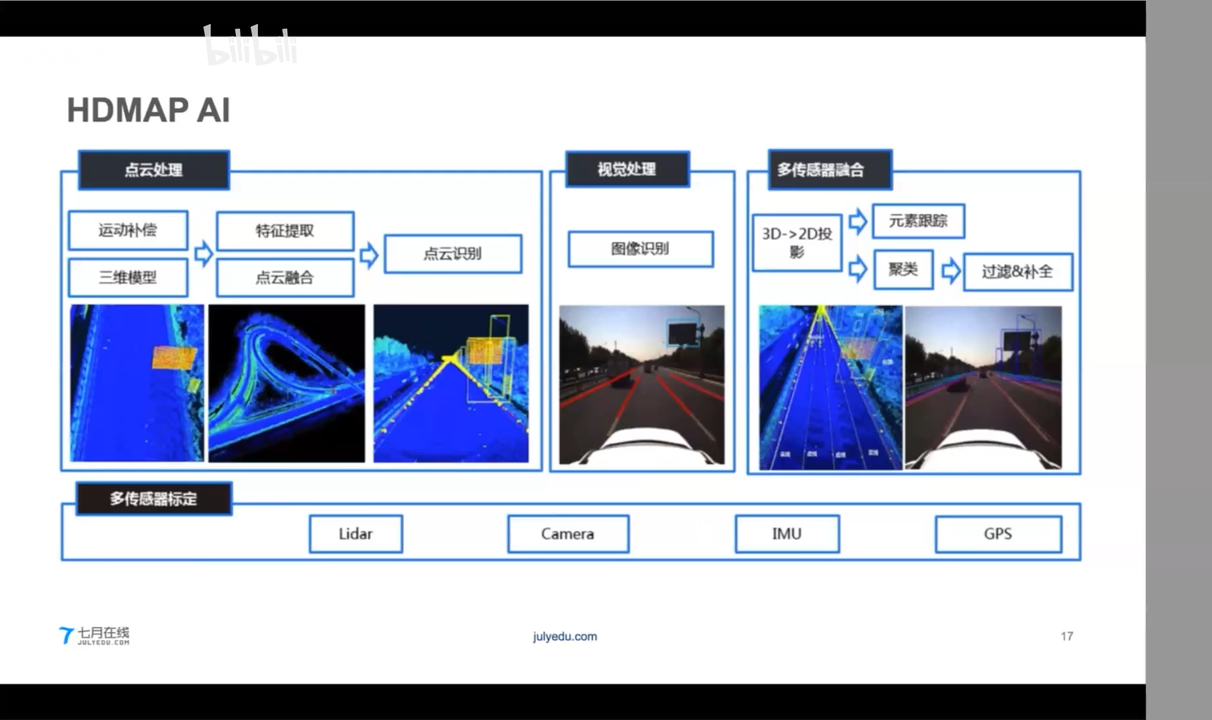
HD AMP
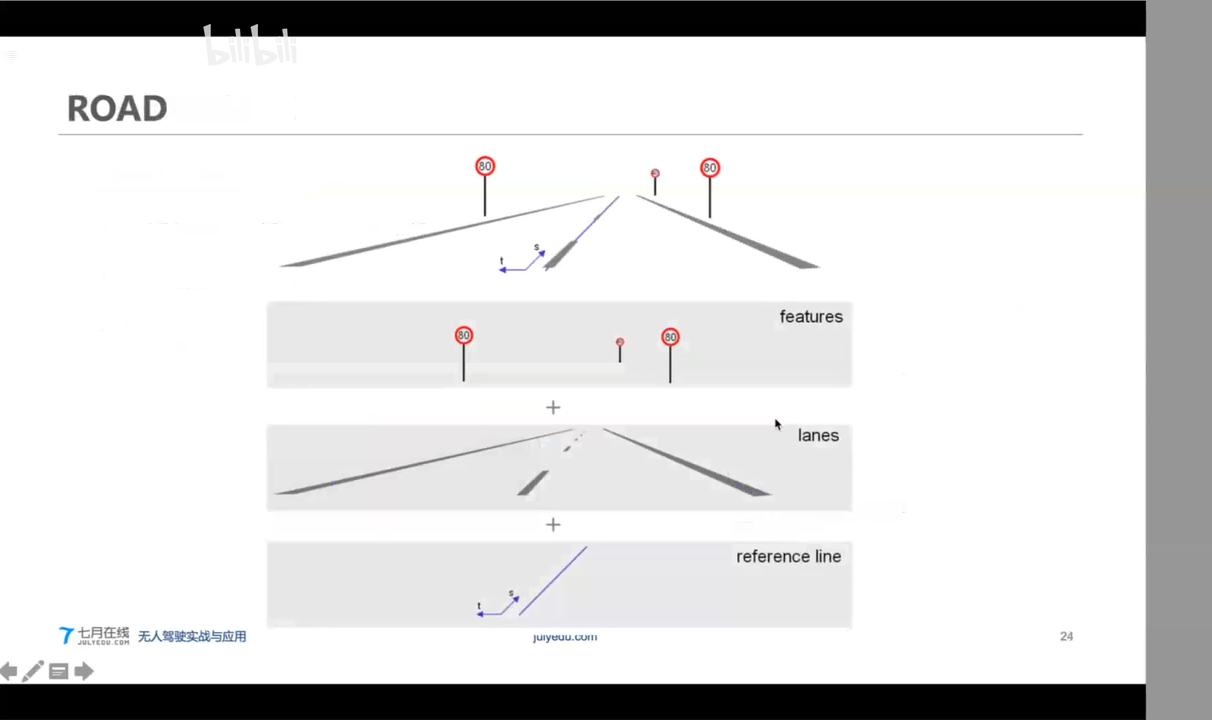
- 元素信息
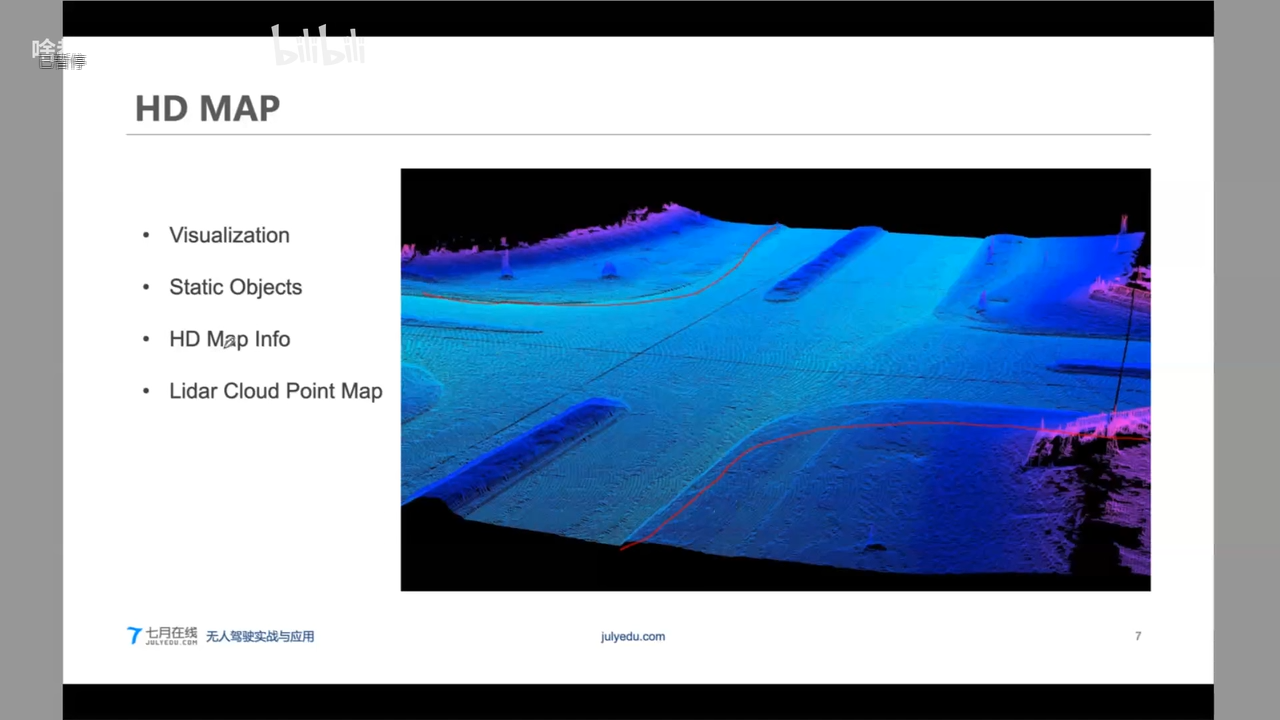
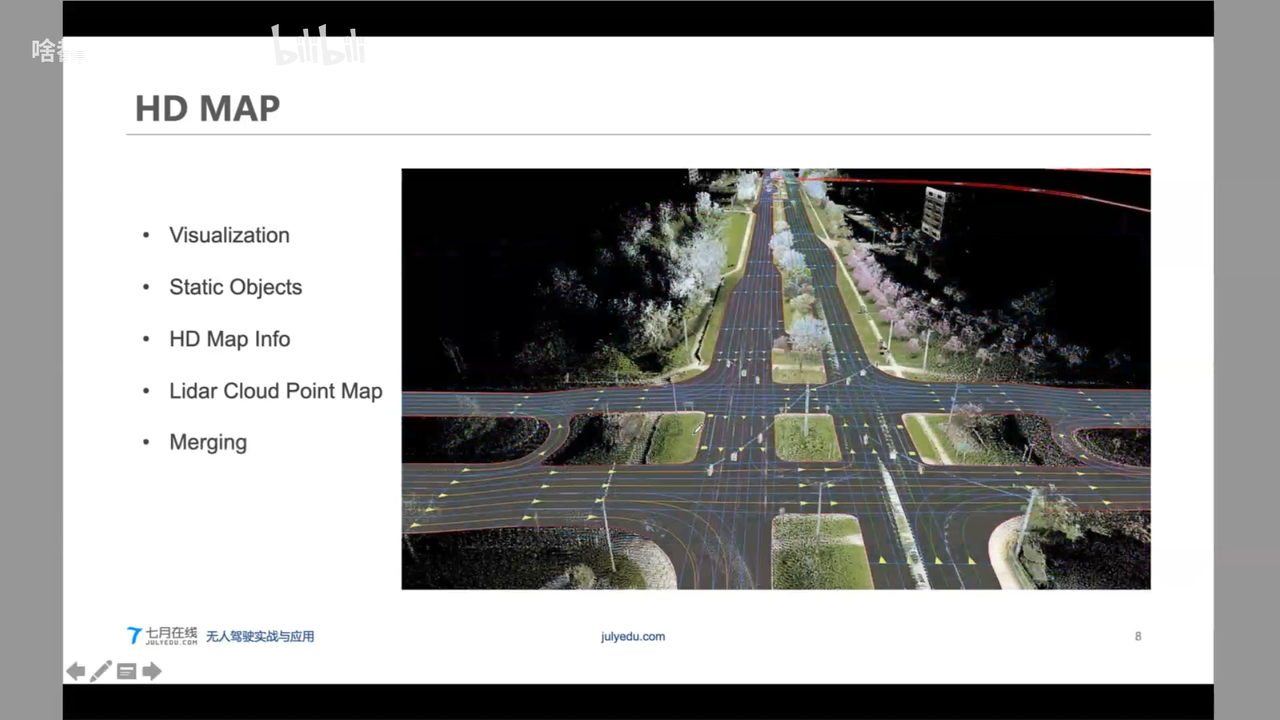
- 点云信息
- HD地图 = 元素地图 + 点云地图
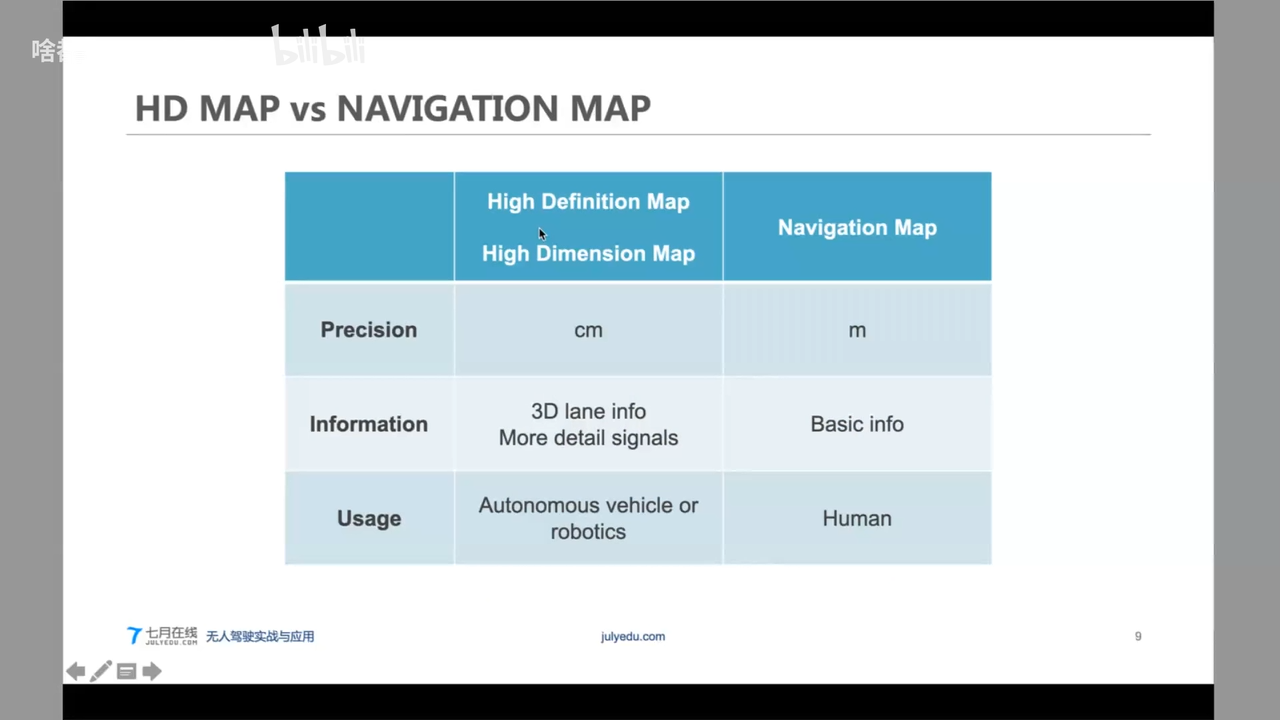
HD Map VS Navigation Map
LOCALIZATION

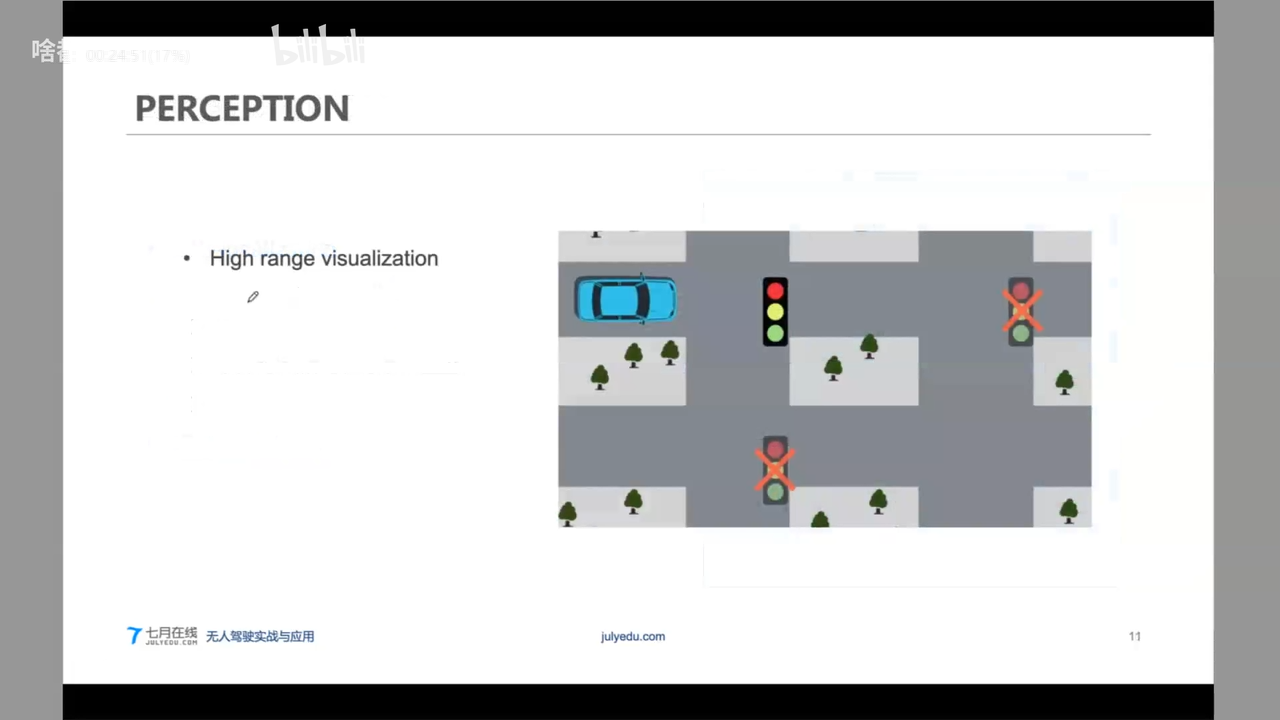
Perception 感知
Planning

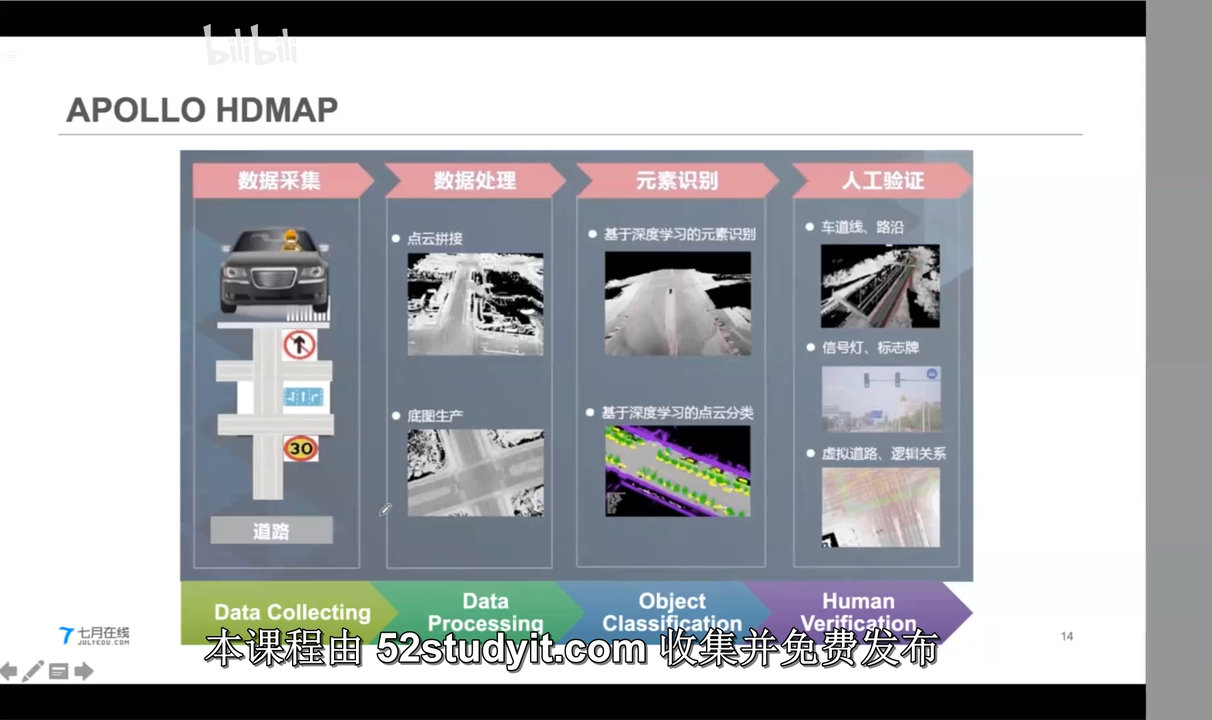
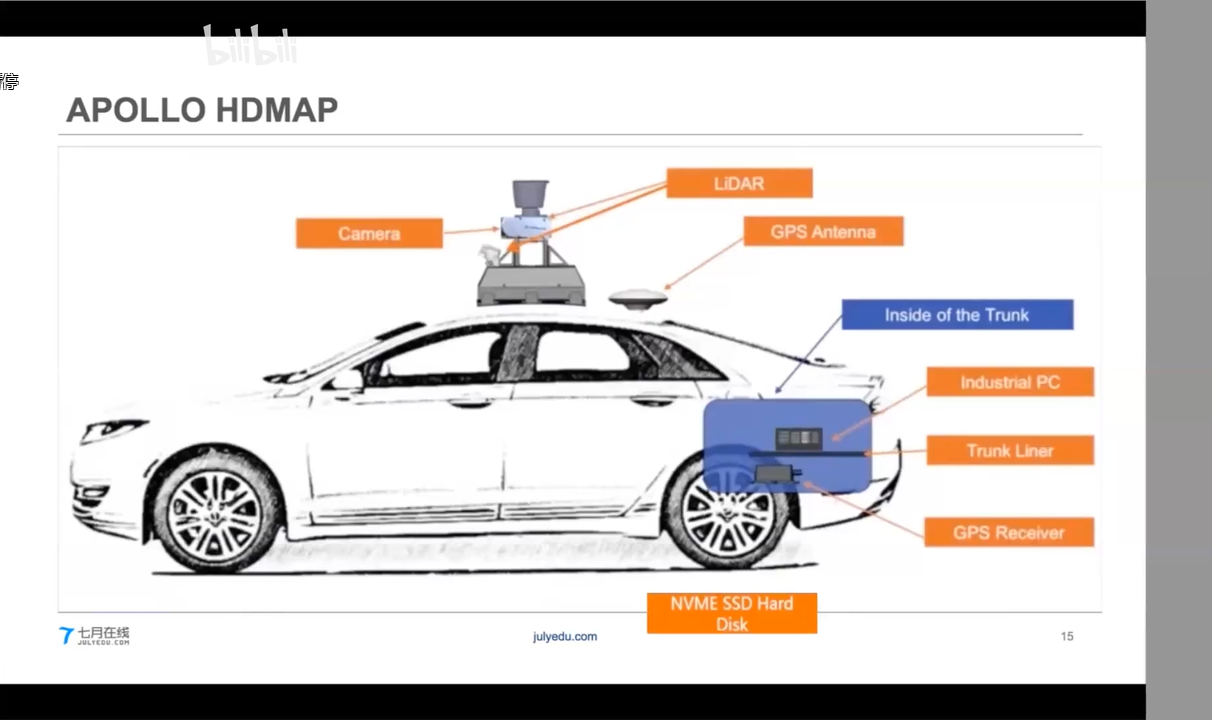
Apollo HDMap
SLAM
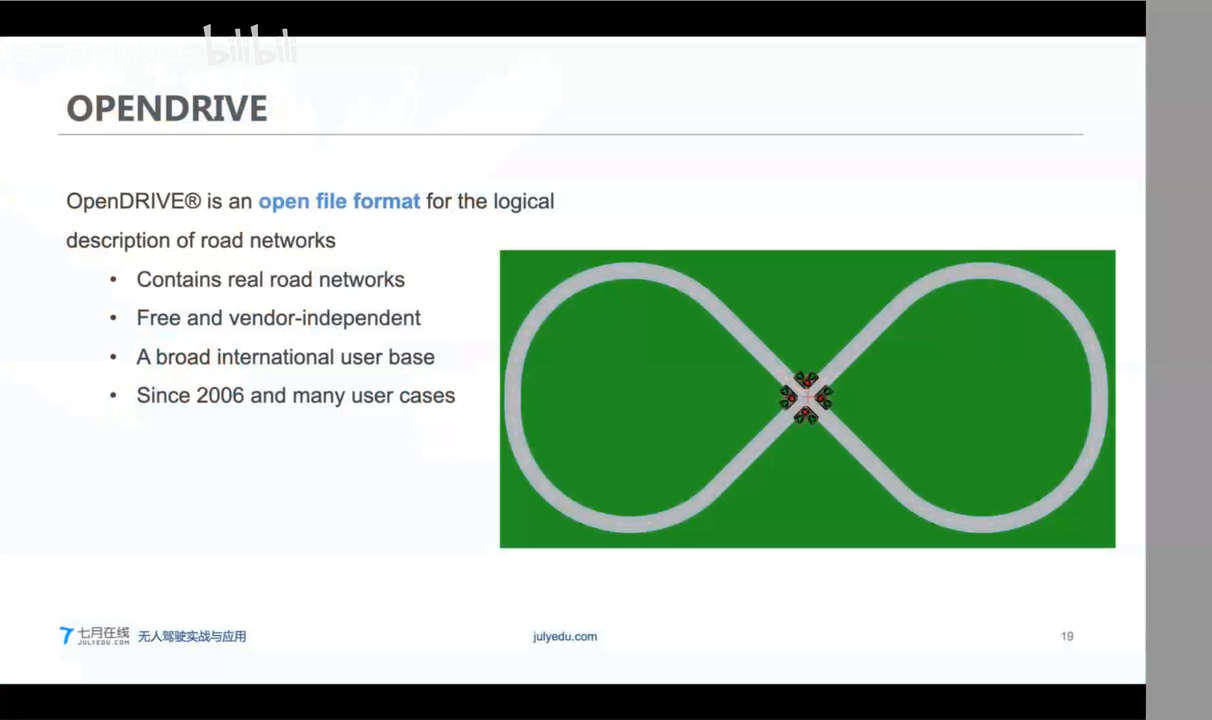
2. OPENDRIVE 开放协议
制图过程和V2X
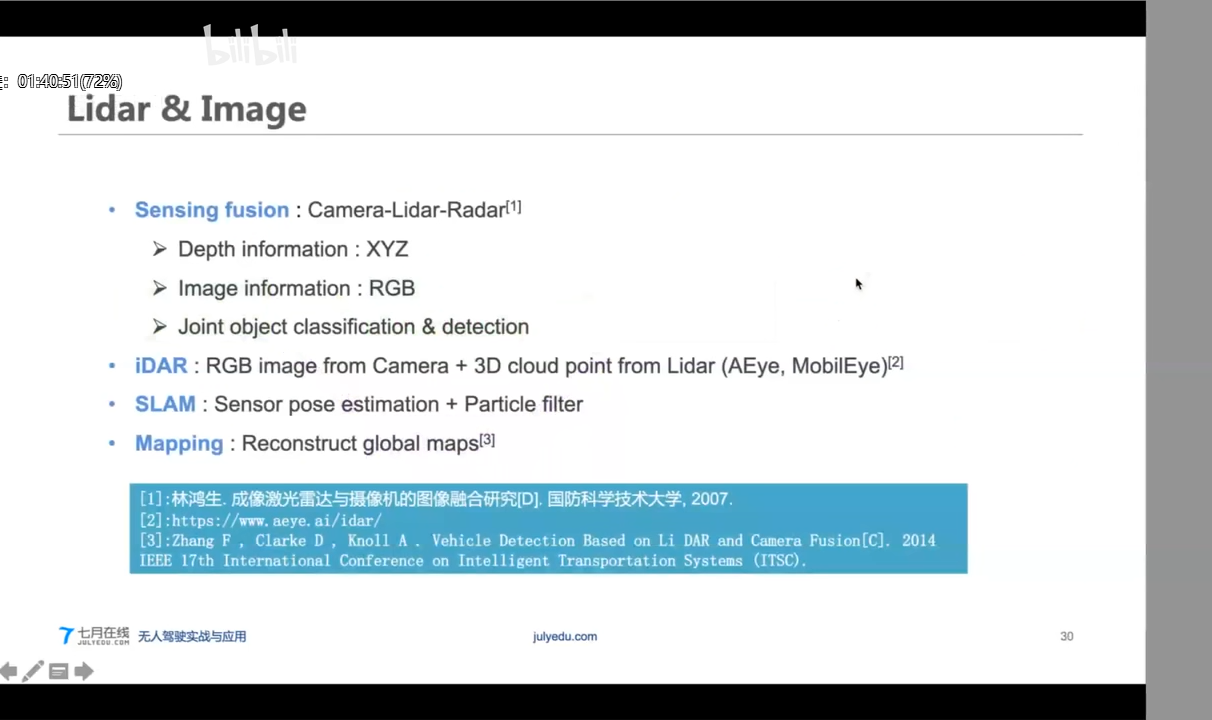
3. Cloud Point Mapping
3.1 Lidar & Image
3.2 点云匹配
1)依赖库说明
—-OpenCV3:目前最常用也是用途最广的图像处理依赖库,熟悉基本操作,比如cv::Mat、imread
—-Eigen:C++下最常用的矩阵运算库,类似于Matlab,对矩阵的描述和计算都非常方便,任何计算都是矩阵
—-PCL:Point Cloud Library,点云计算库,方便对点云进行操作和可视化
2)安装方法:
—-Eigen库使用源码拷贝的方式或者apt-get安装
—-Opencv安装可以用ppi源来安装,也可以用源码编译安装
—-在Ubuntu下使用apt-get安装PCL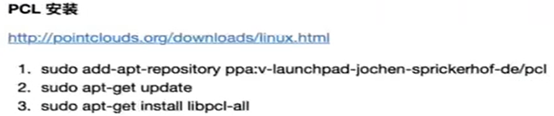
3)使用说明
代码库:JointMapping
–cmake .
–make
–./joinMap
–pcl_viewer ./map.pcd
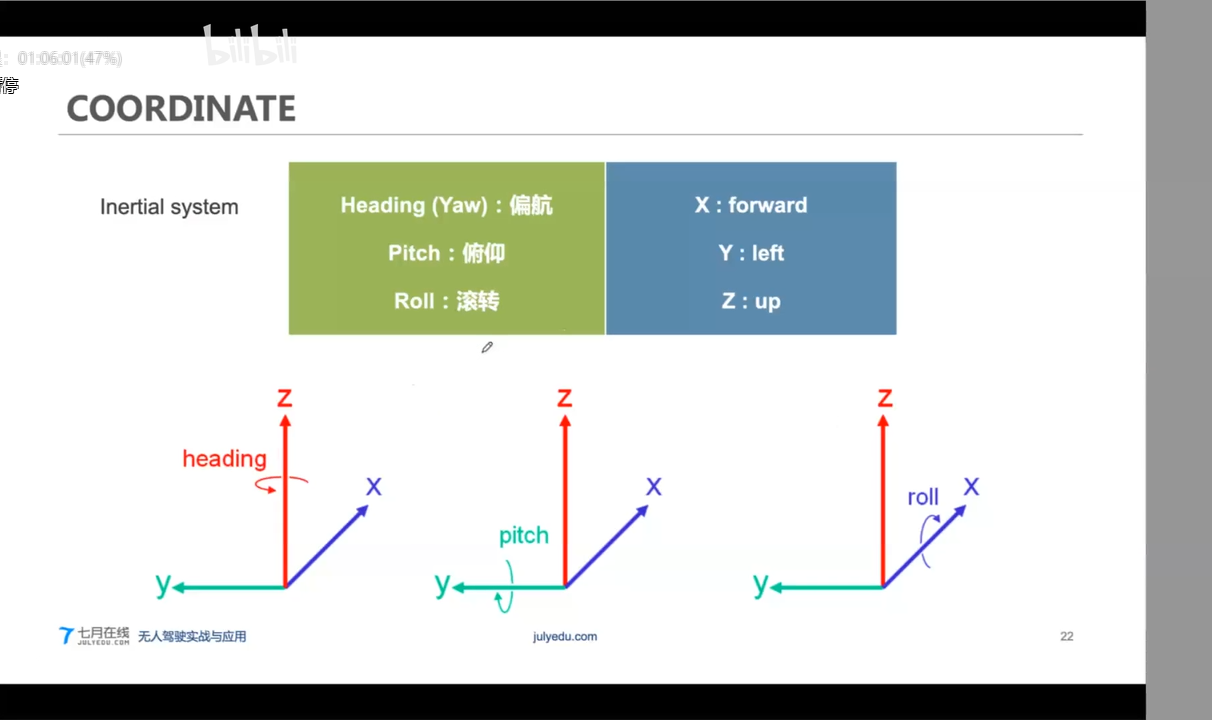
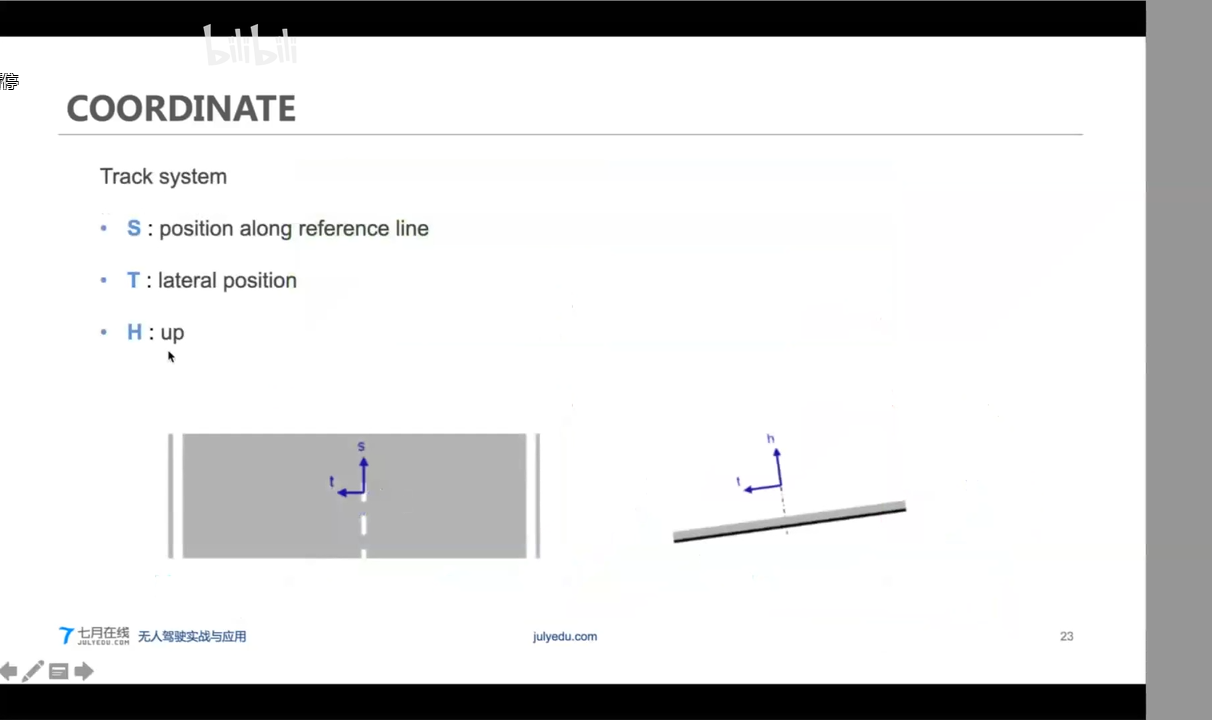
3.3 基础概念
- 相机内参
- 相机外参
- 像素坐标系
- 刚体运动
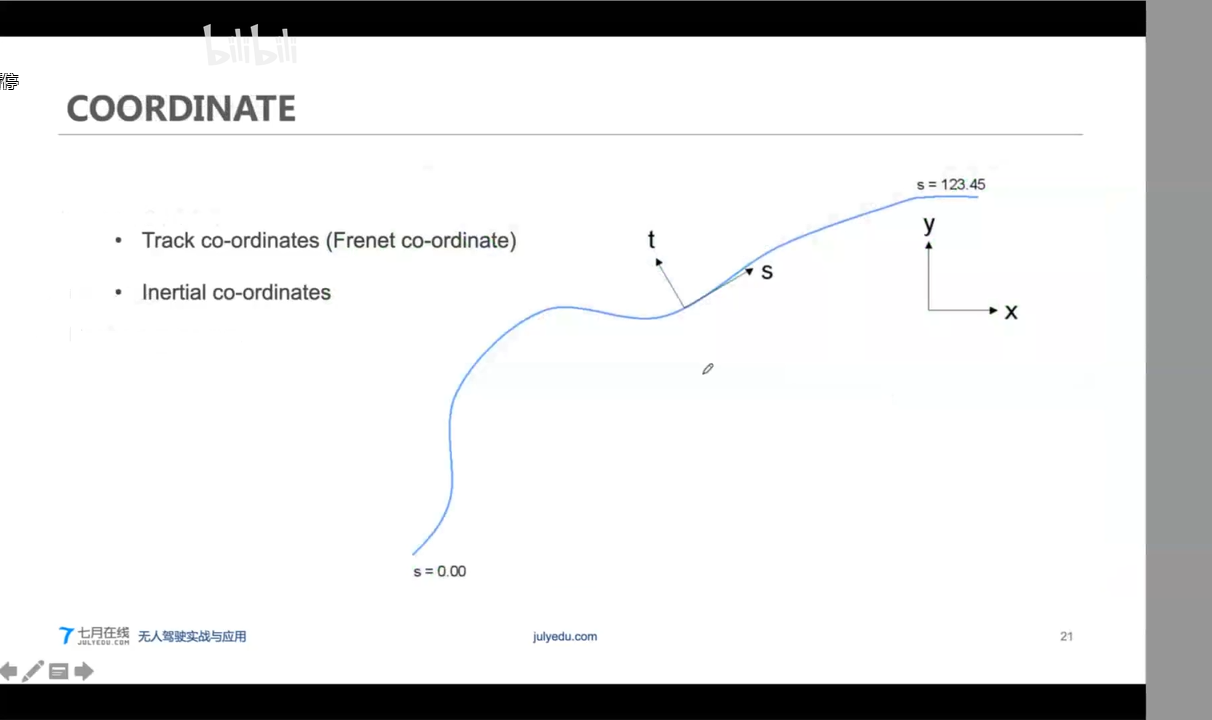
- 坐标系转换
- 旋转坐标
- 平移坐标
- 齐次坐标系,变换矩阵
- 欧拉角
- 四元数
3.4 相机模型
1)相机成像的原理是针孔相机模型:
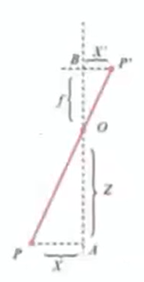
—-P表示物理世界中的一个点;P’表示成像中模型中的位置;坐标分别为XYZ和X’Y’Z’
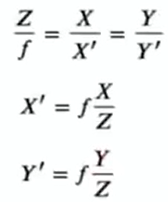
—-相似三角形关系:
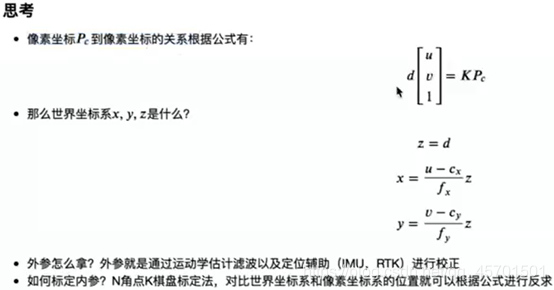
2)相机内参
将成像坐标P’切换到像素坐标系中,要进行两步转换:缩放和原点平移
假设P’的像素坐标为[u v]T(表示列矩阵),变换坐标就是:

把这个形式切换到齐次坐标系:
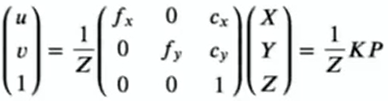
这里的K就是我们说的内参矩阵,也就是每个相机需要校准的内参
3)相机外参
注意一下,这里的P是相机坐标系下的位置,而其世界坐标系下的坐标Pw,可以根据旋转平移来得到:
$$
ZP_{w} = K(RP_w + t) = KTP_{w}
$$
—-这里有齐次变换到非齐次坐标的变换
—-因此,相机姿态R,T(t?是不是指的是上面公式的)又称为相机外参
—-外参会随着车辆移动而移动,因此我们高精地图构建过程中就是需要去估计这个外参,同时也是车辆移动轨迹
4)数据结构
–PGM数据格式:Portable Gray Map,最简单的灰度图数据格式,这里我们拿来表示把点云压成平面的深度信息(0-65535),其中0表示没有检测到深度
–png:RGB信息的常用格式
–pose:5组7状态,txt文档,[x y z qx qy qz qw],平移向量和旋转四元数
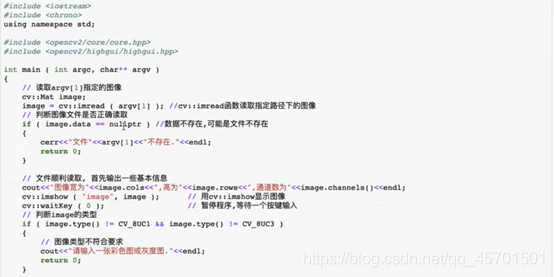
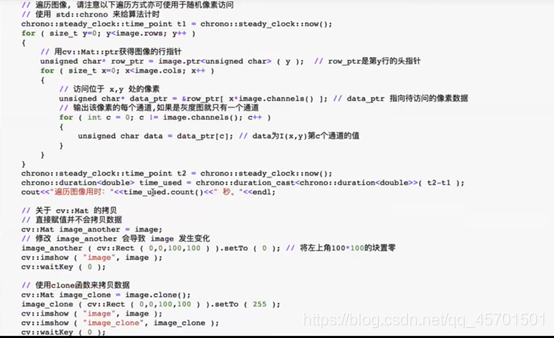
5)代码示例:
–根据相机内参计算RGB和点云的对应关系
–根据各图相机外参把点云和RGB融合进行图片融合,构成全局地图
【源码是老师的,没有放到云端,下面就是部分截图,仅供参考】
todo
通过该函数,可以获取得到点云图
【下面偷个小懒,截个图算了,哈哈哈】
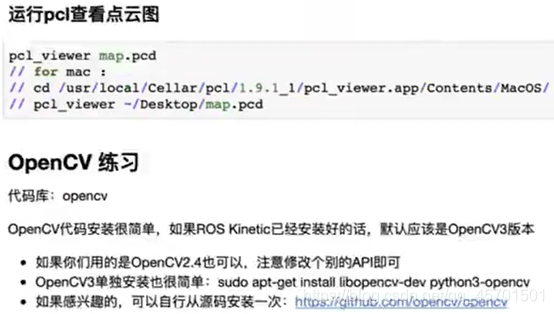
OpenCV 练习

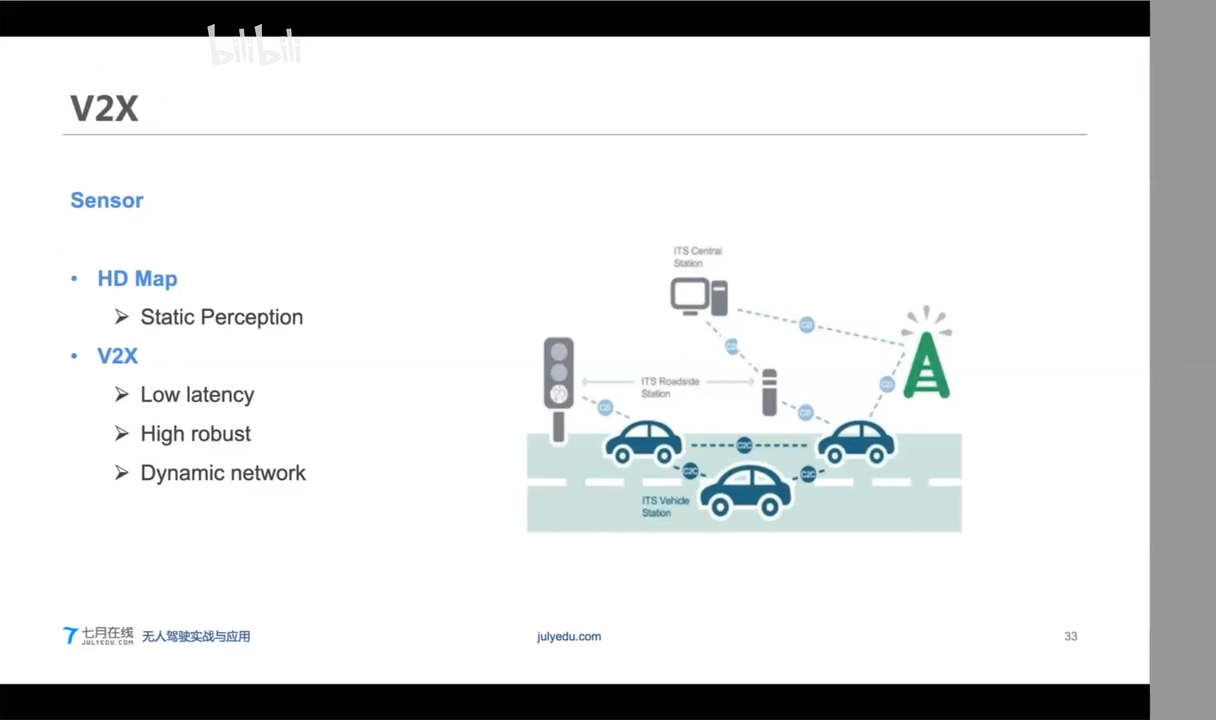
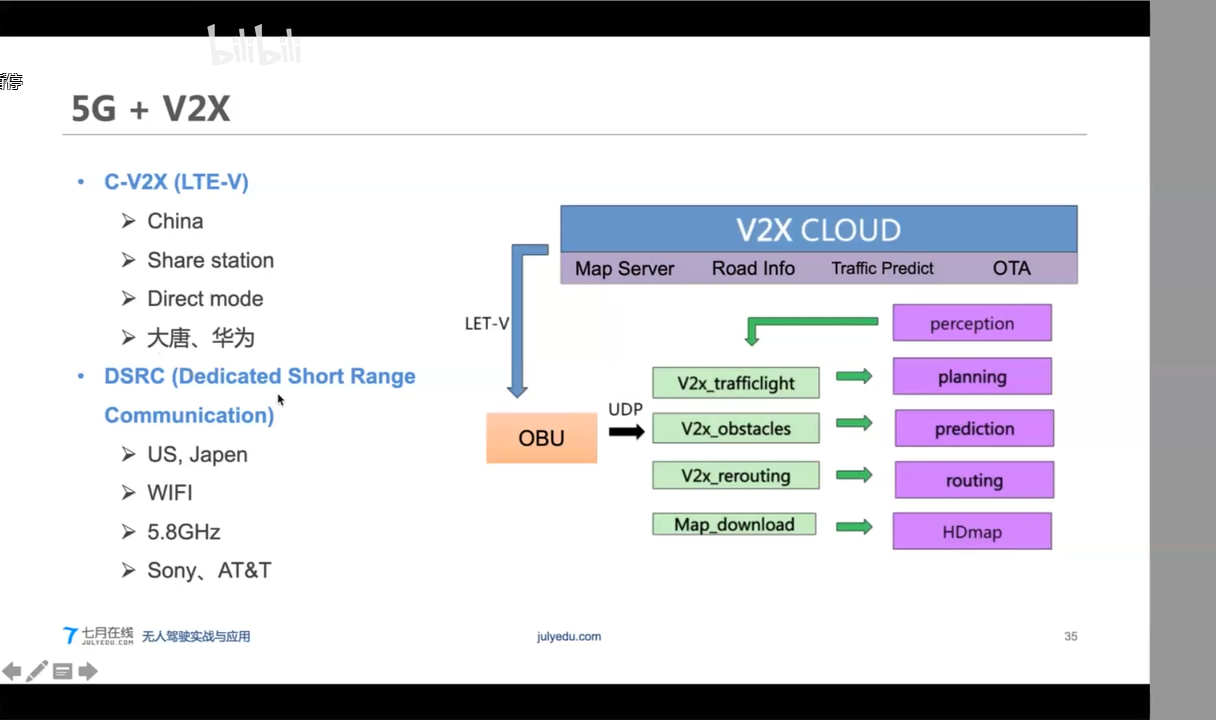
4. V2X
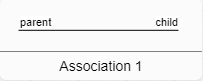
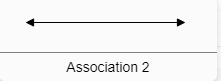
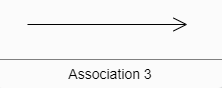
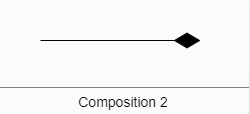
UML

无人驾驶(5)动态环境感知与3D目标检测
[TOC]
5.1 基于激光雷达点云的检测算法 (3D检测)
- 激光雷达点云简介
- Pixel-Based
- Voxel-Based
- Tree-Based
- Point-Based
- 实战基于点云的目标检测
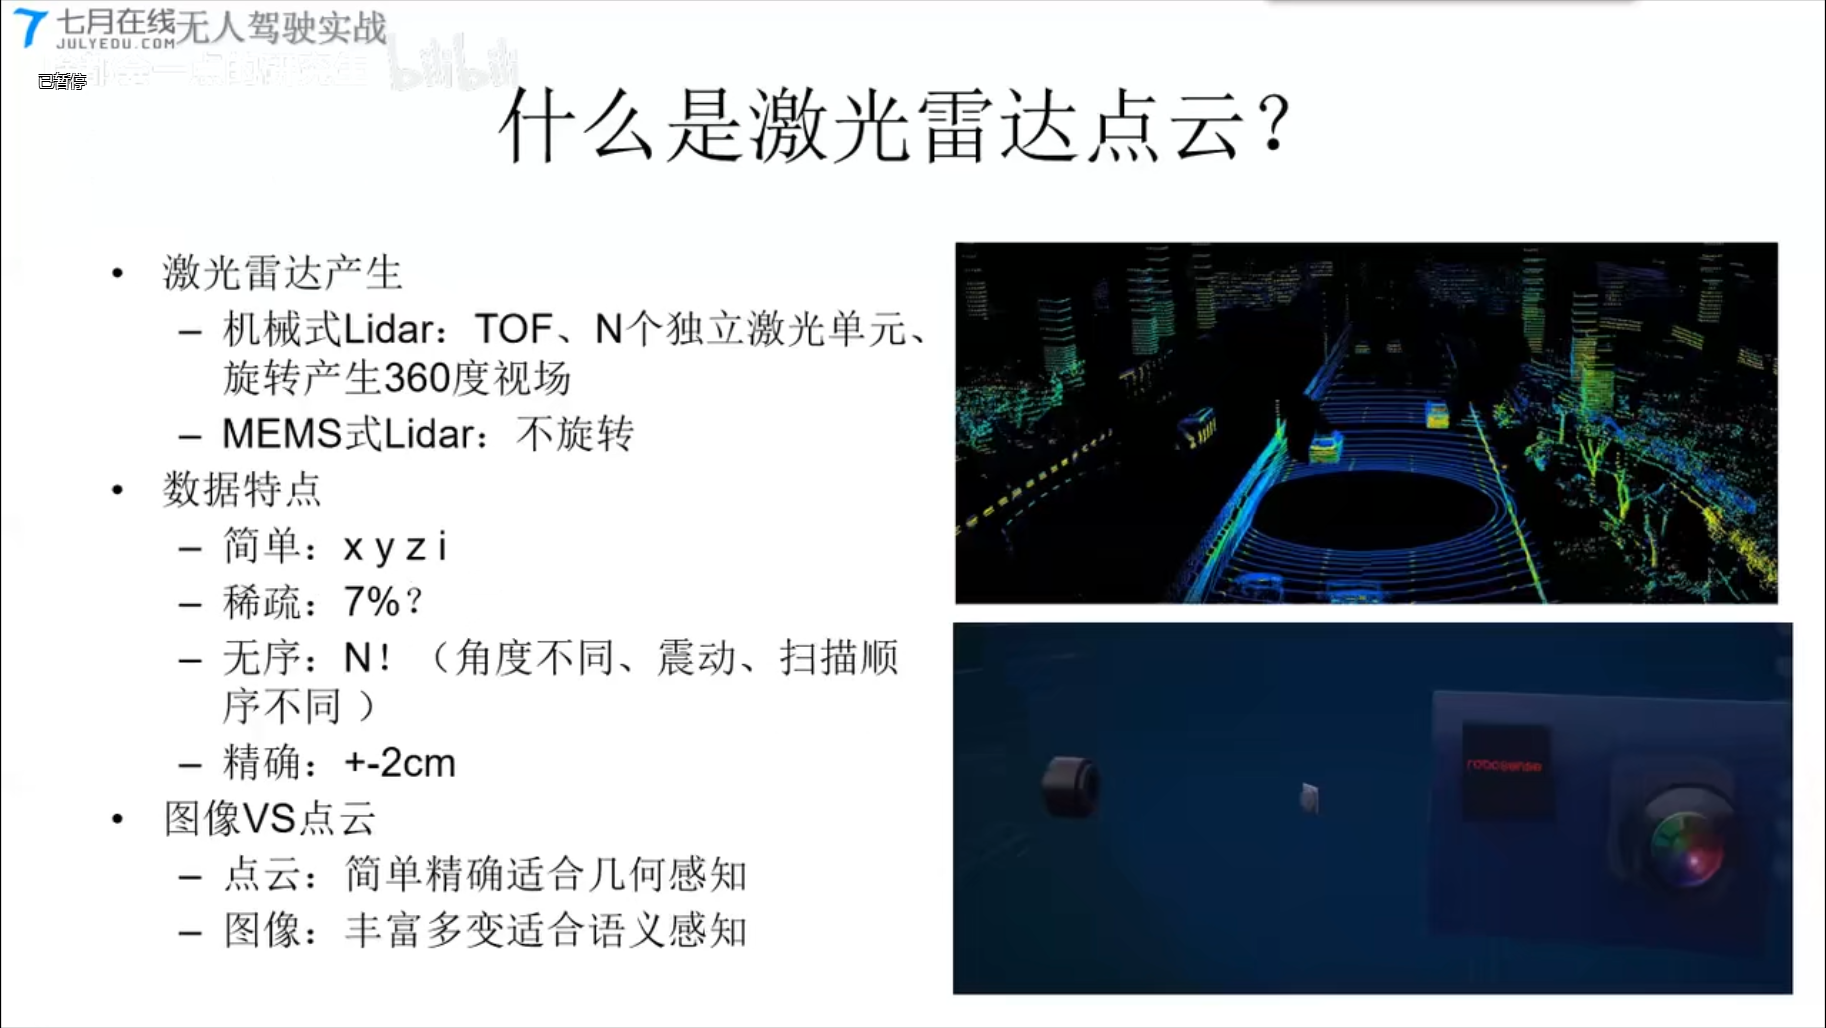
0、激光雷达点云简介
什么是激光雷电点云?
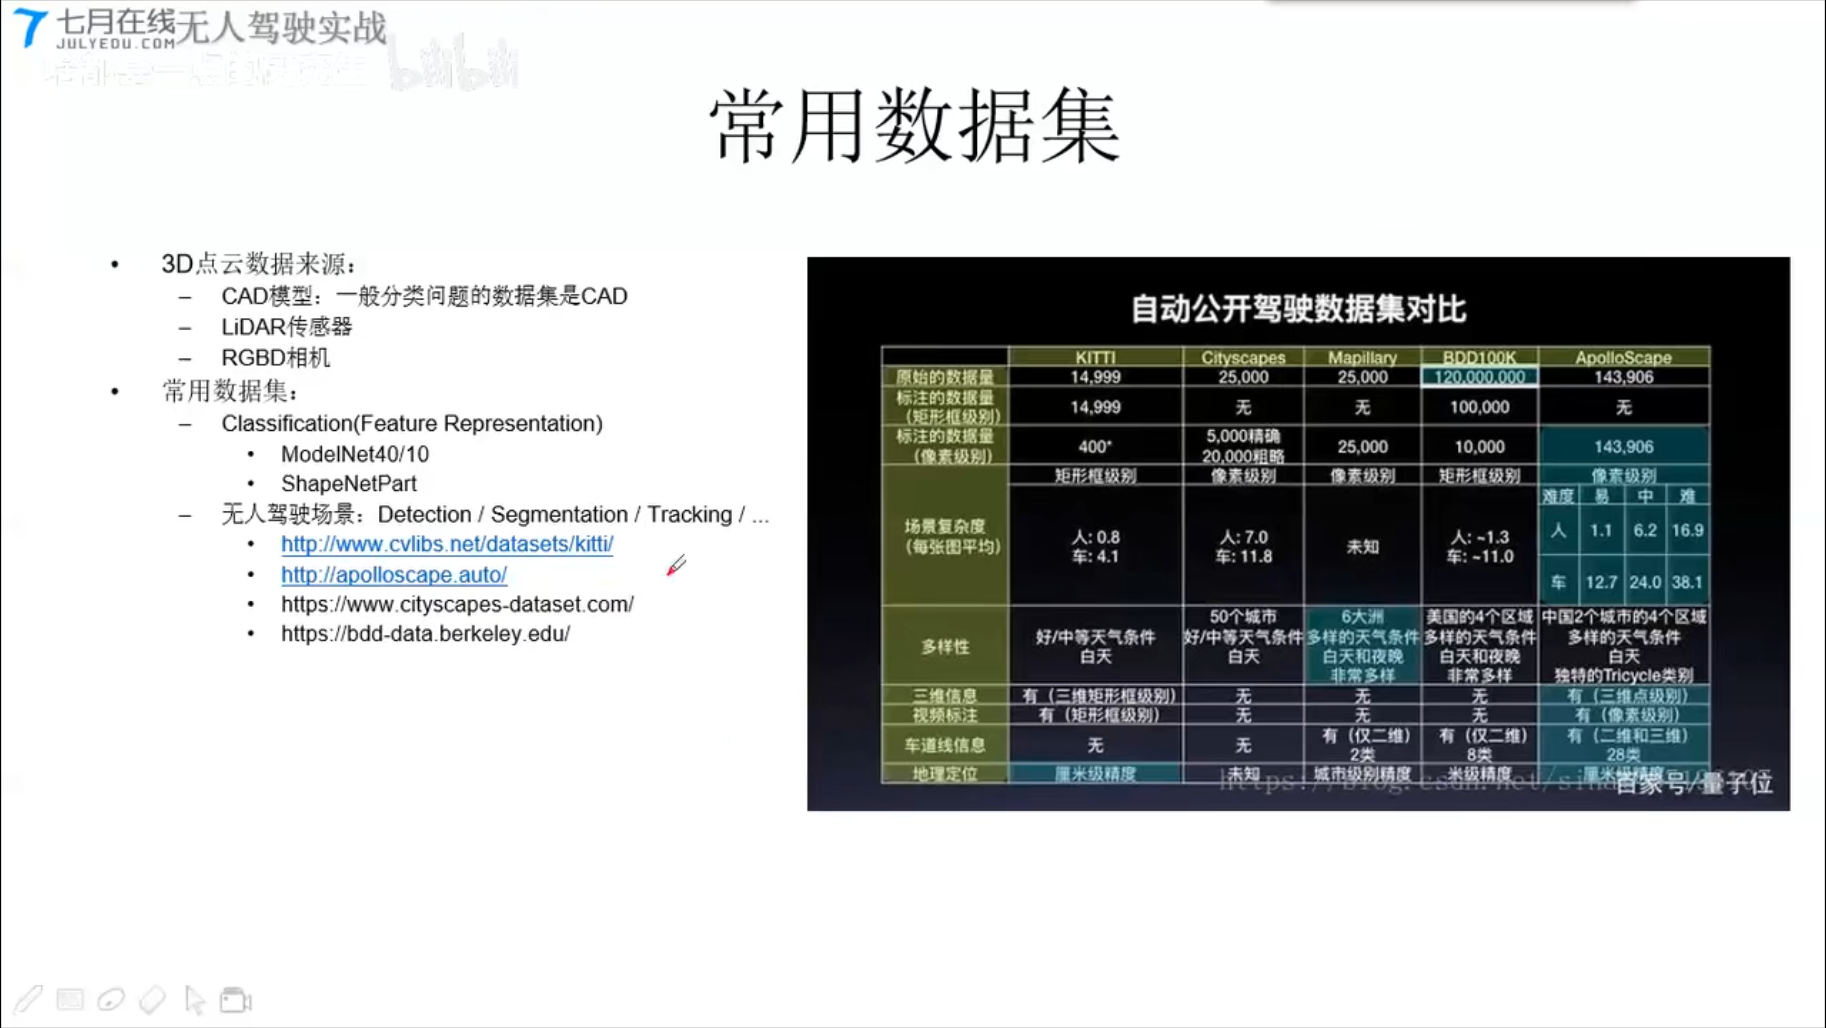
常用数据集
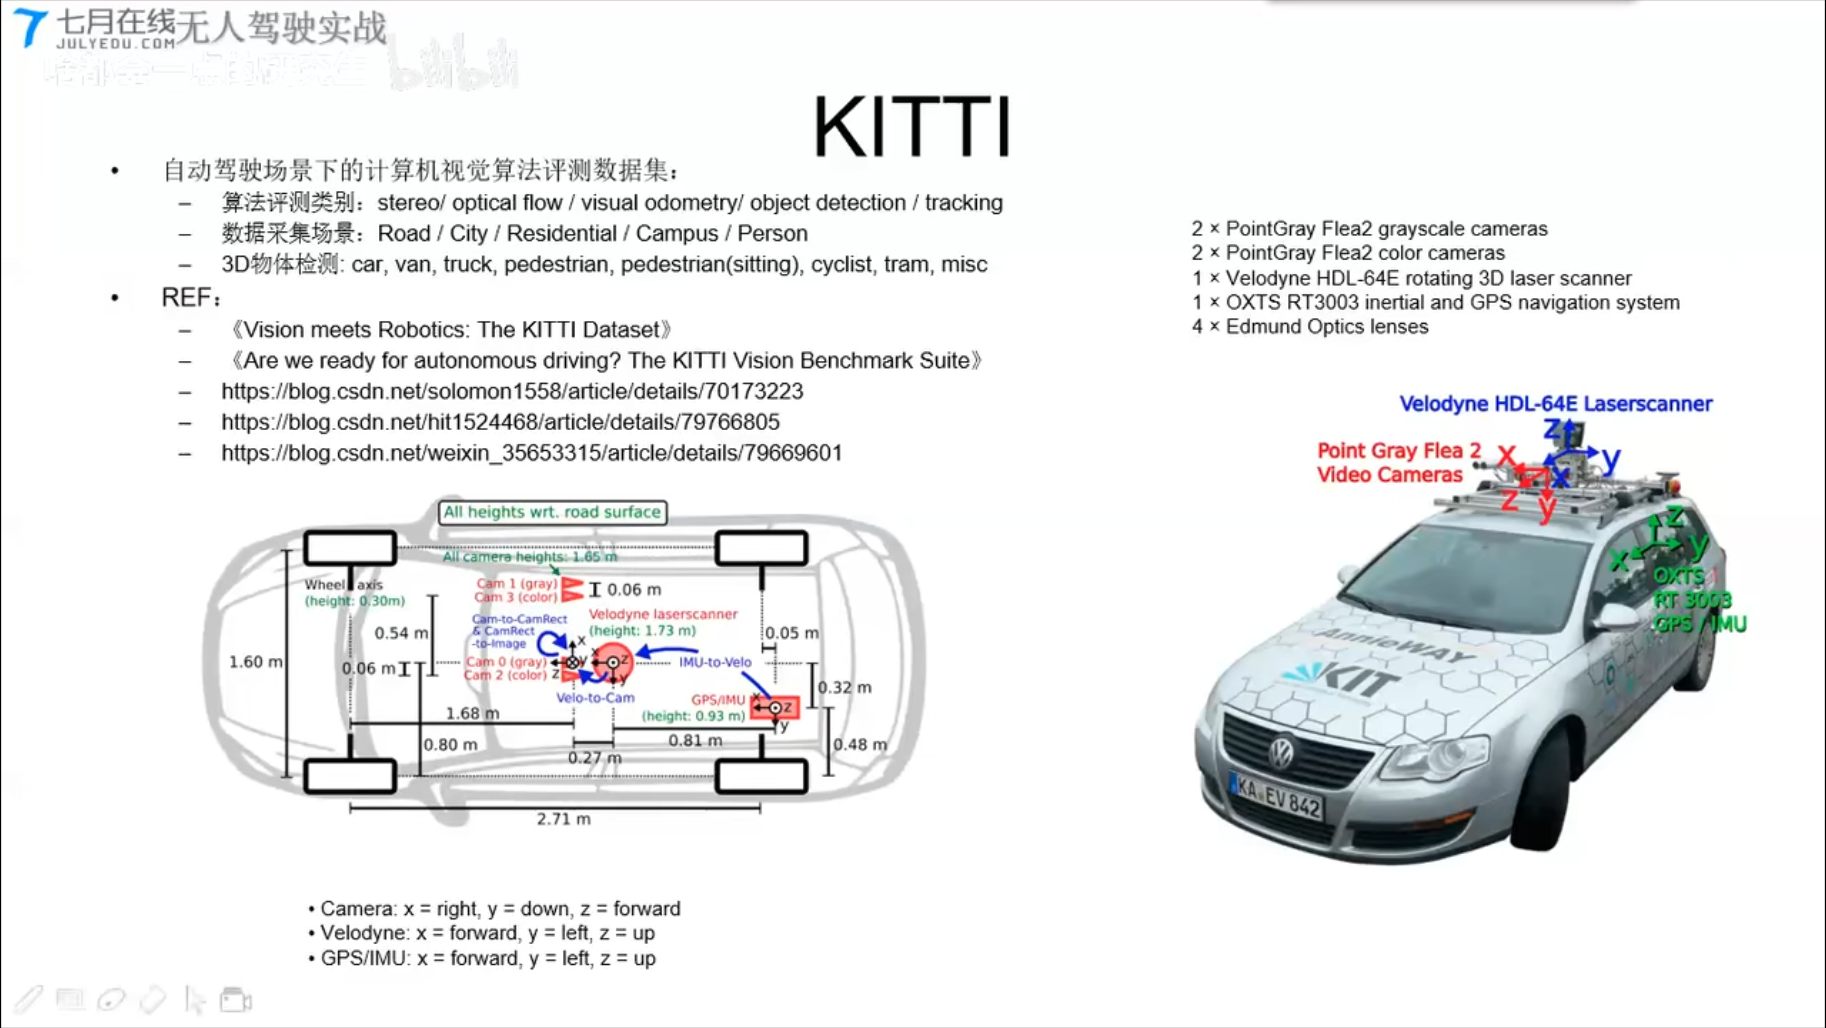
KITTI 实战kitti LIDAR点云生成鸟瞰图BEV
点云基础 - 将点云投影到图片上
- BEV: 俯视图
- Lidar Point on Image

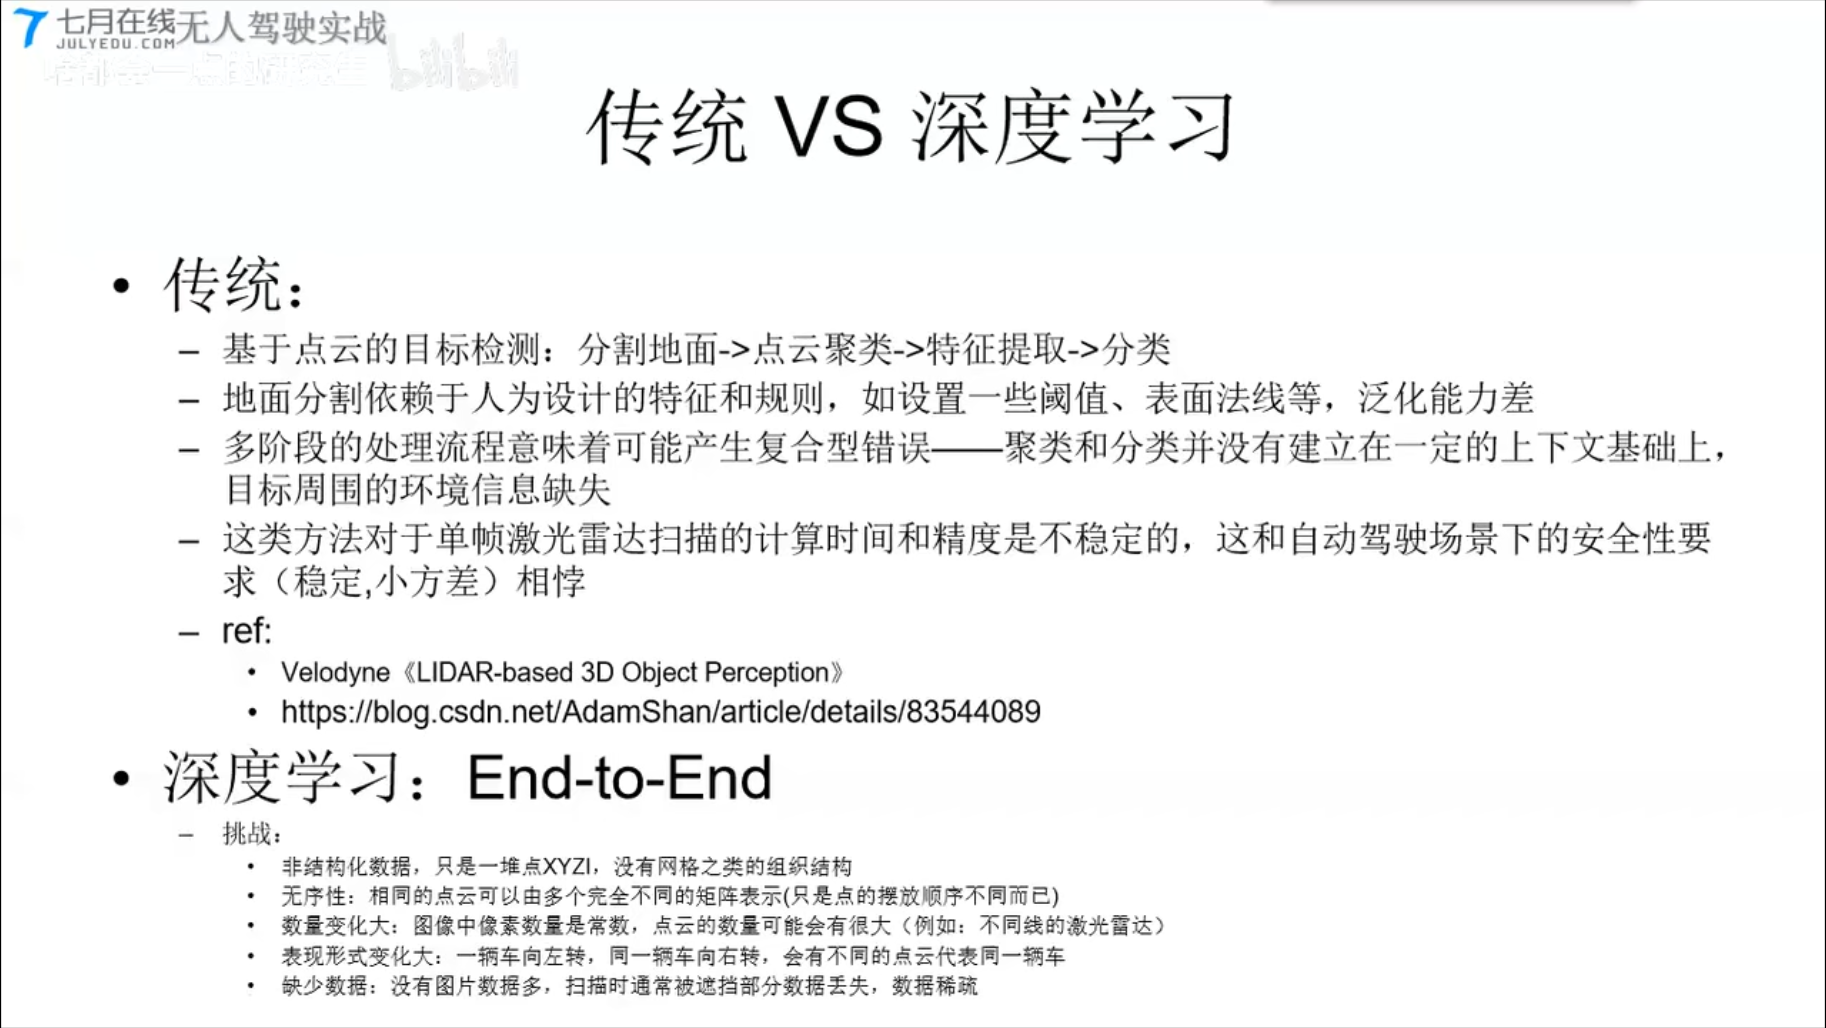
传统VS深度学习
1、基于像素的点云算法(Pixel-Based)
- 基本思想:
- 3D-2D, 三维点云在不同角度的相机投影(映射)
- 再借助2D图像处理领域成熟的深度学习框架进行分析
- 典型算法
- MVCNN, MV3D, AVOD
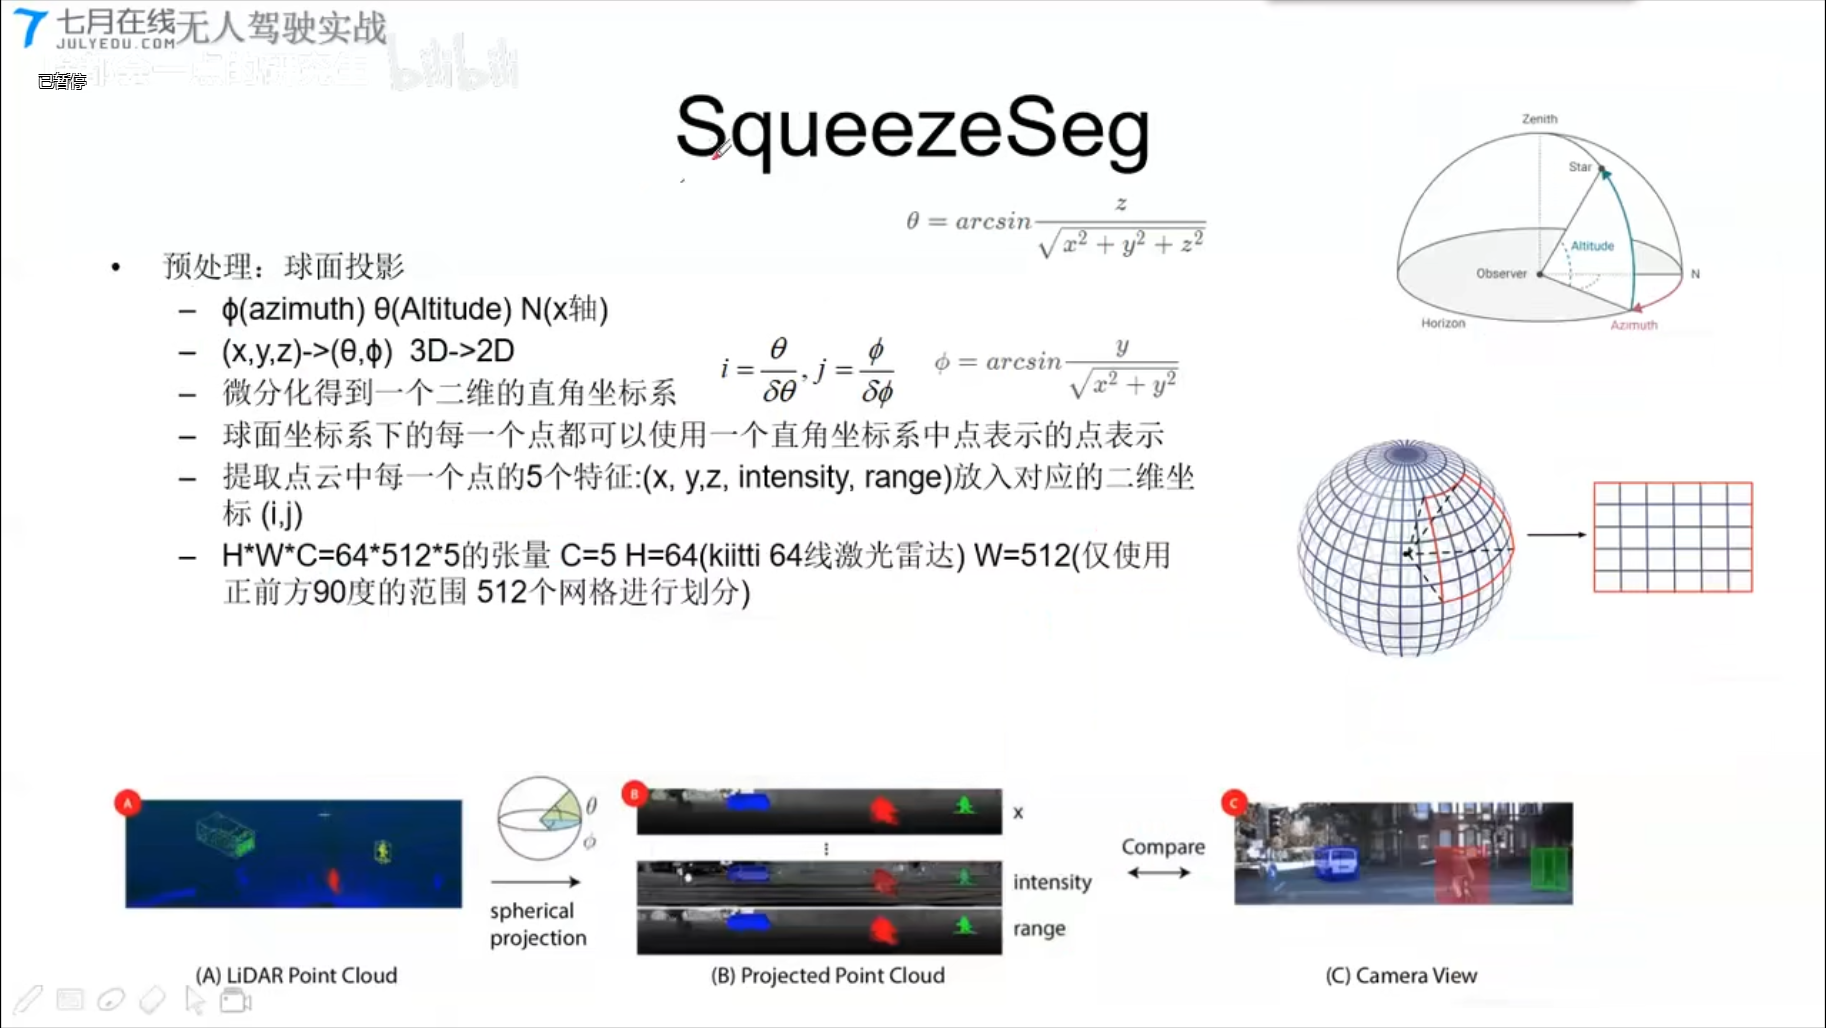
- Apollo2.0 SequeezeSeg
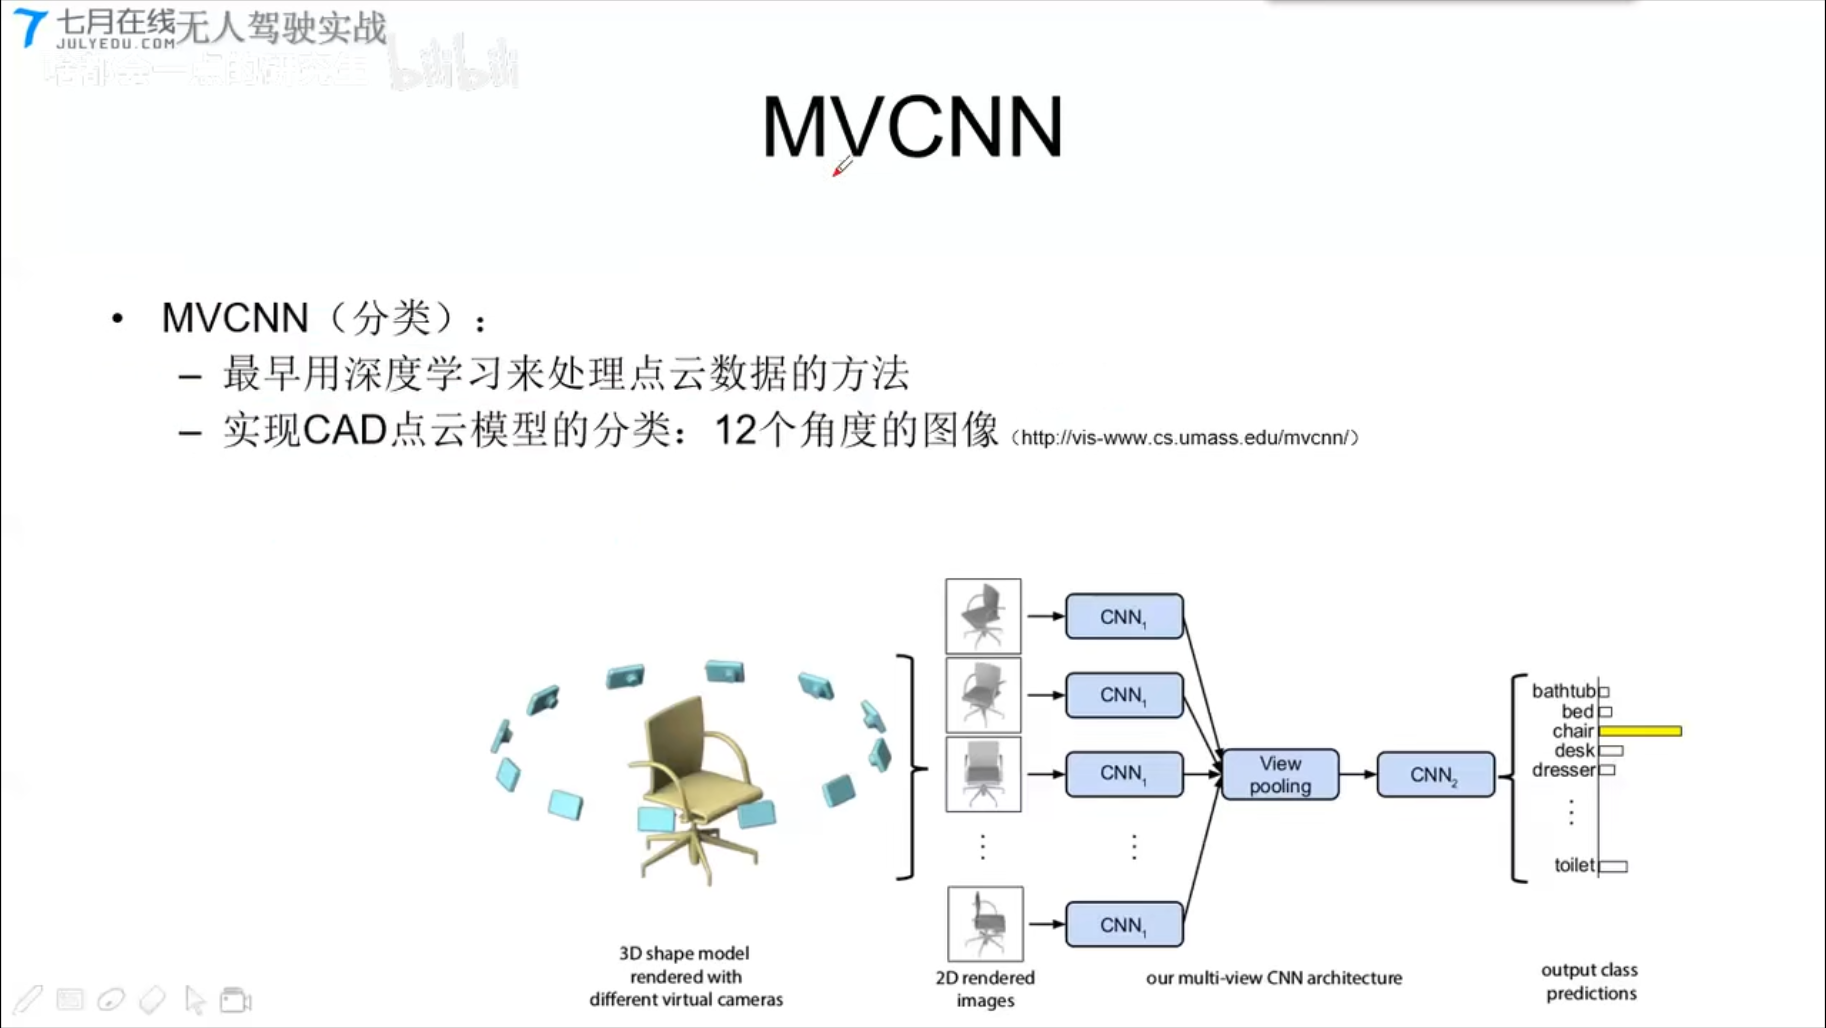
MVCNN (分类)
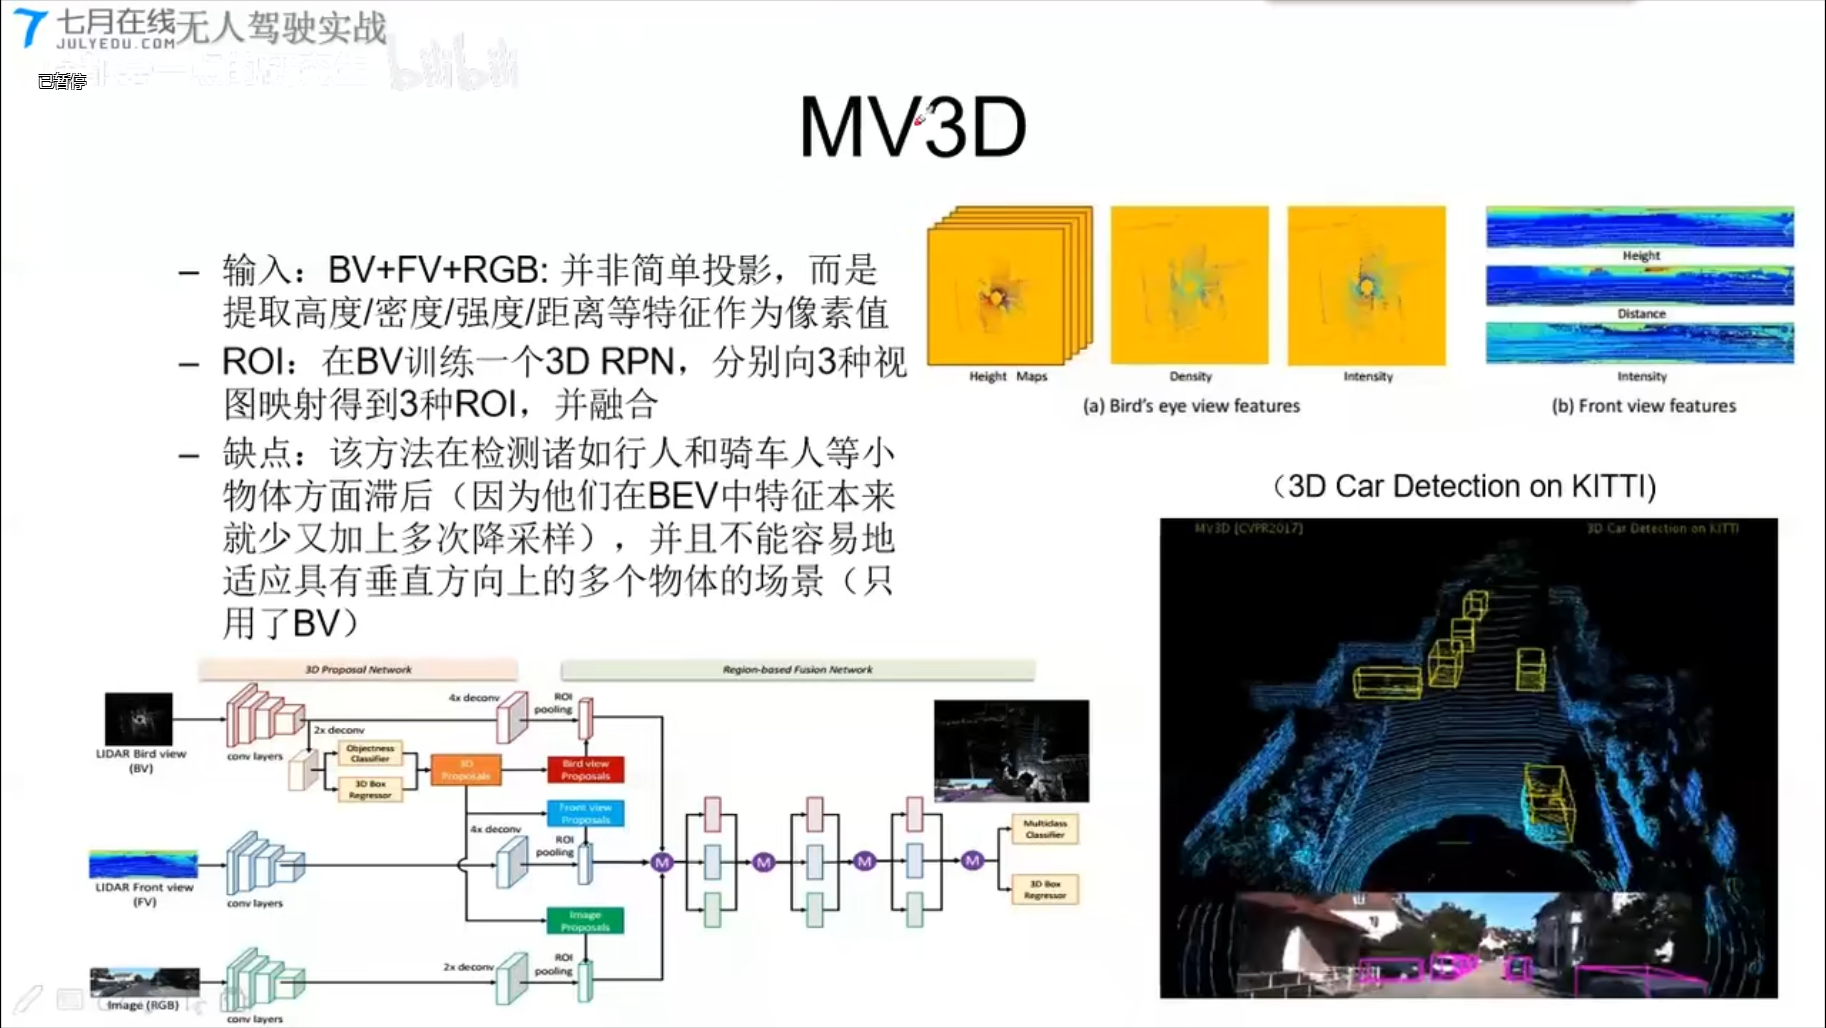
MV3D
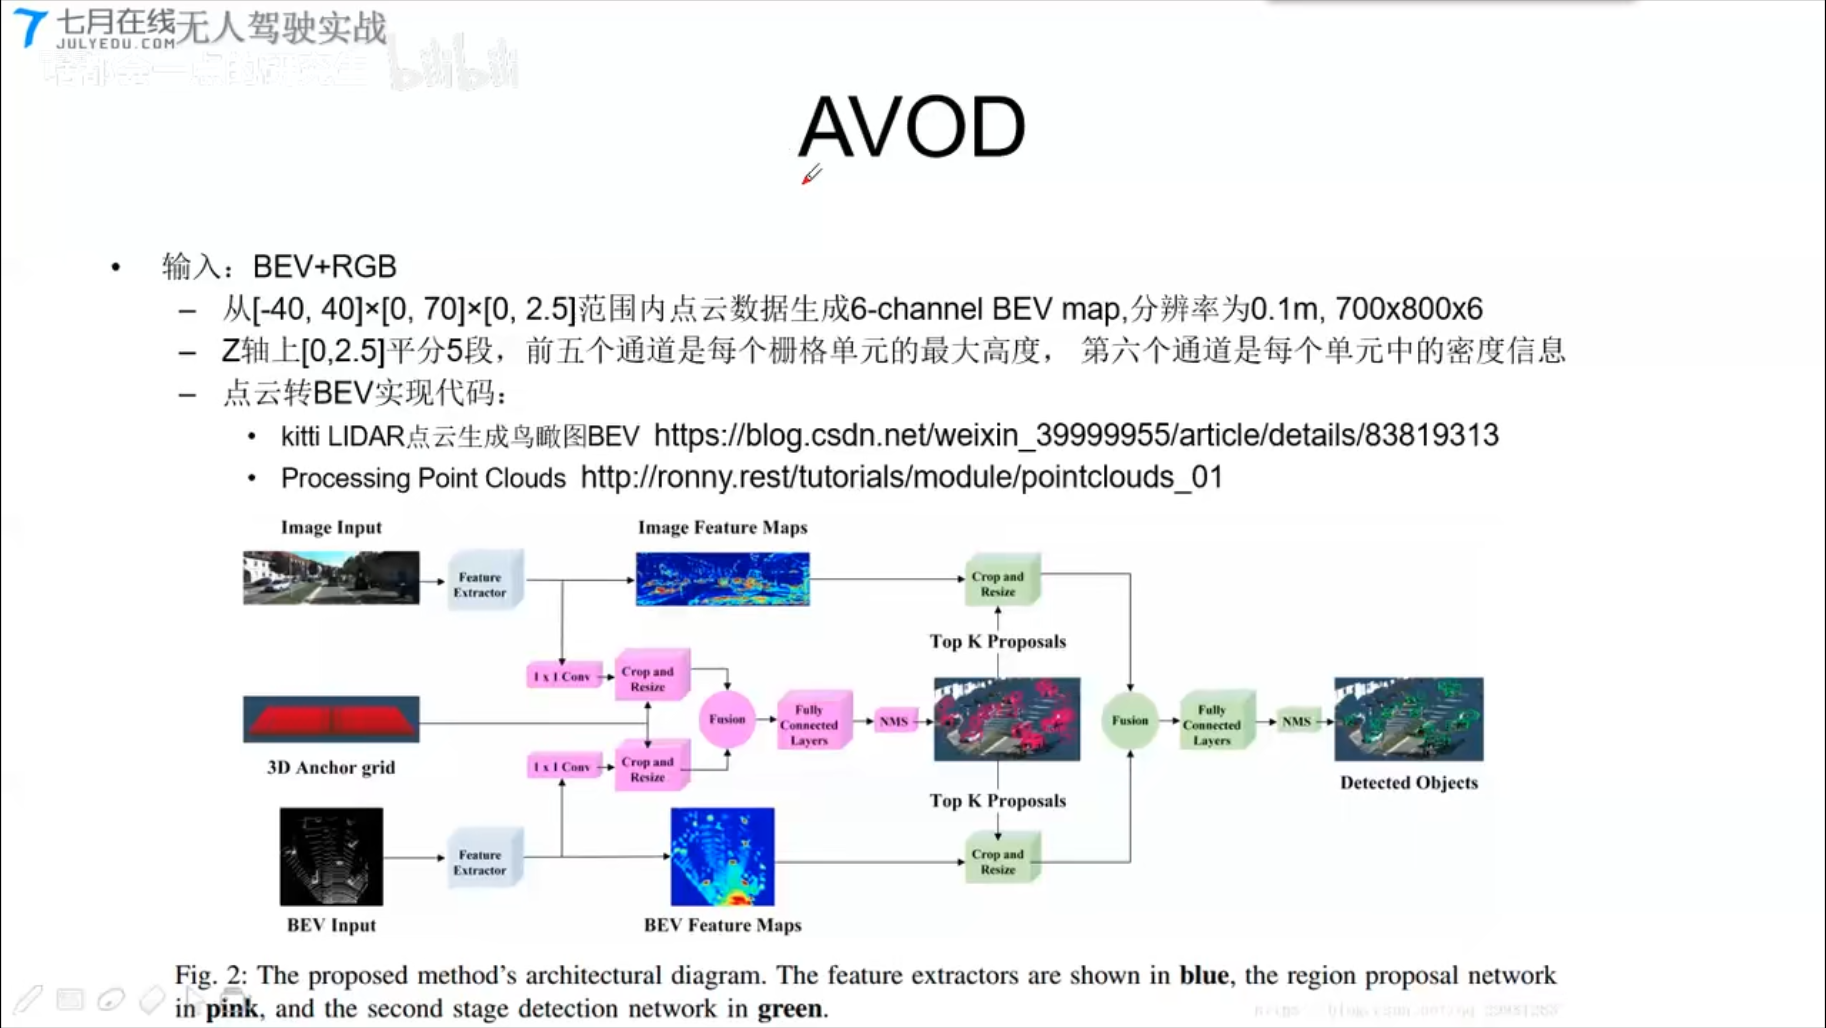
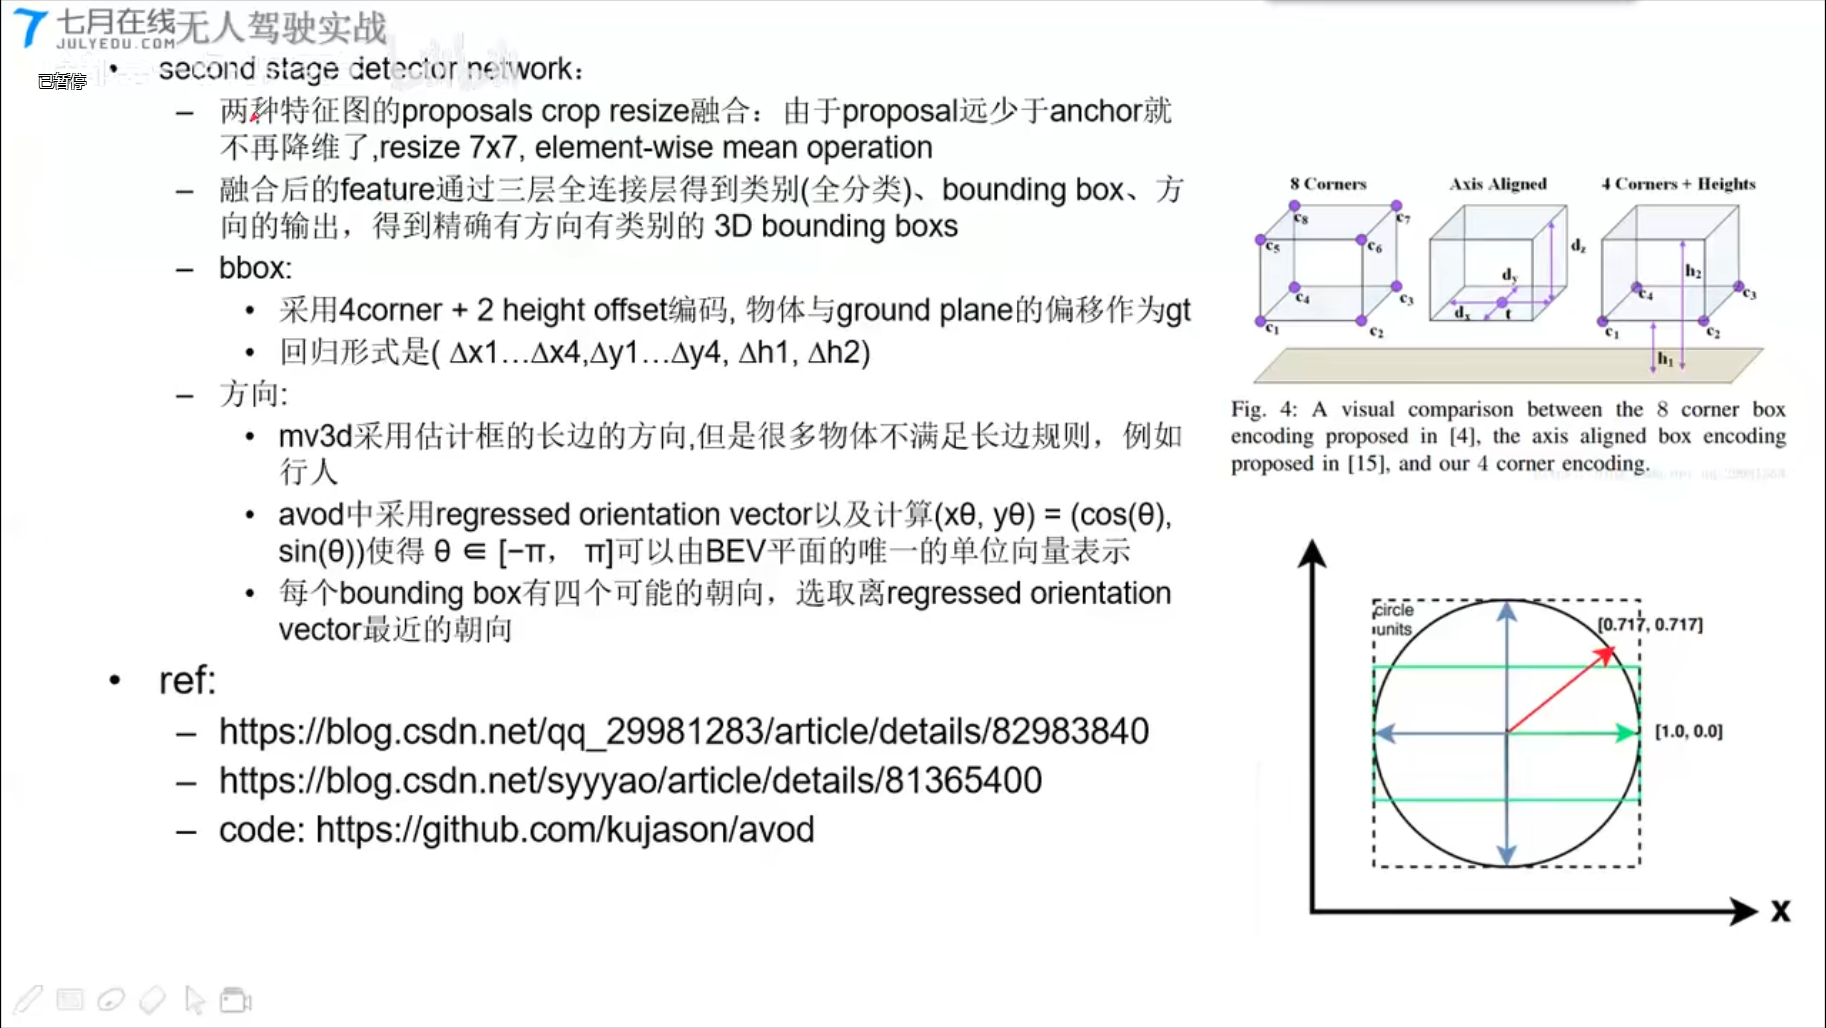
AVOD
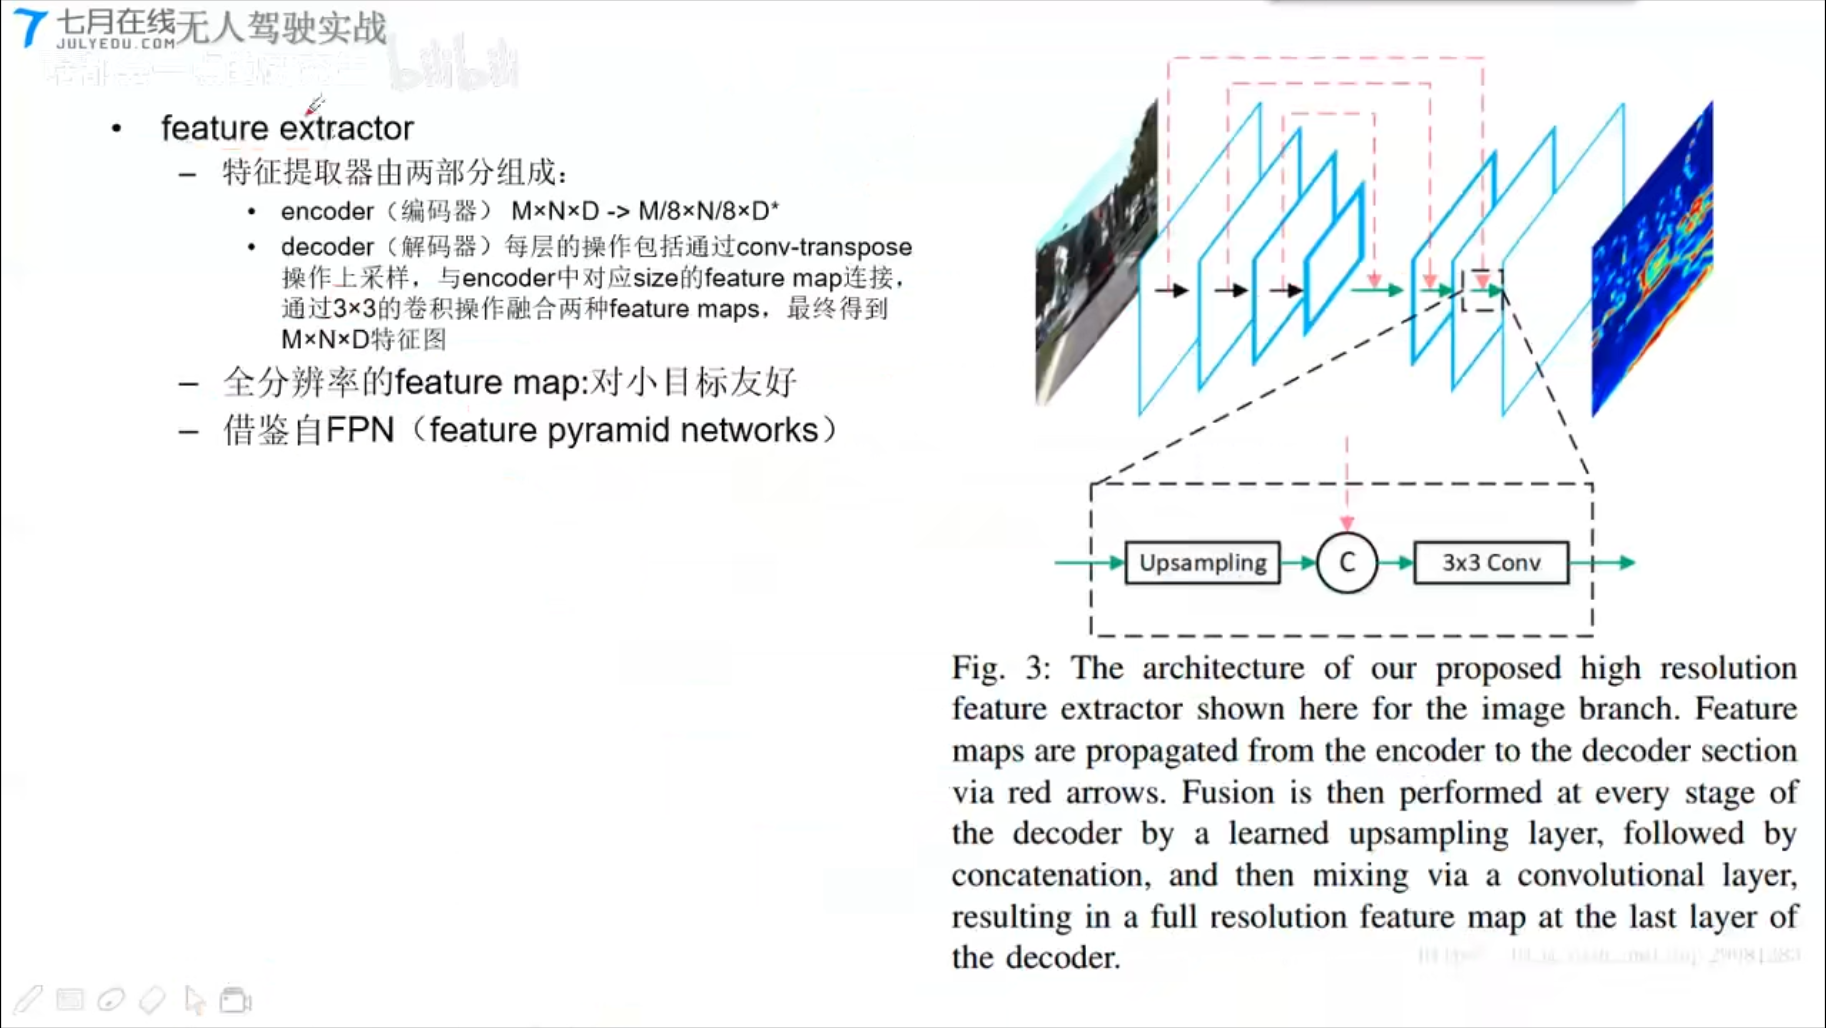
Feature Extractor
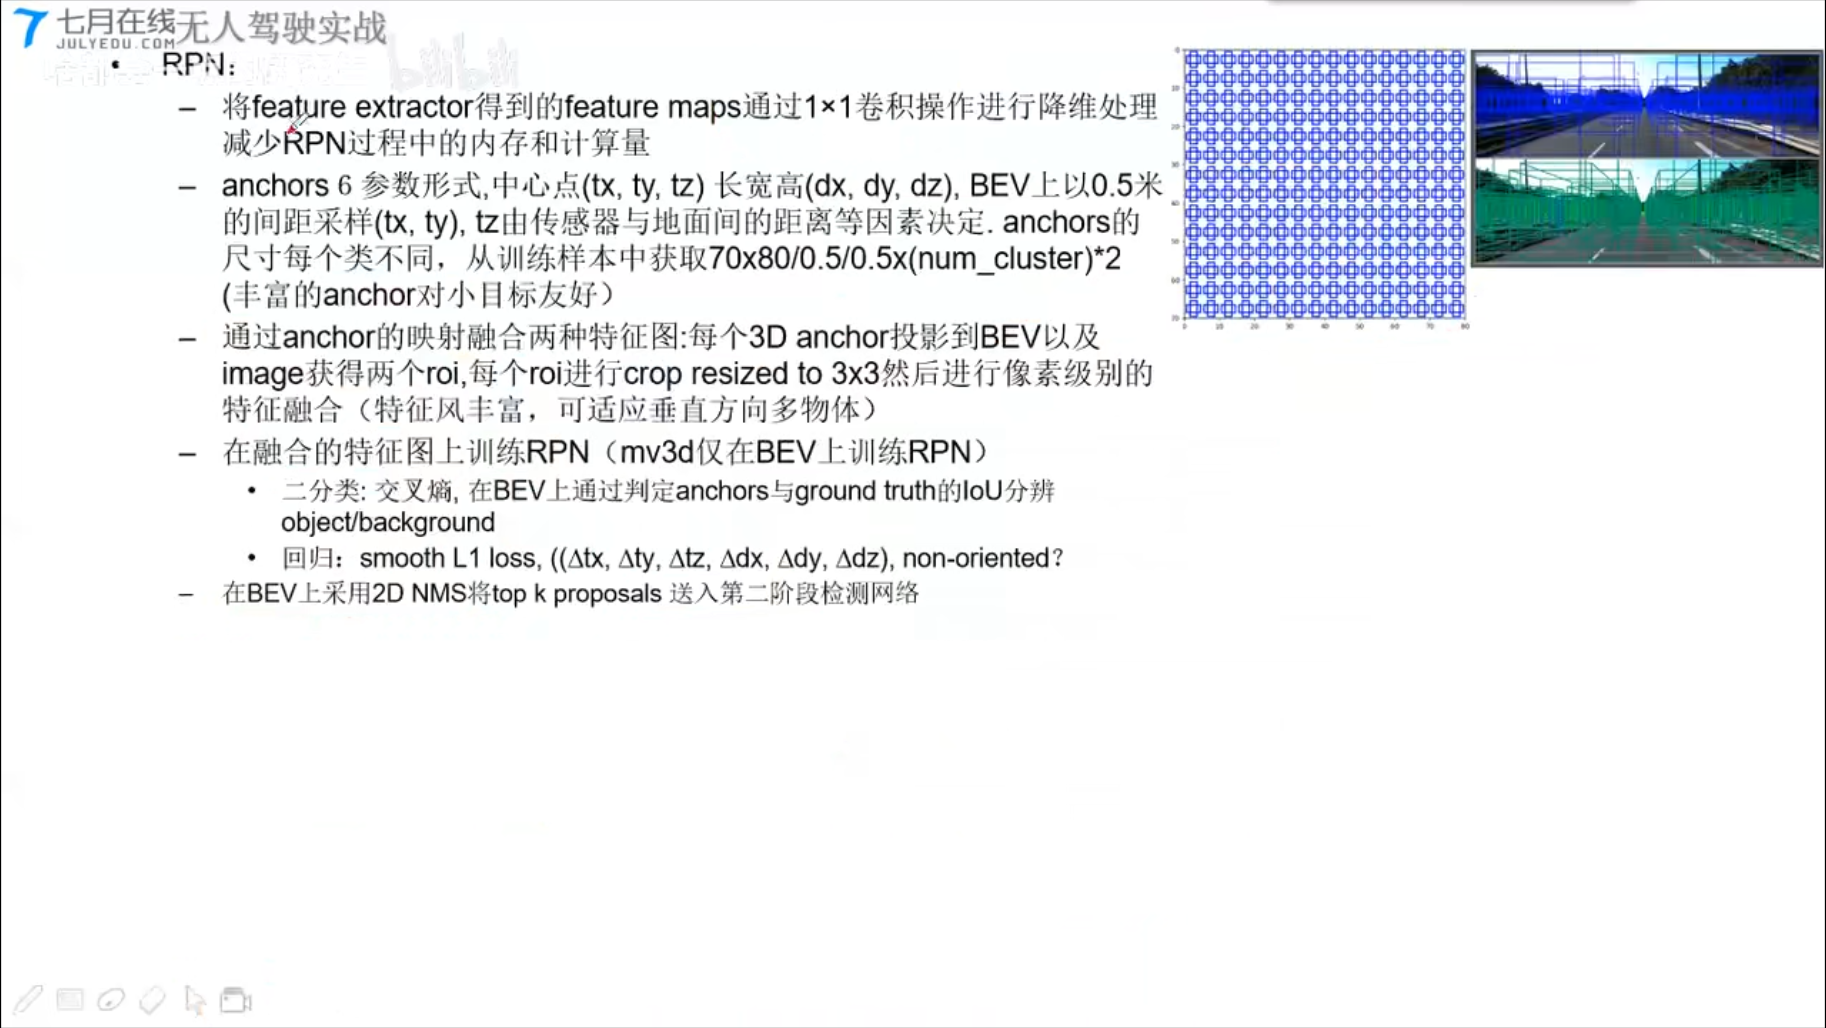
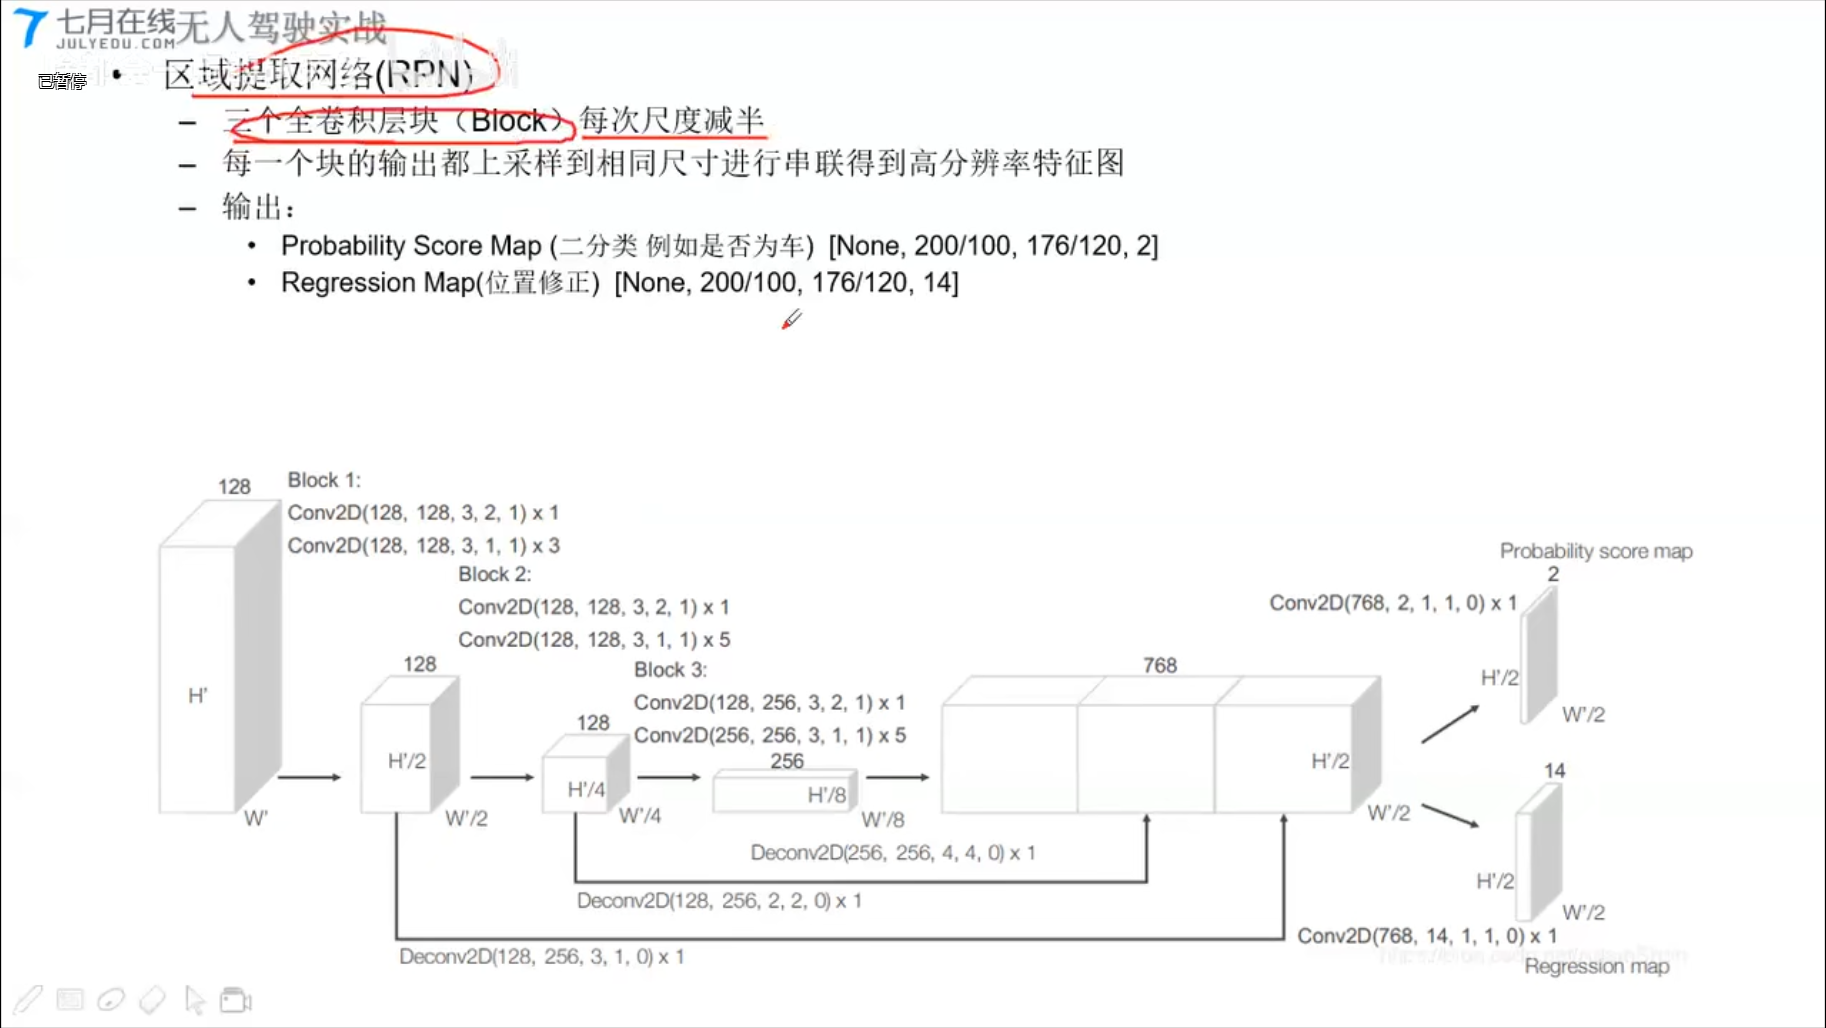
RPN
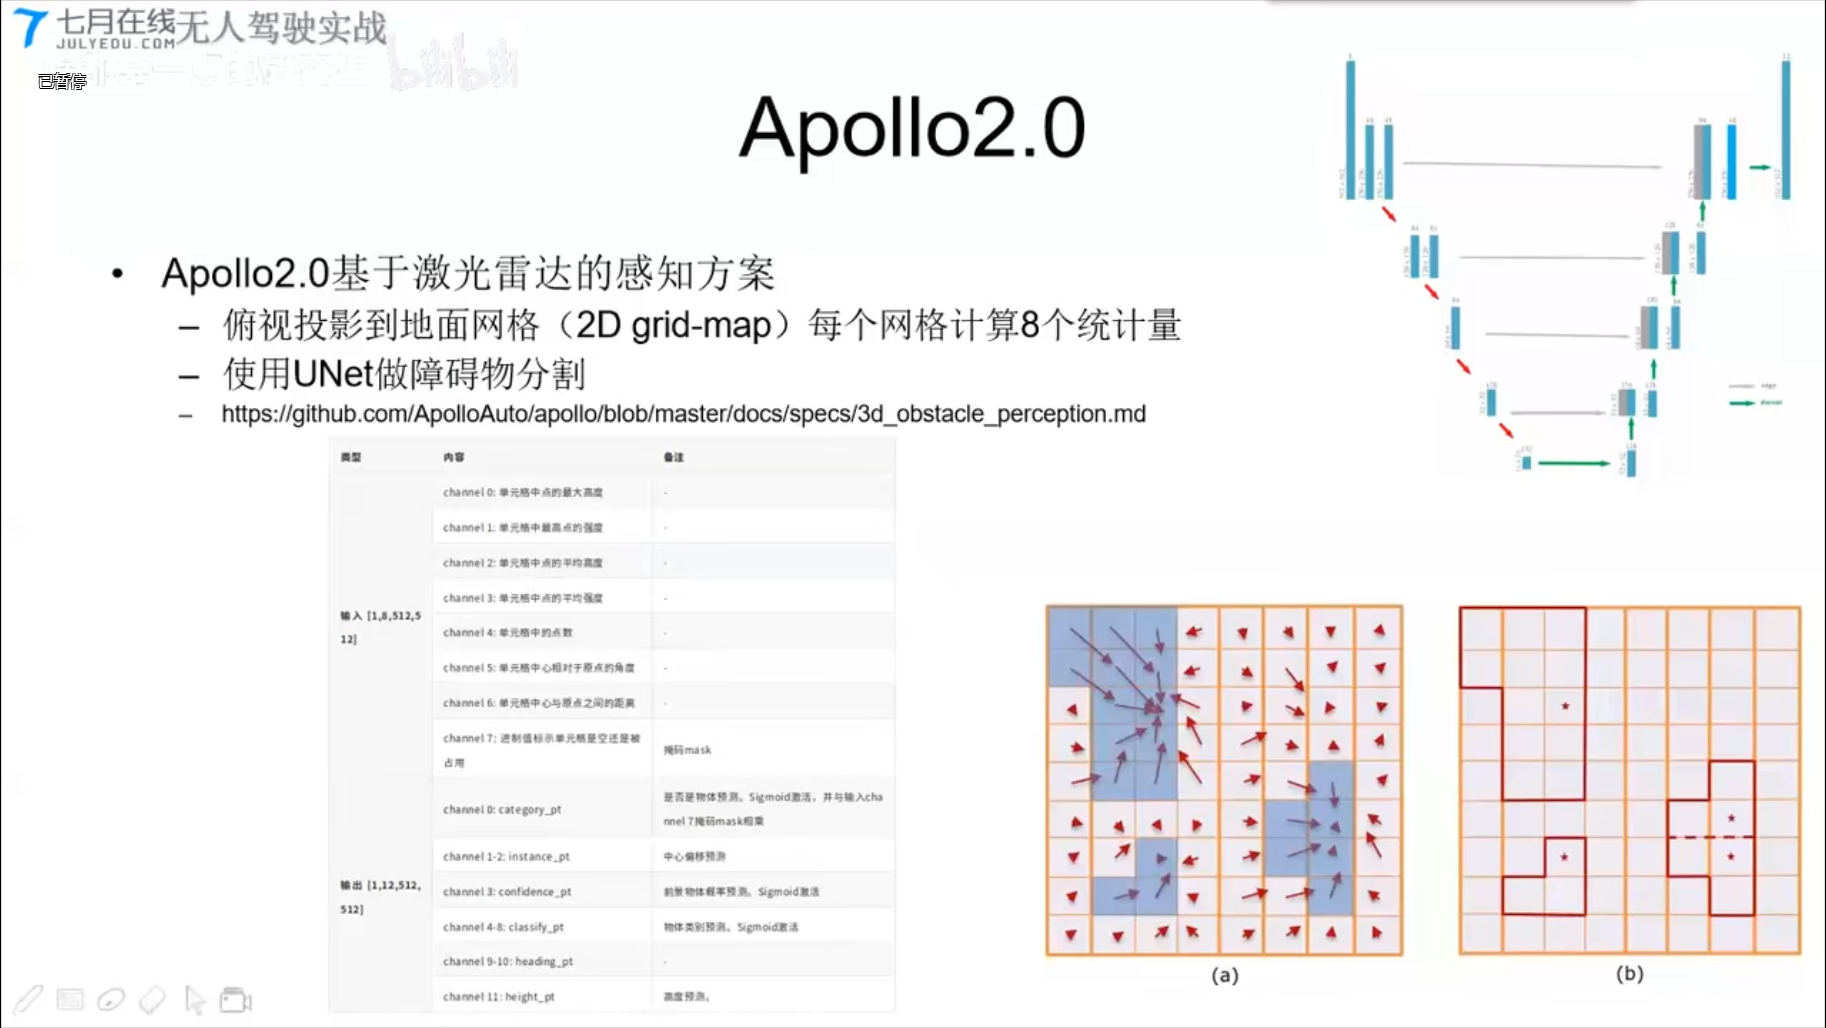
Apollo2.0
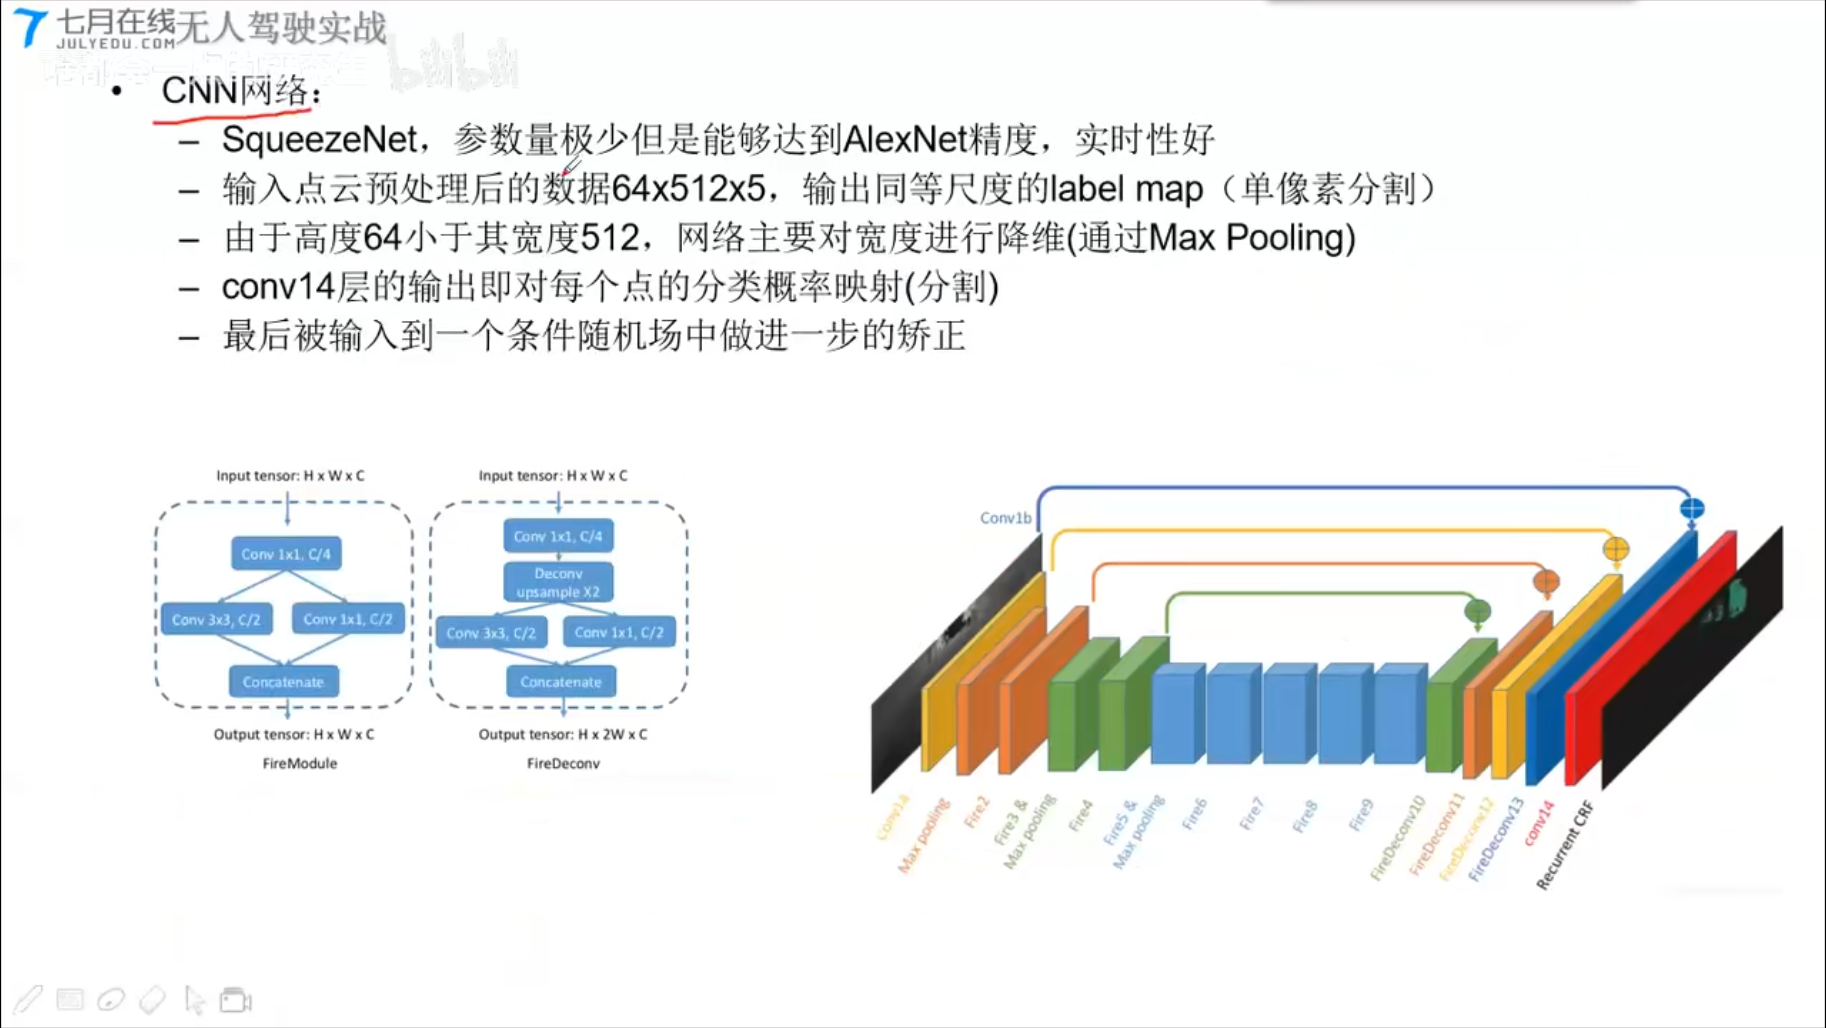
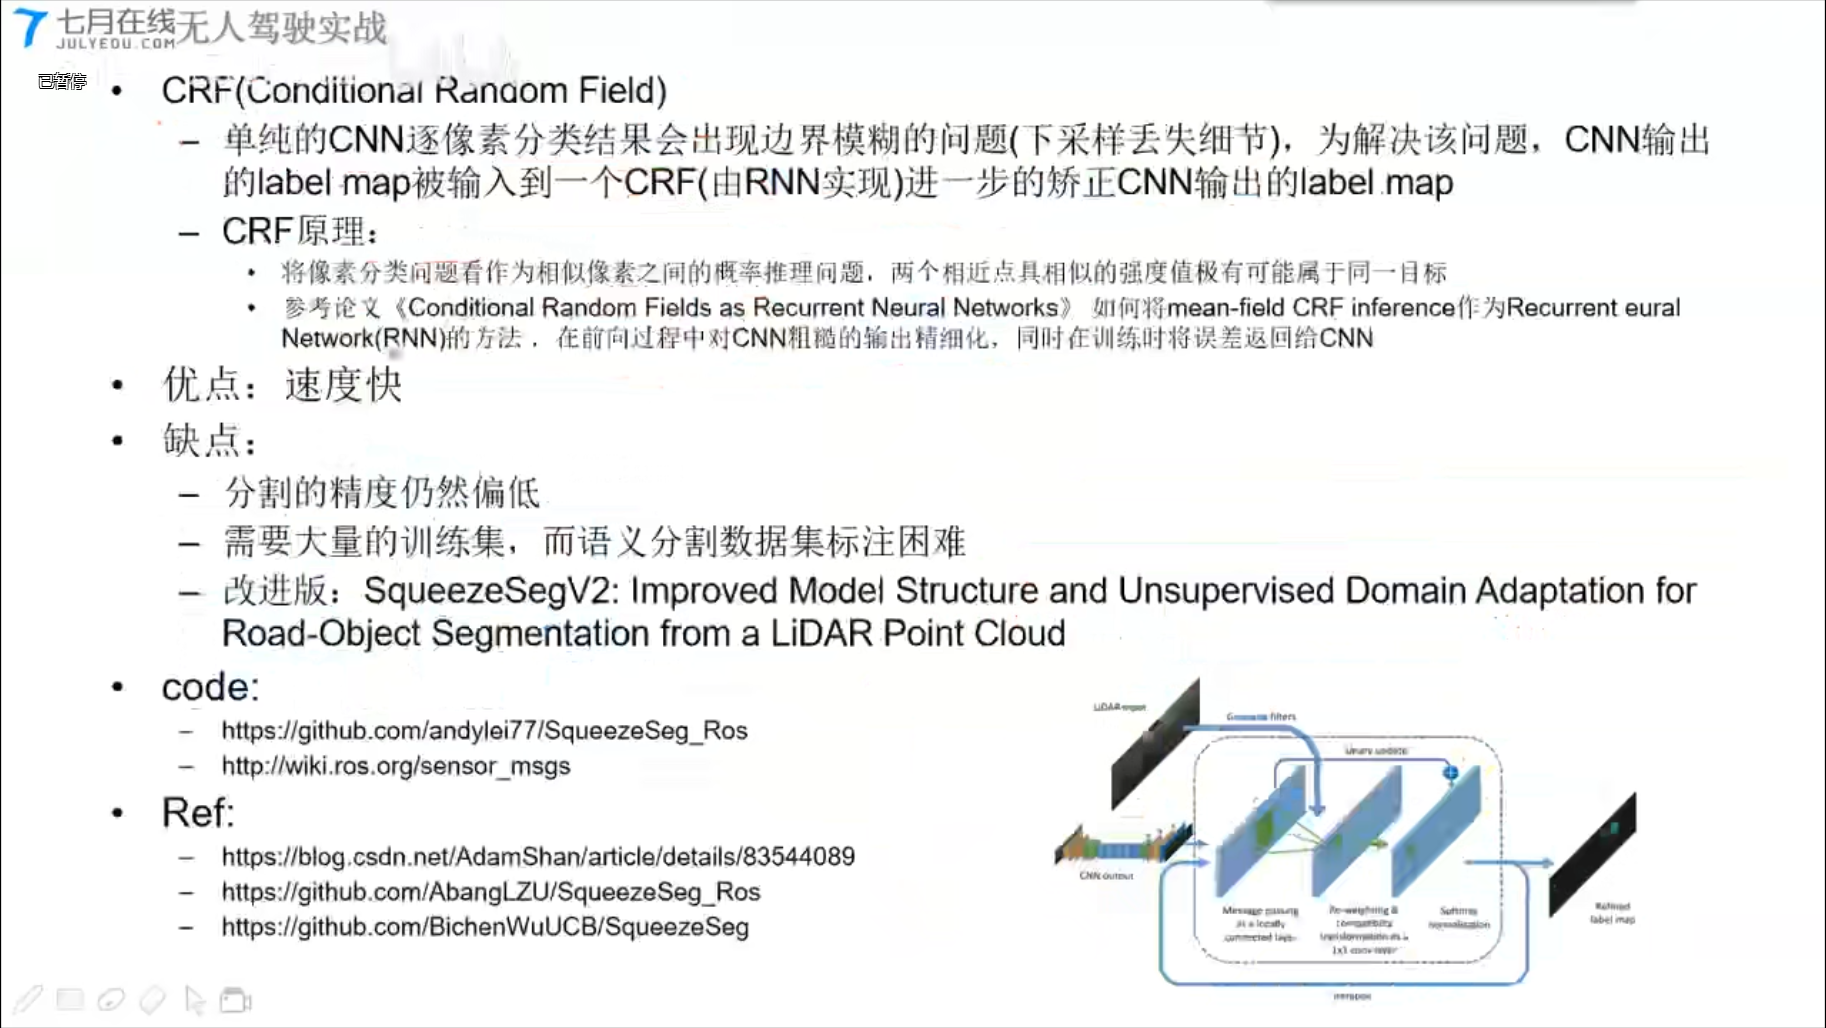
SqueezeSeg
代码实战:[tolearning]
无人驾驶汽车系统入门(二十六)——基于深度学习的实时激光雷达点云目标检测及ROS实现
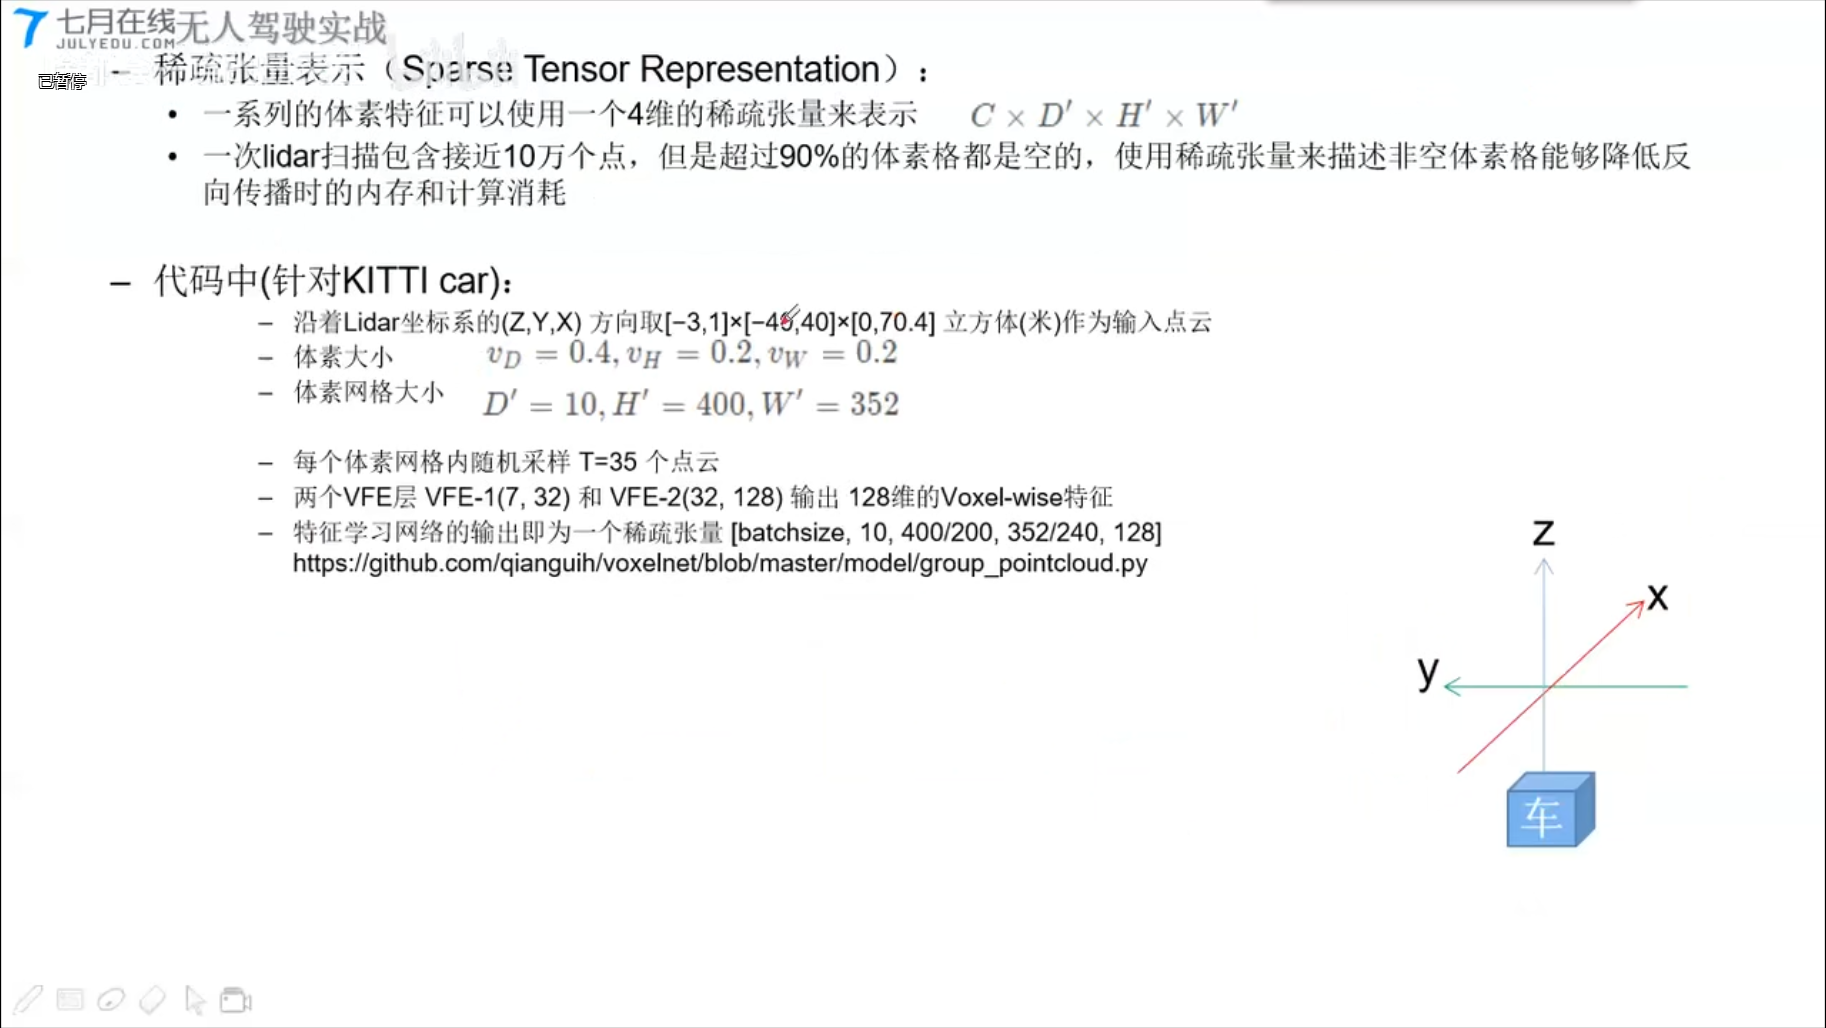
2、基于体素的点云算法(Voxel-Based)
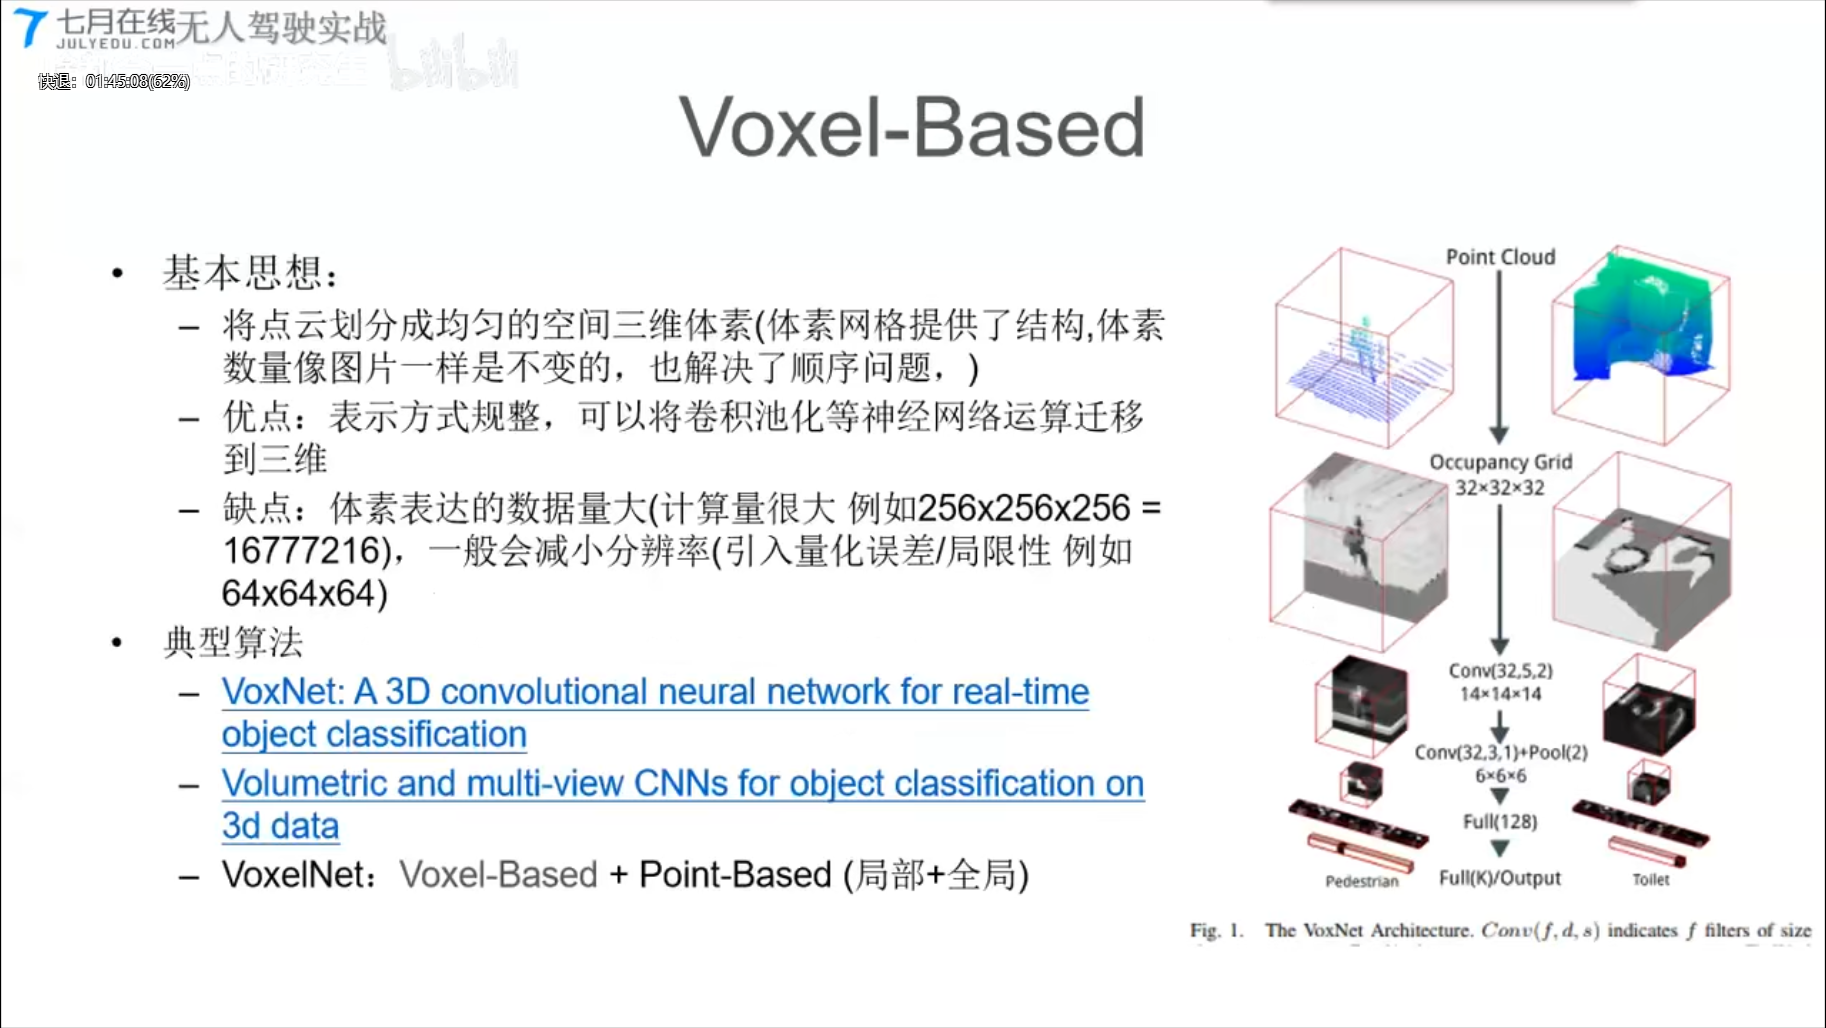
VoxNet
VoxelNet
= Voxel-Based + Point-Based (局部+全局)
3、基于树的点云算法(Tree-Based)
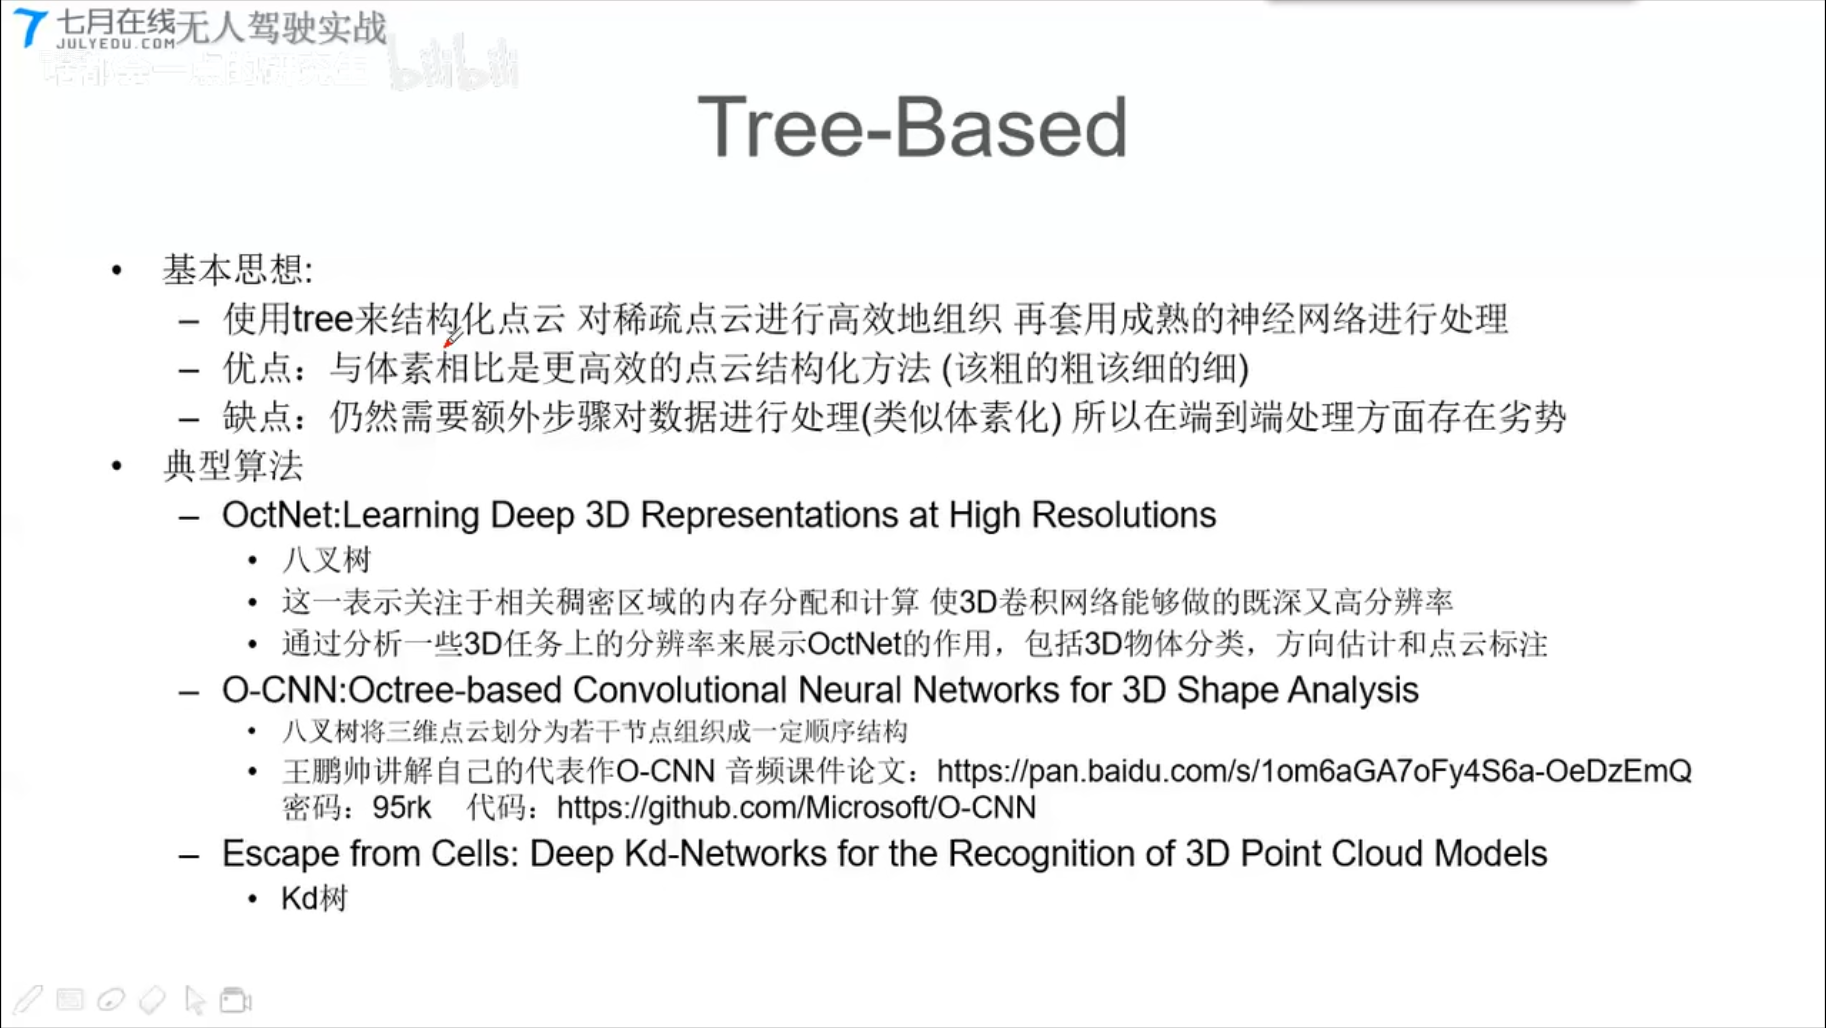
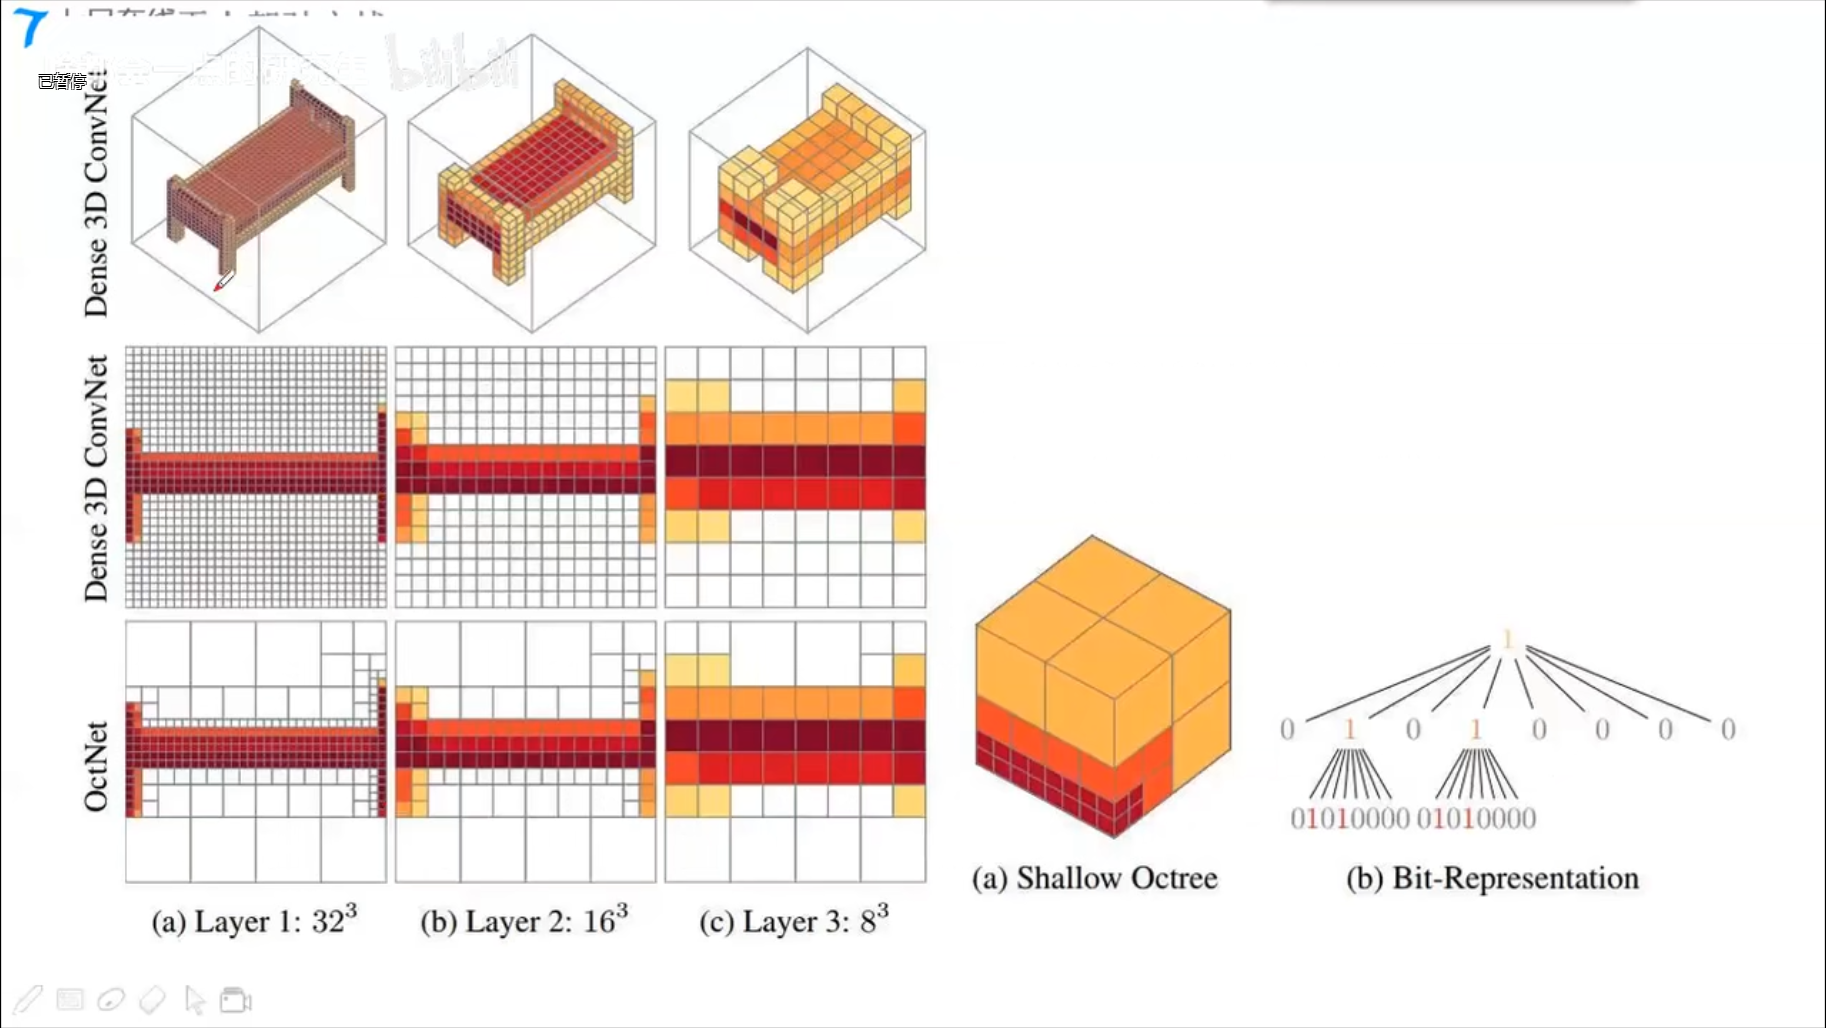
OctNet
O-CNN
Escape from Cells
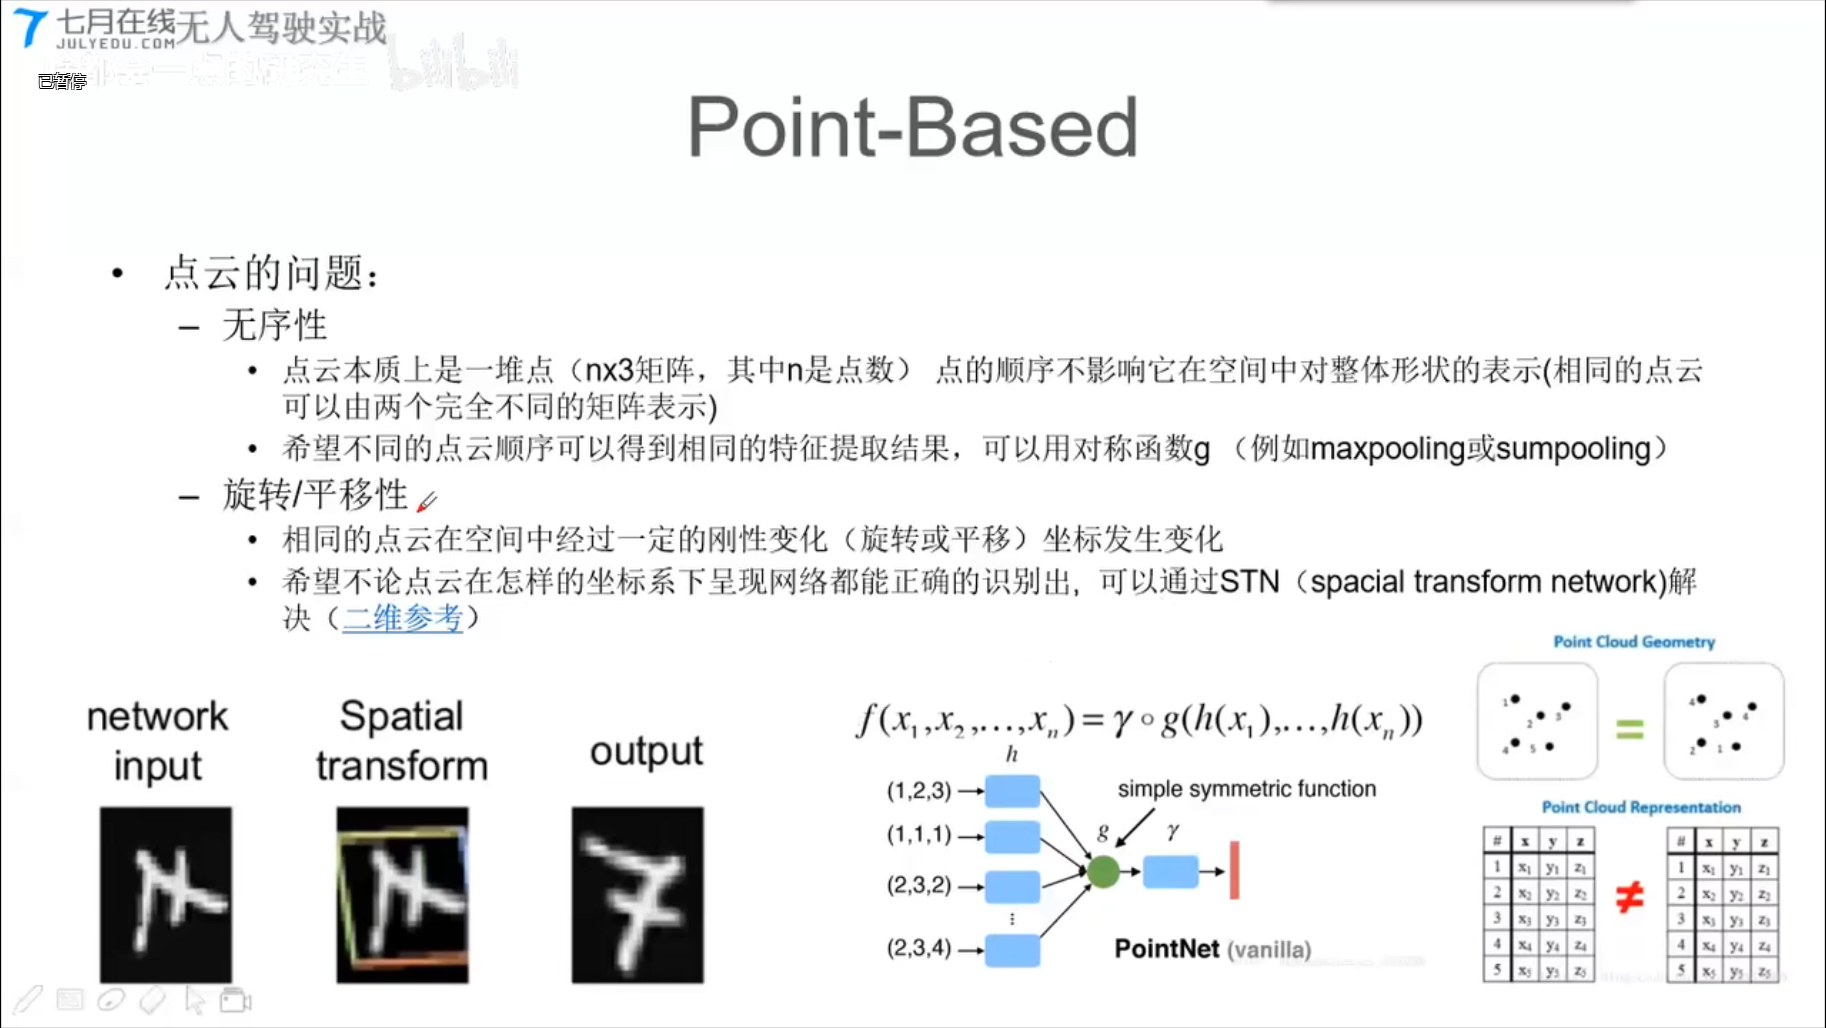
4、基于点的点云算法(Point-Based)
- 对称函数、X变换
PointNet (CVPR2017)
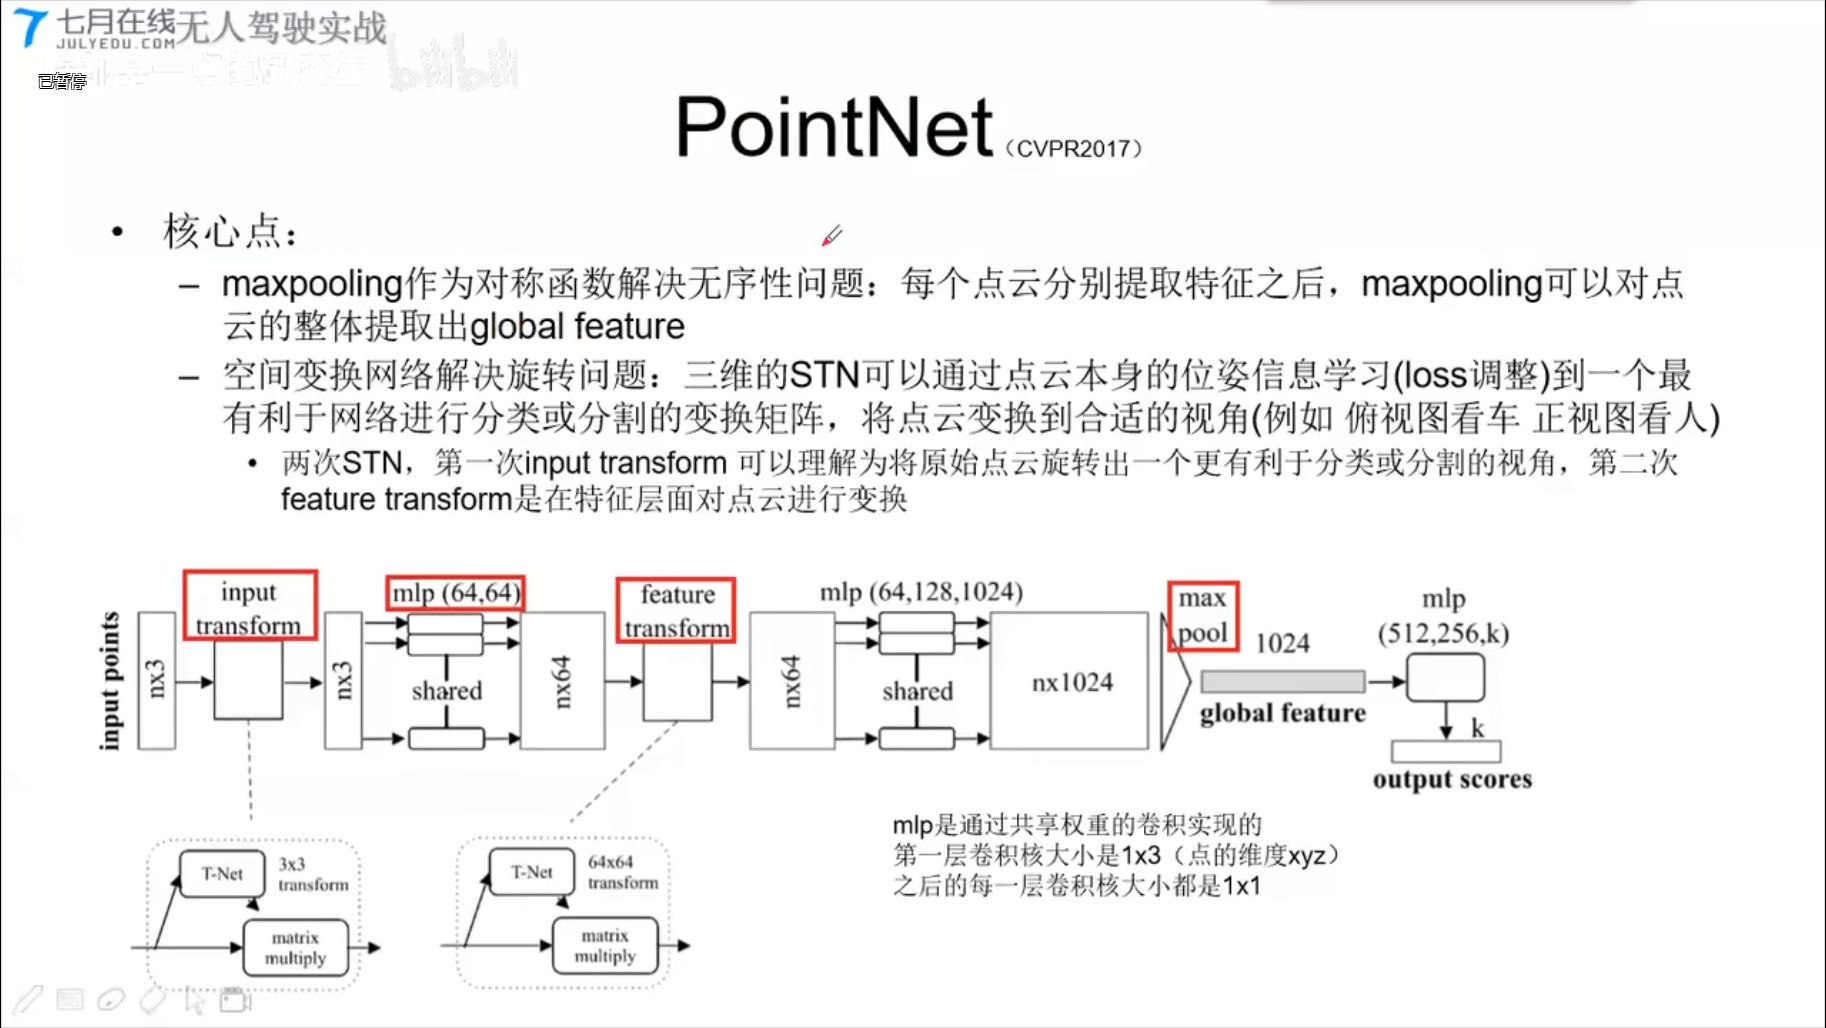
1x3的卷积,实现全连接层
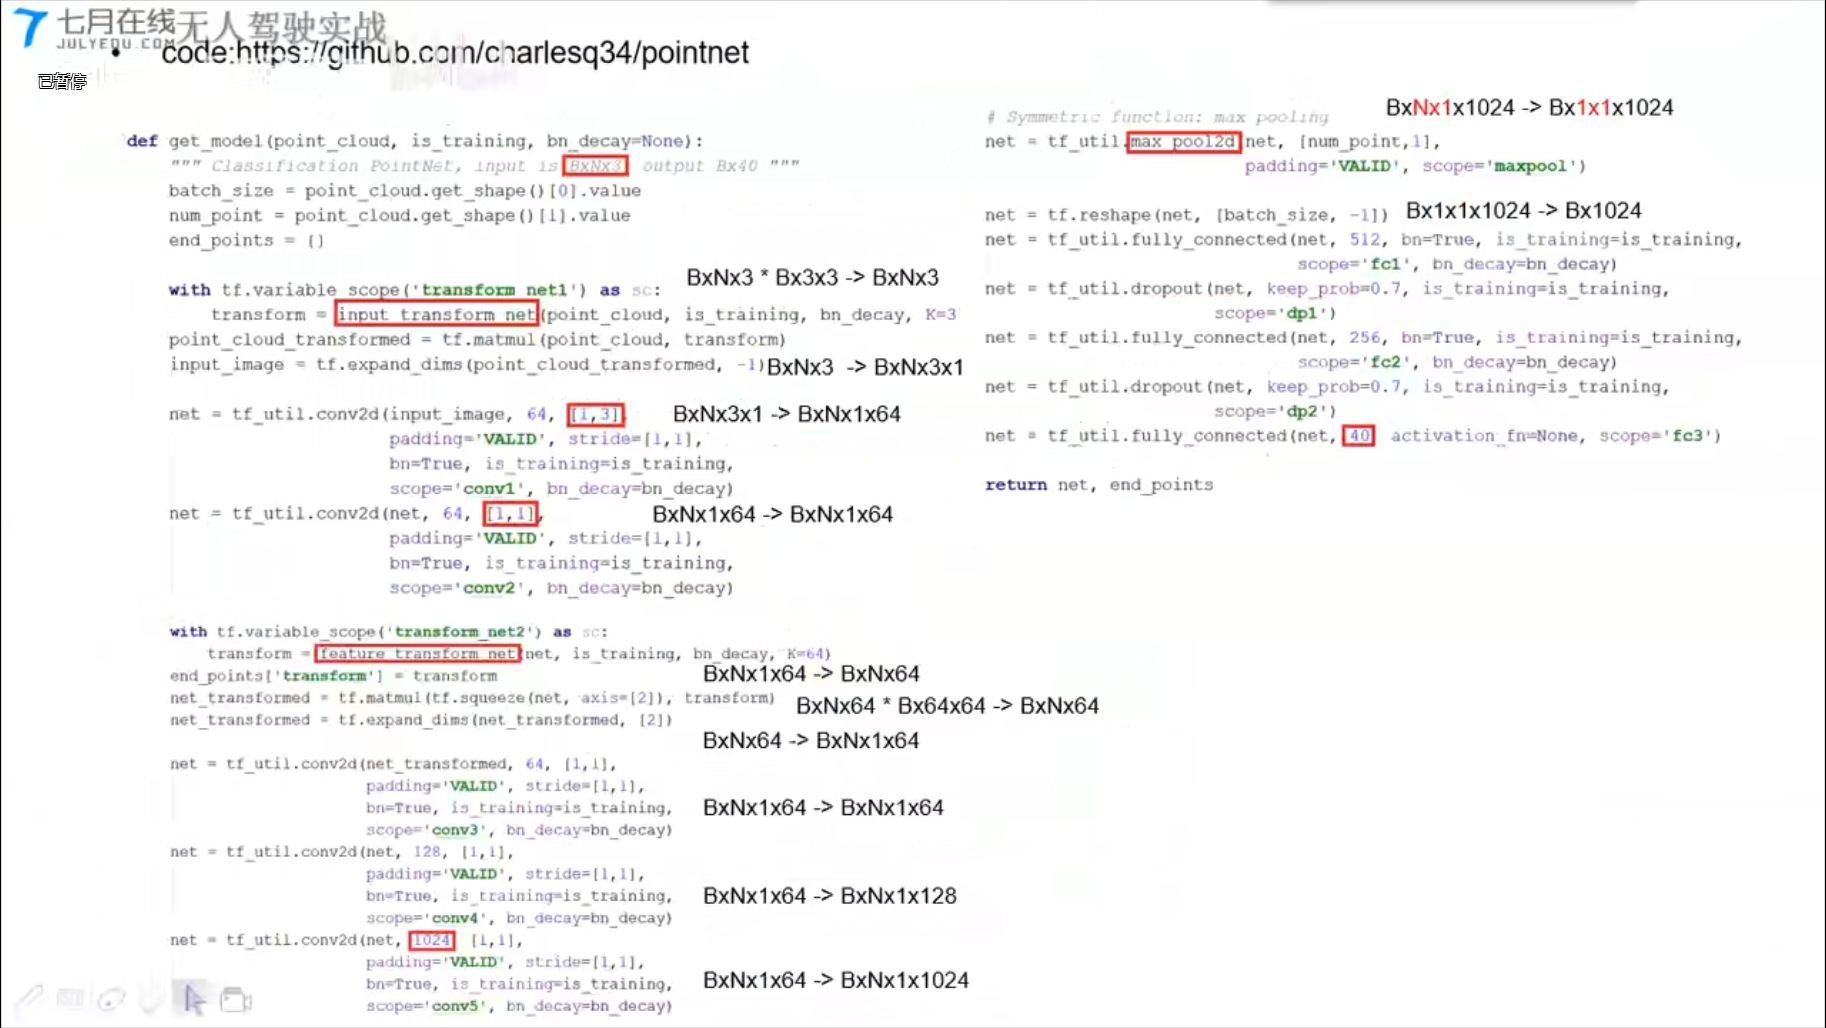
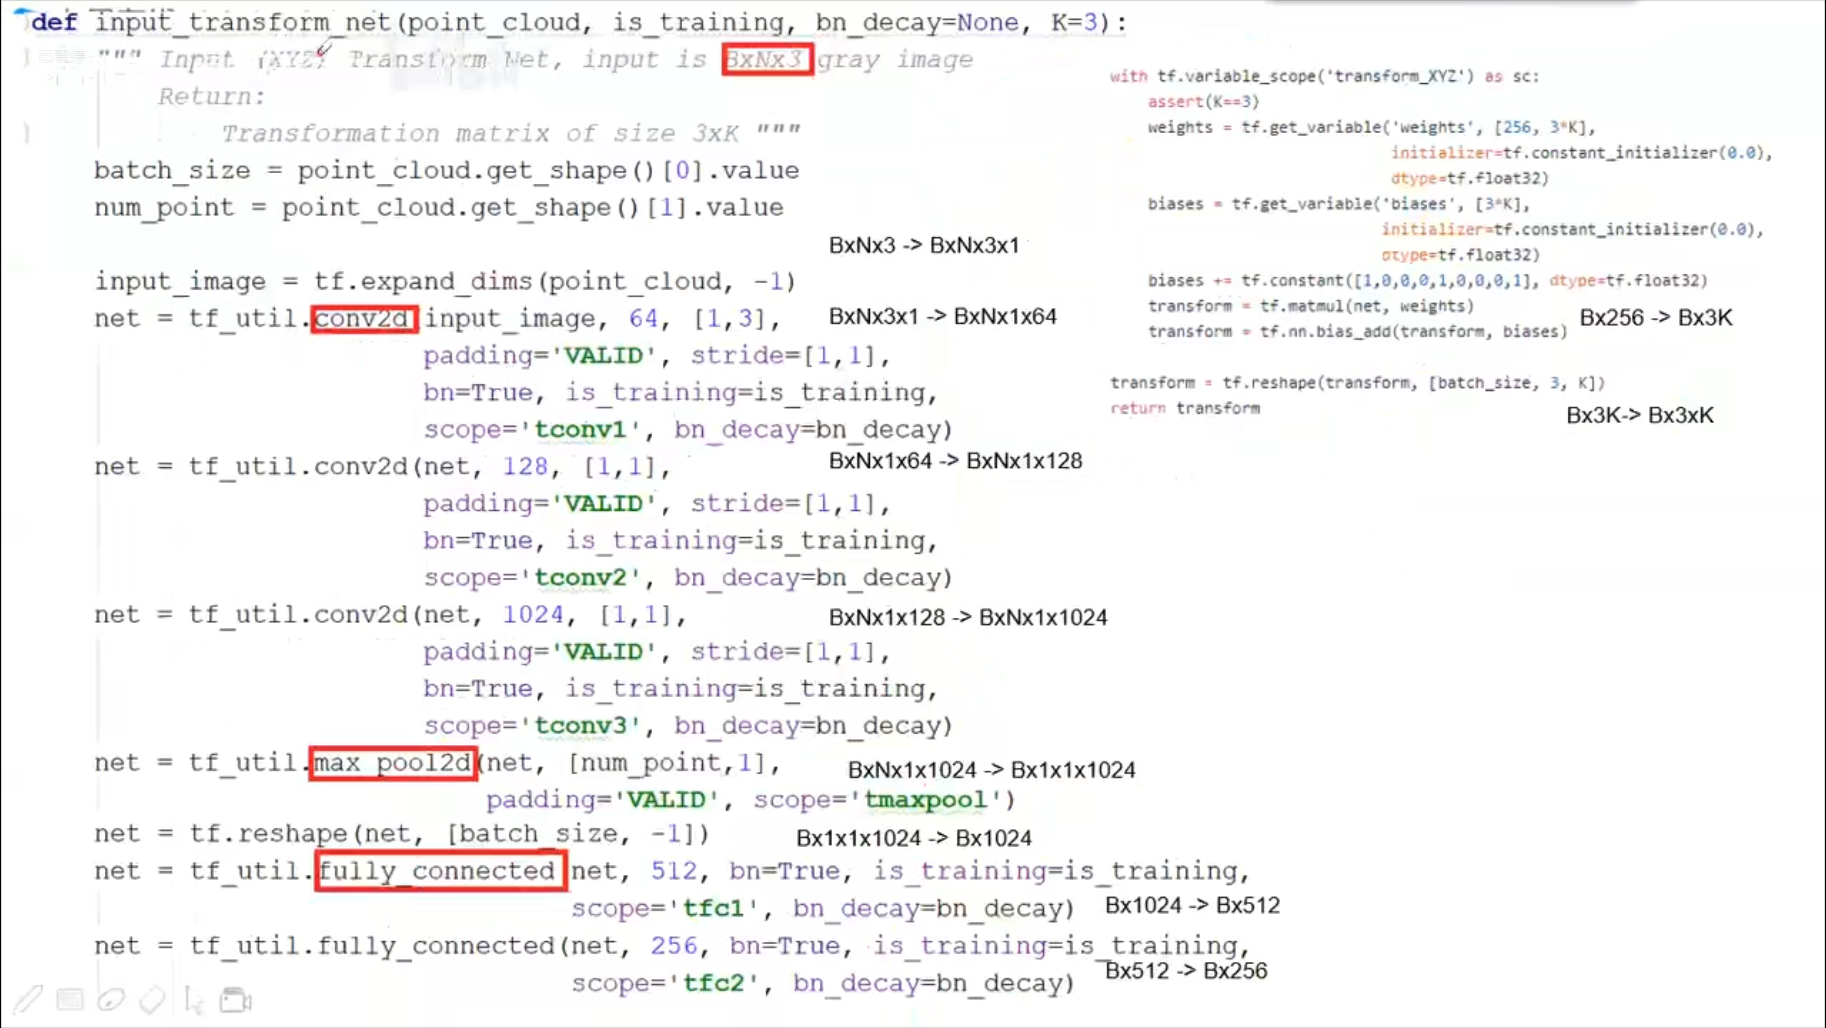
transform_net
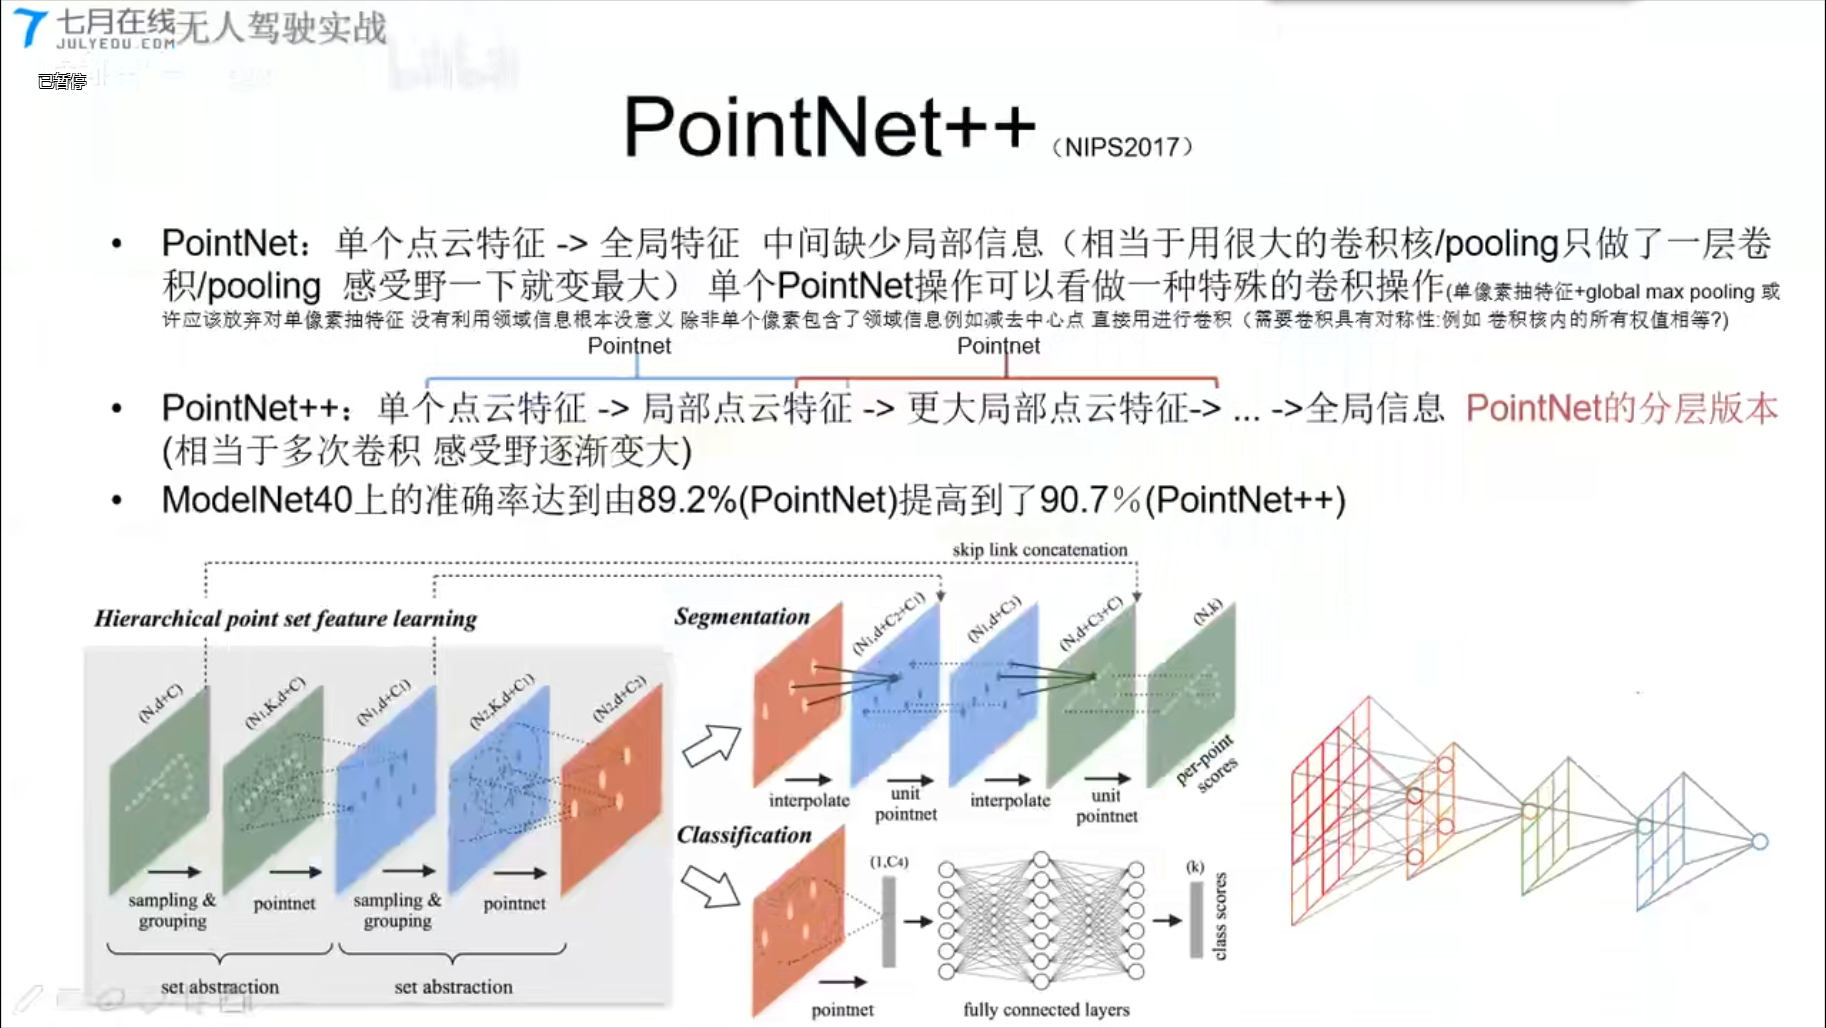
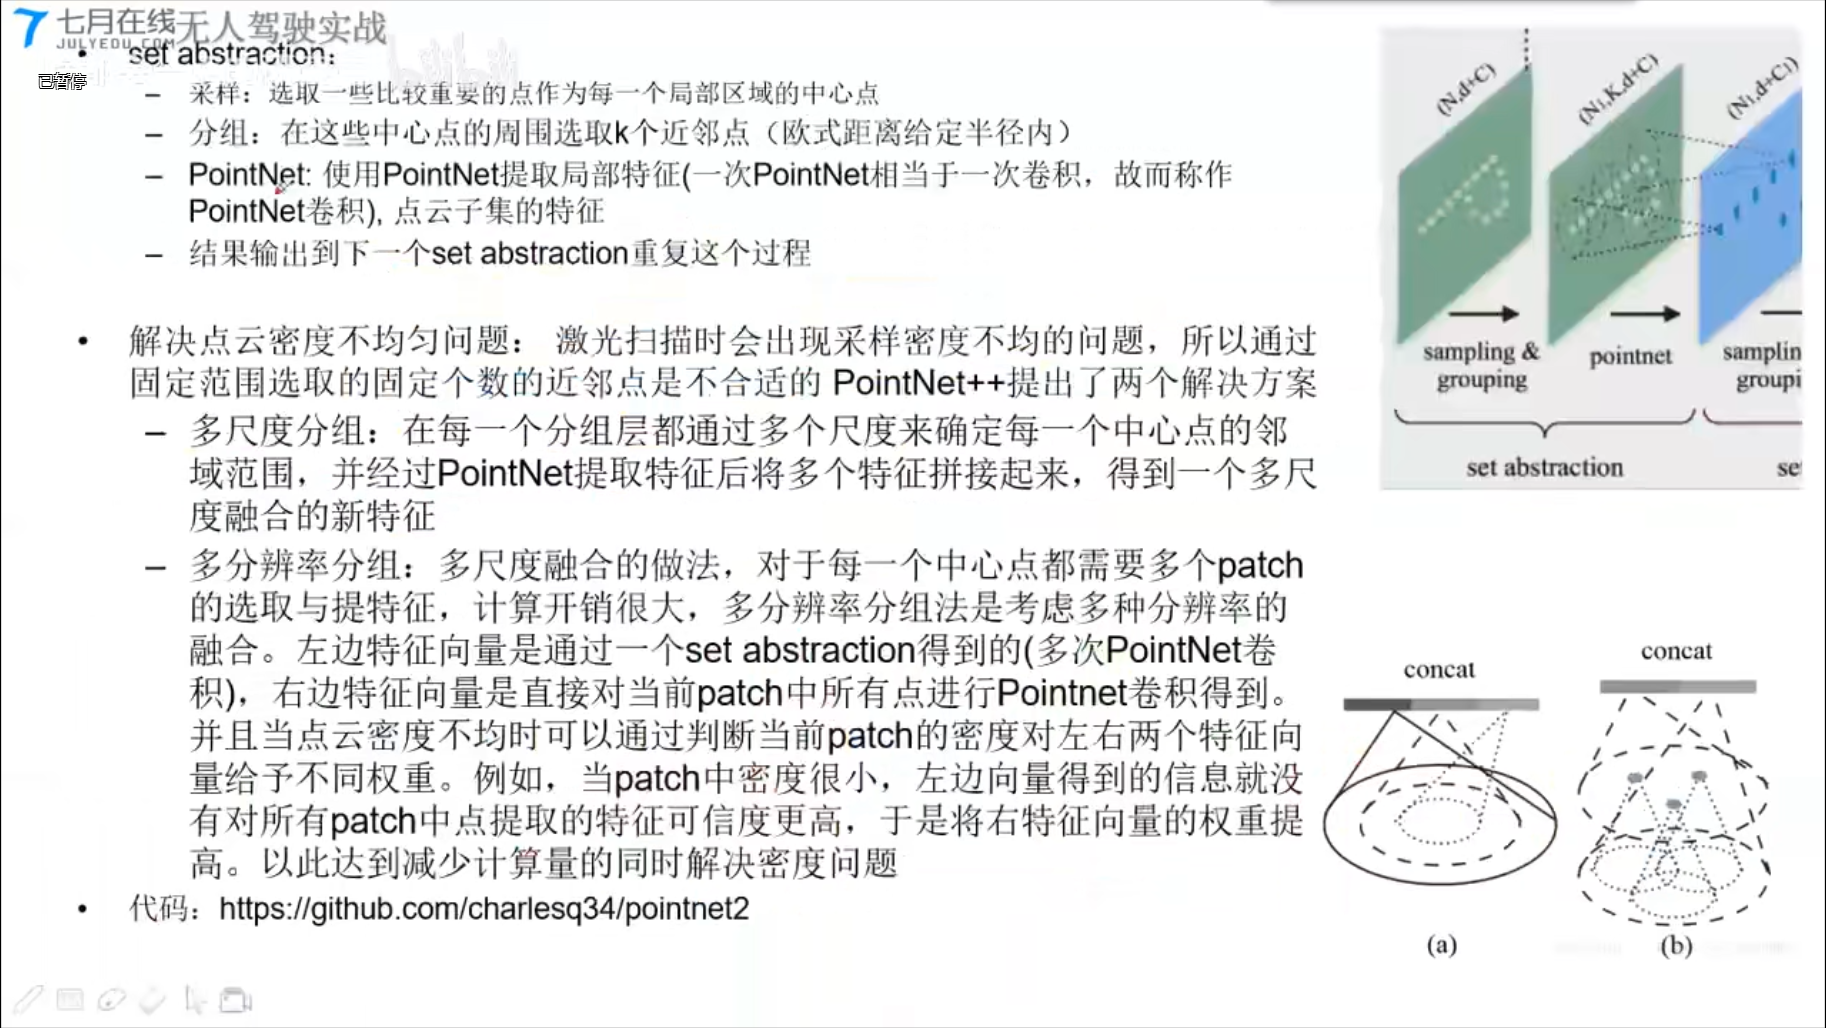
PointNet++ (NIPS2017)
PointCNN
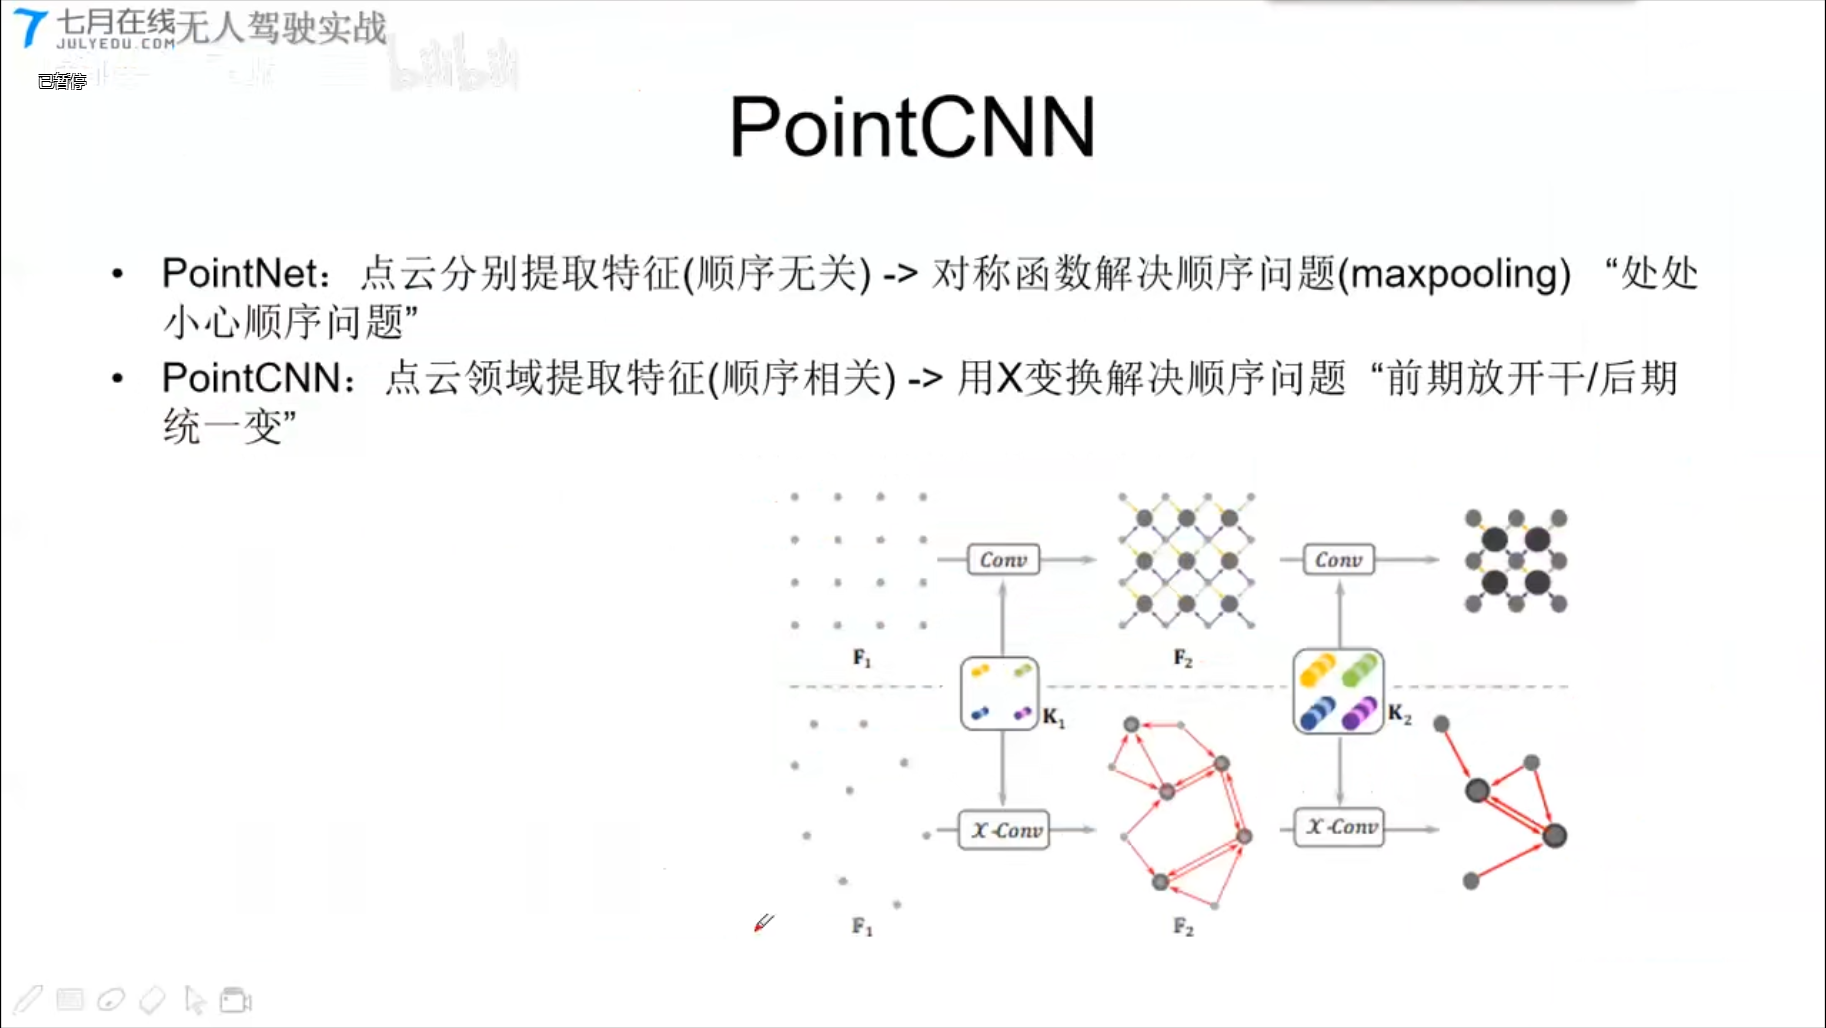
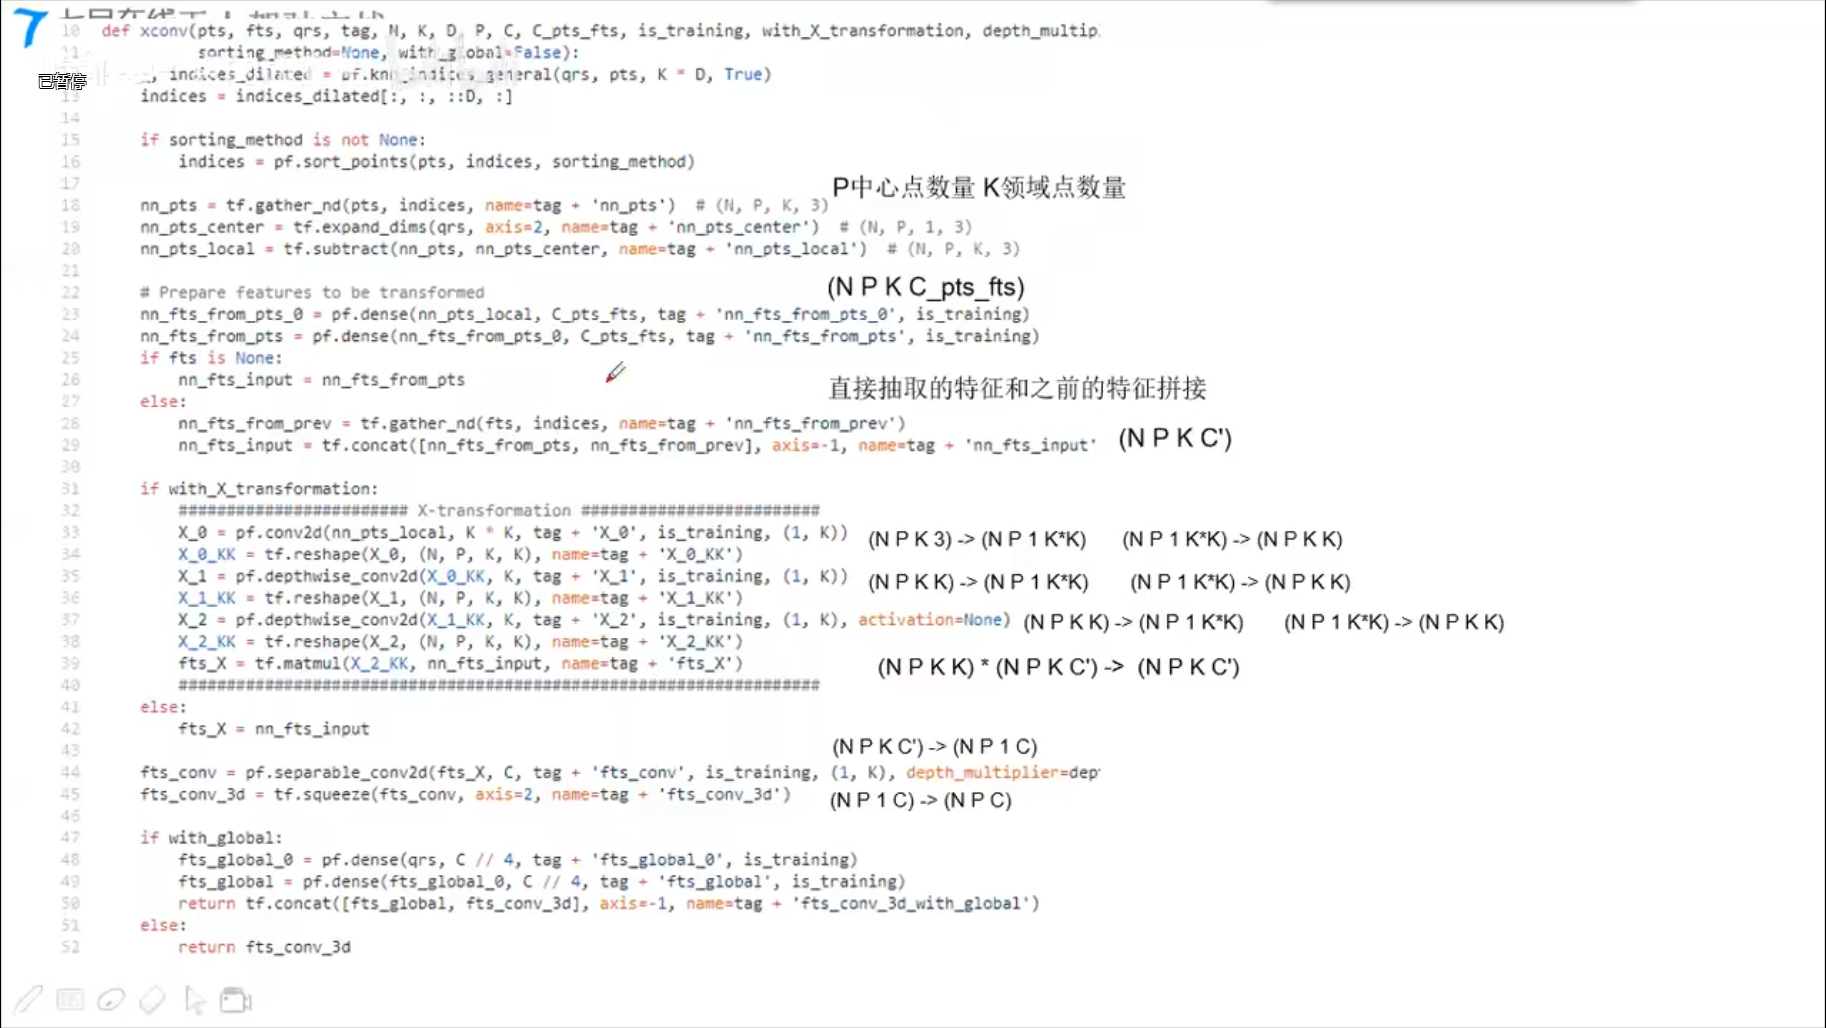
核心:X卷积
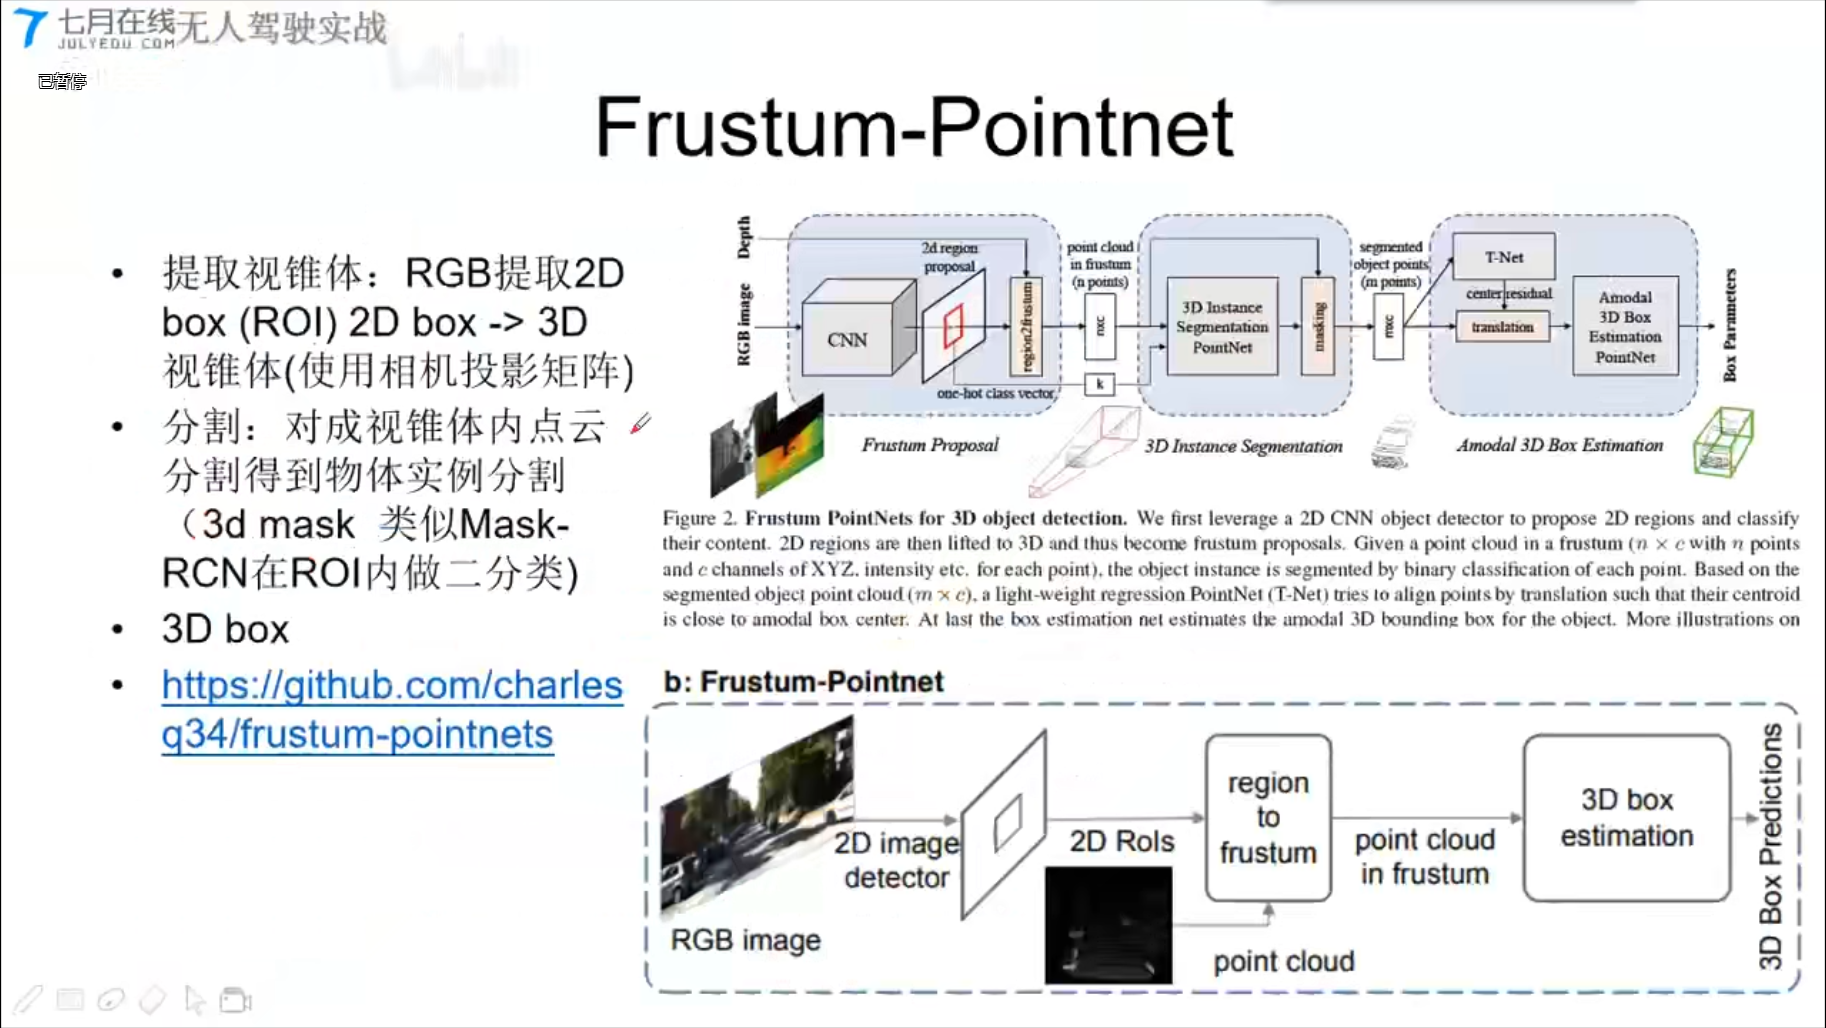
Frustum-Pointnet

PointRCNN
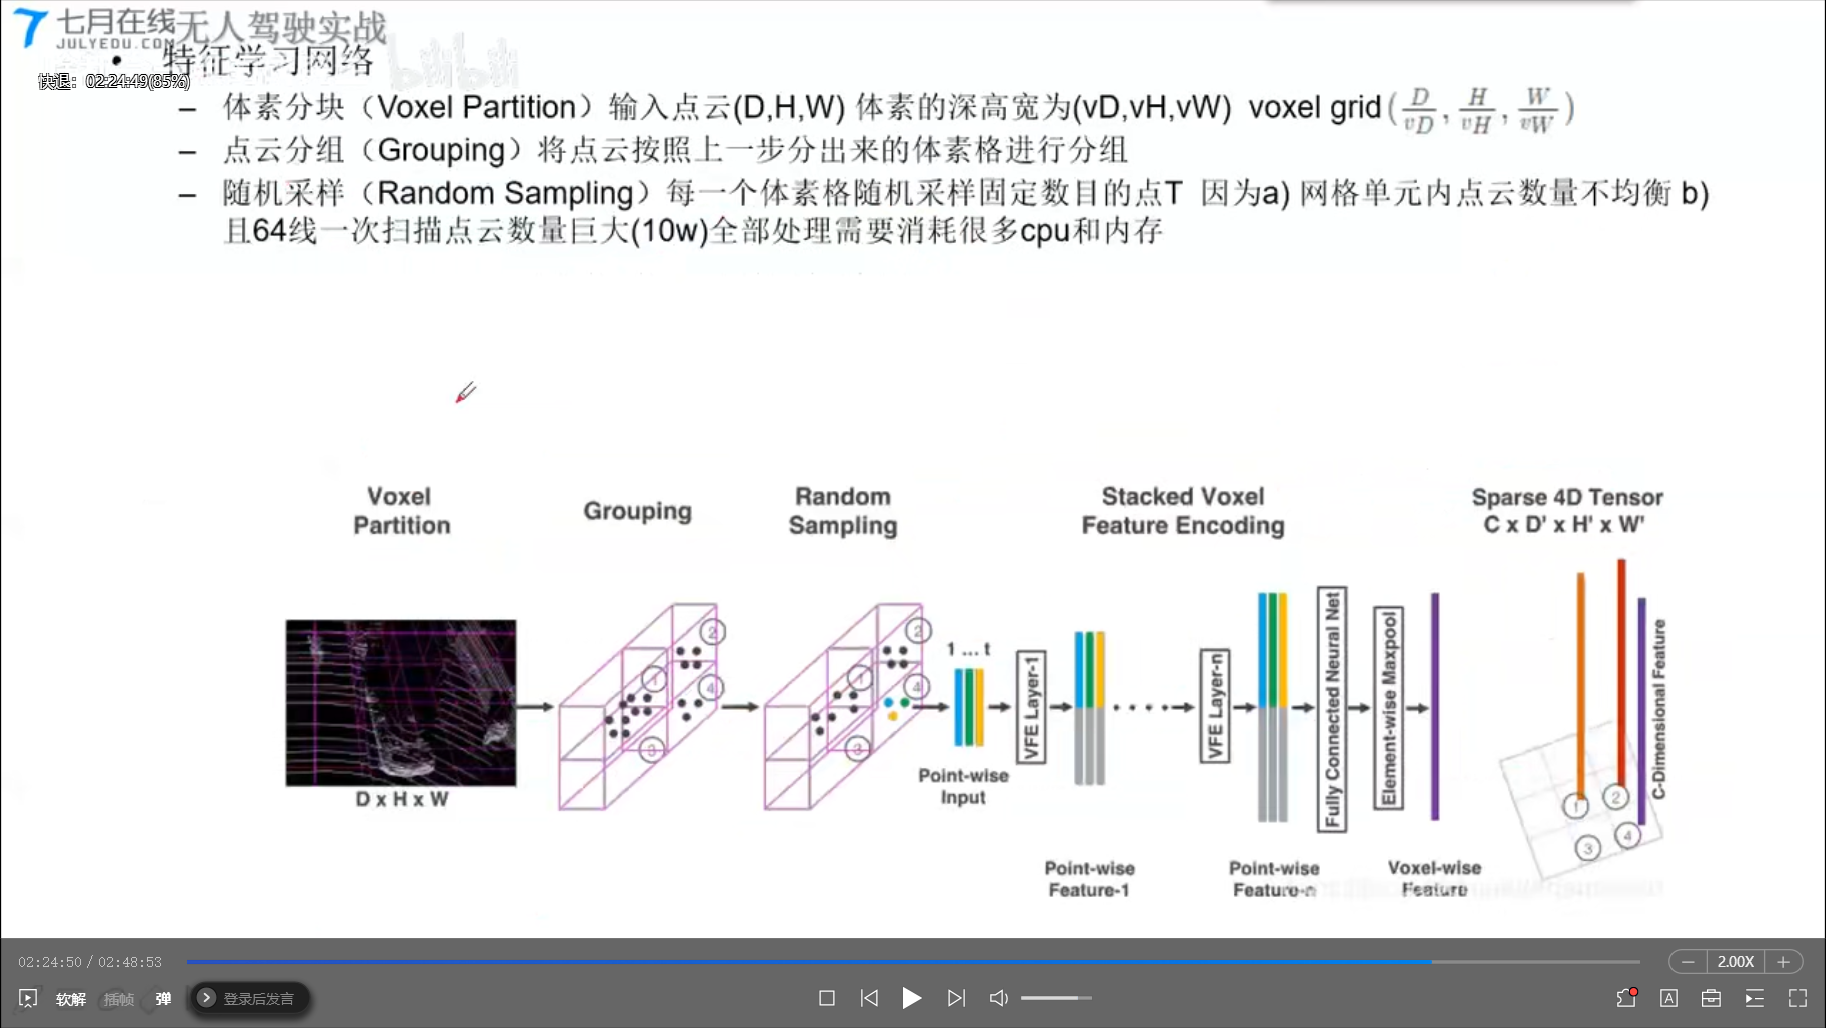
5.2 Voxelnet


代码结构

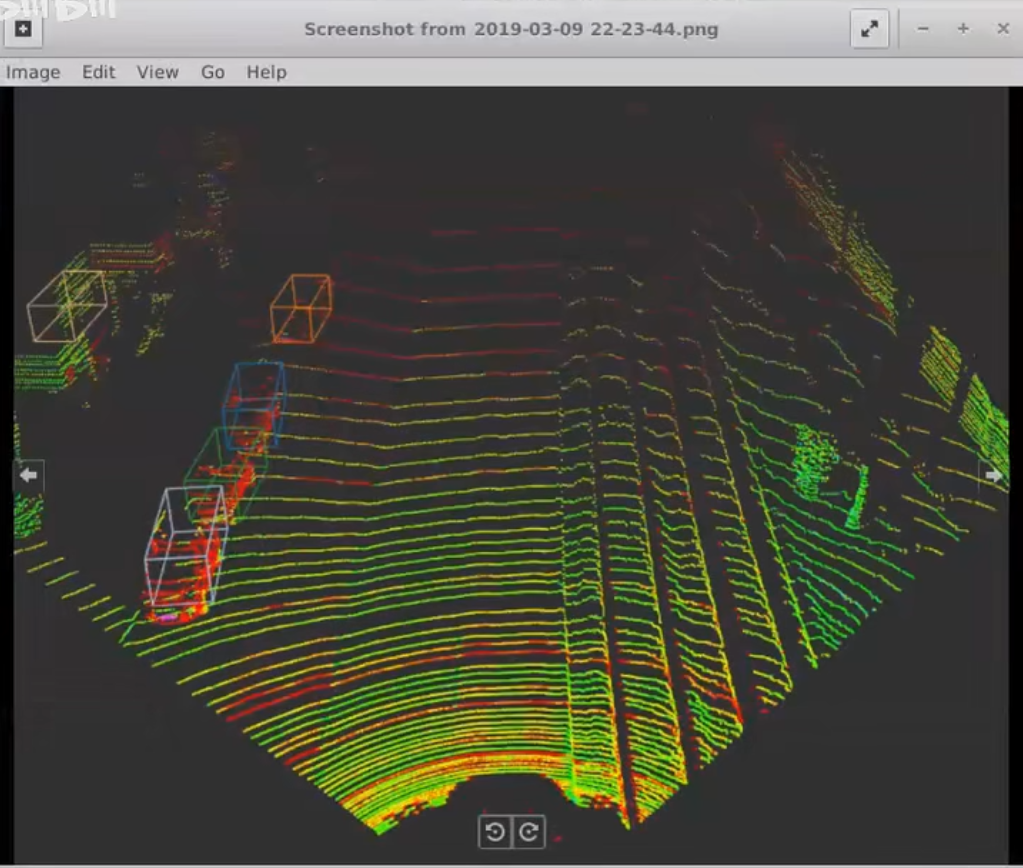
效果:
相关资料
系列零:自动驾驶相关数据集调研总结【附下载地址】(2023更新)
# 系列一:3D目标检测框架综述(OpenPCDet|mmdetection3d|Det3D|Paddle3D)
Onnx Model inference by C++
[TOC]
0. onnx模型准备以及测试图
1. c++使用onnxruntime进行推理
1 |
|
参考资料
无人驾驶(6)动态环境感知与跟踪
[TOC]
单目跟踪算法:
- 产生式
- 鉴别式
- 基于相关滤波
- 基于深度学习
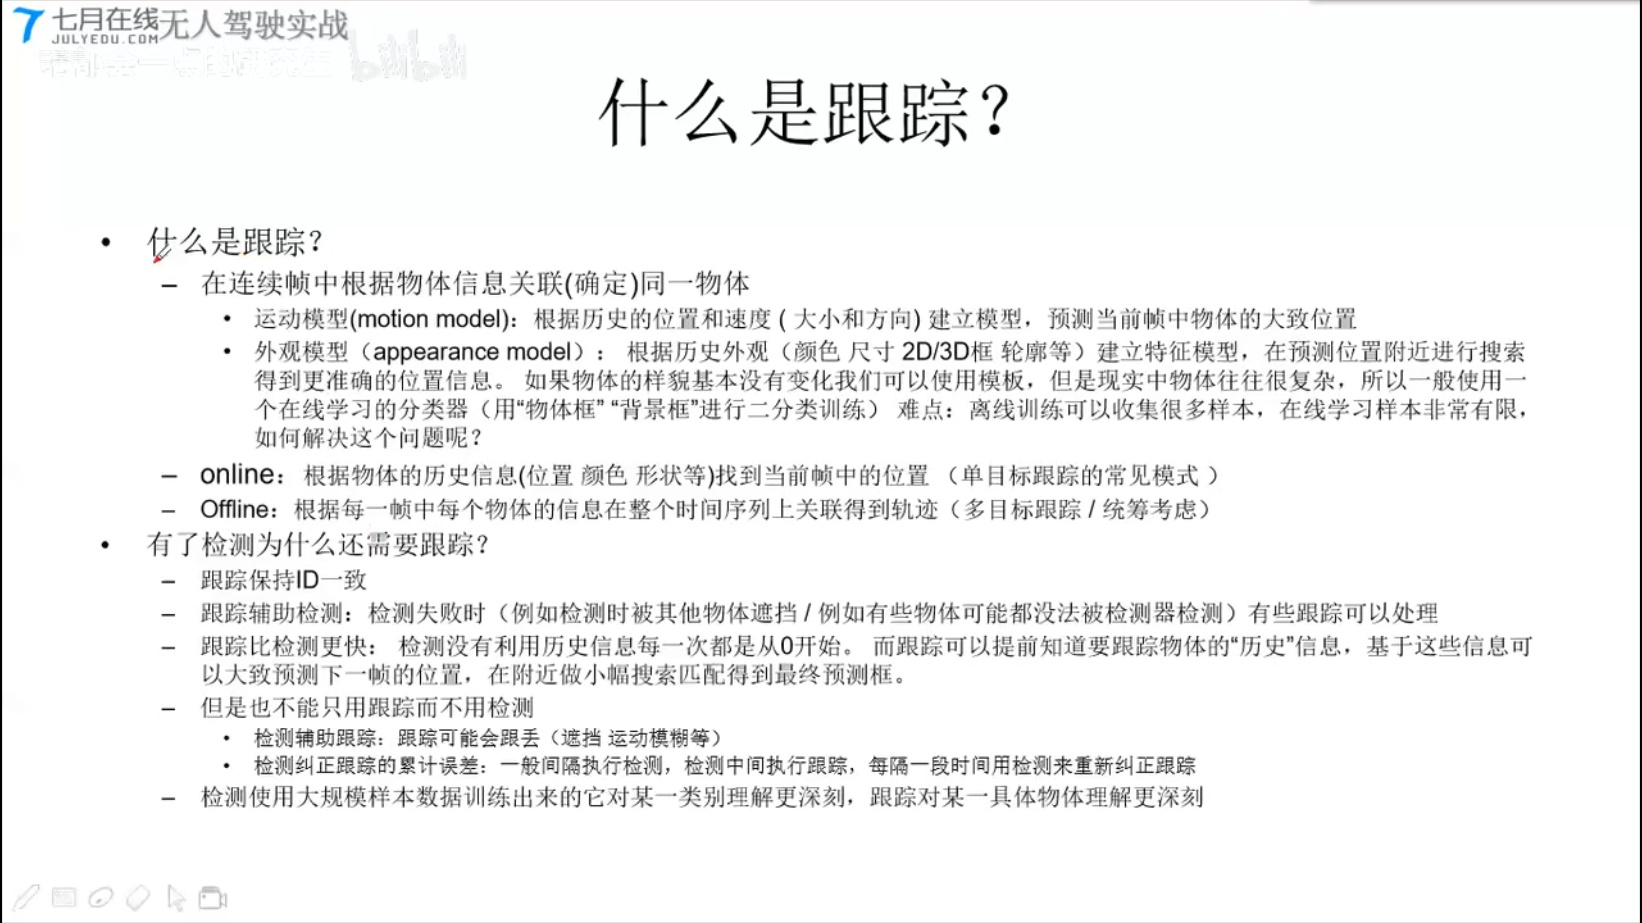
6.1 什么是跟踪?
6.2 单目标跟踪
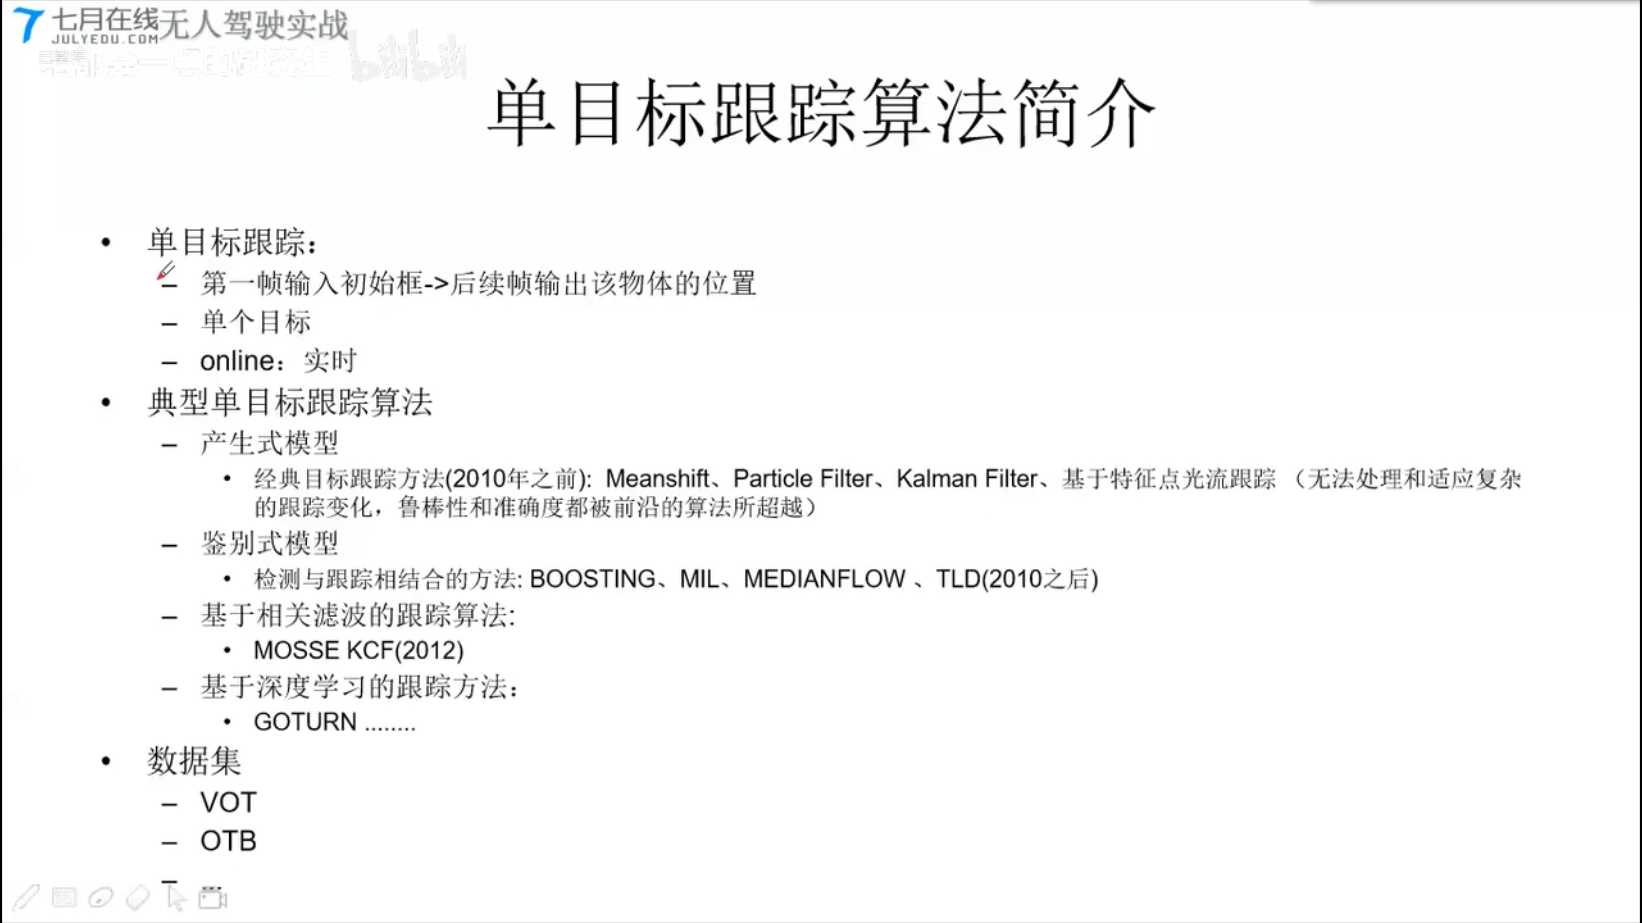
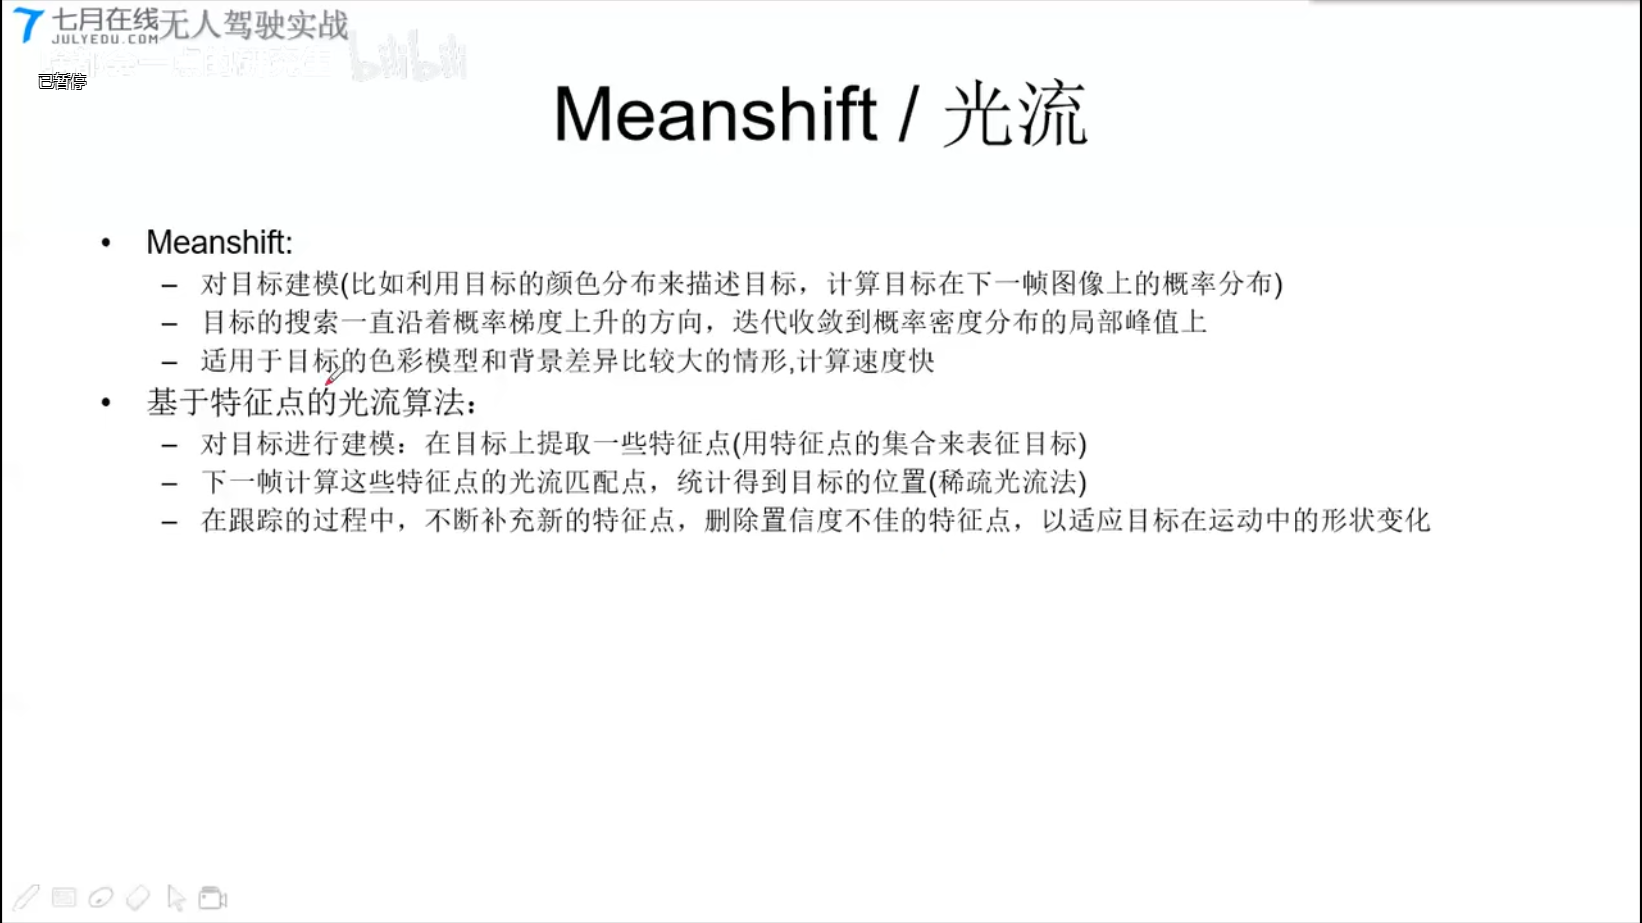
6.2.1 单目标跟踪-产生式模型
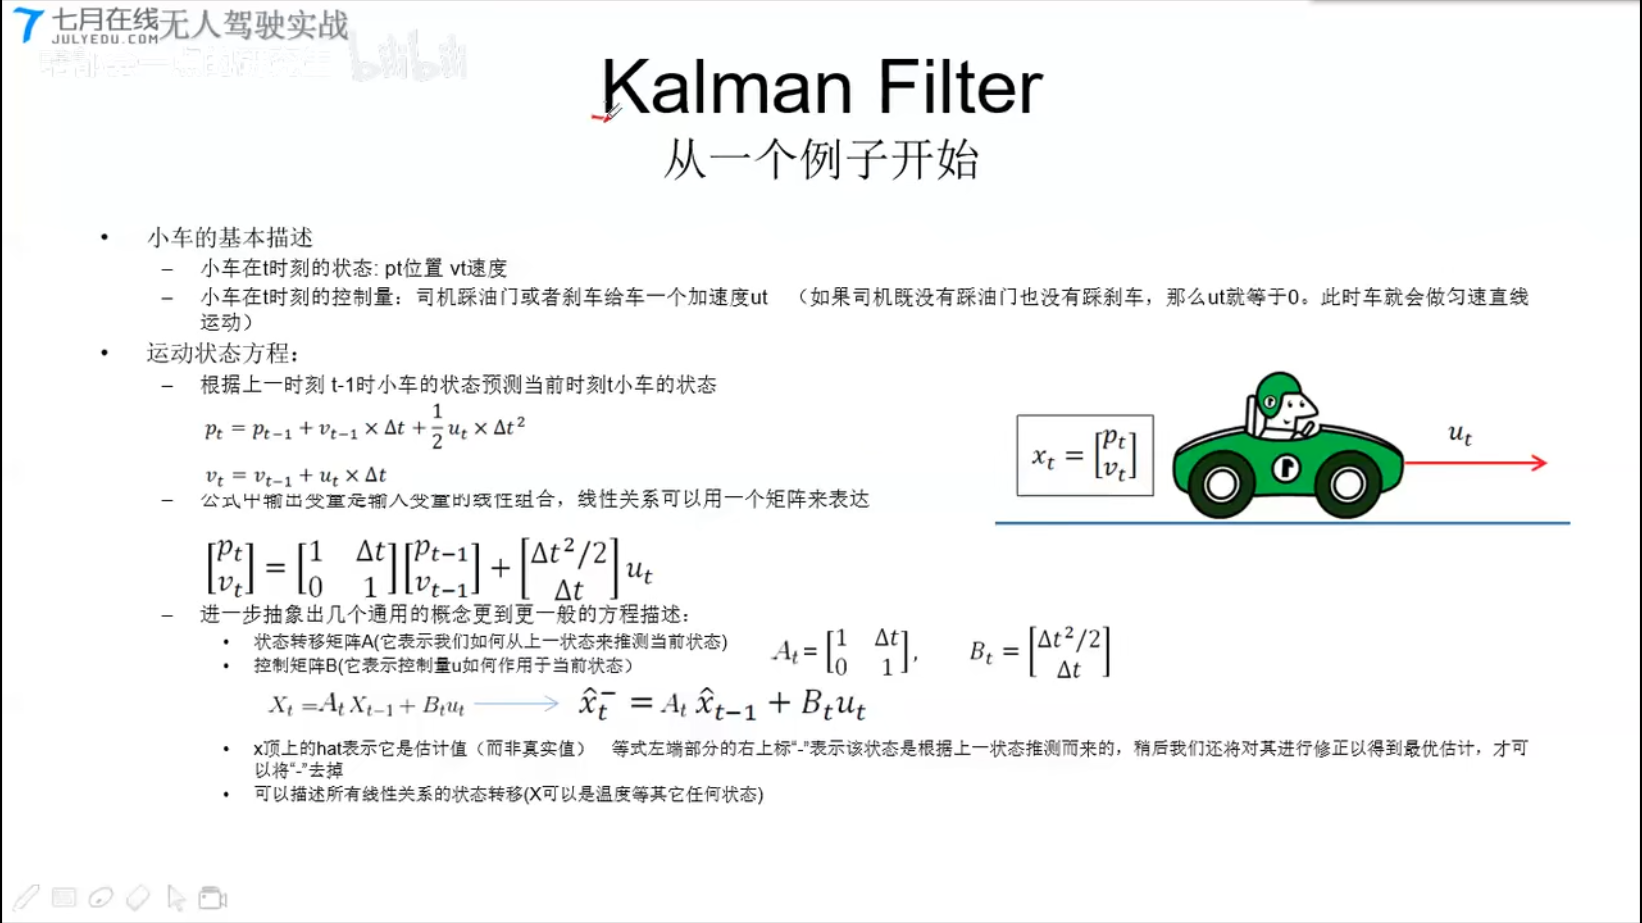
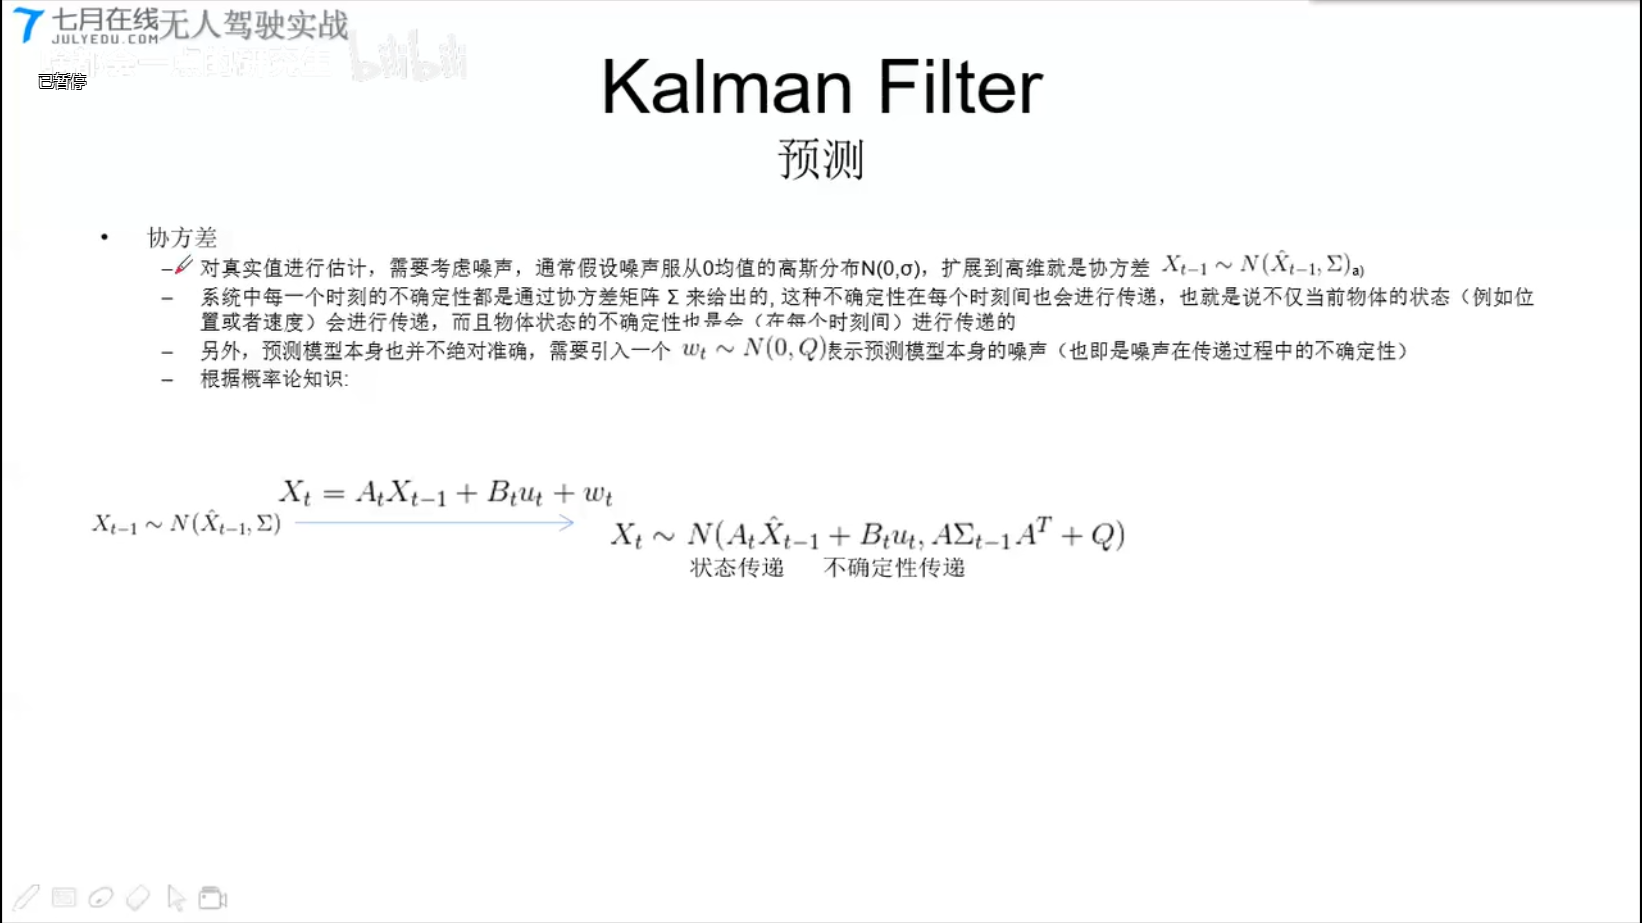
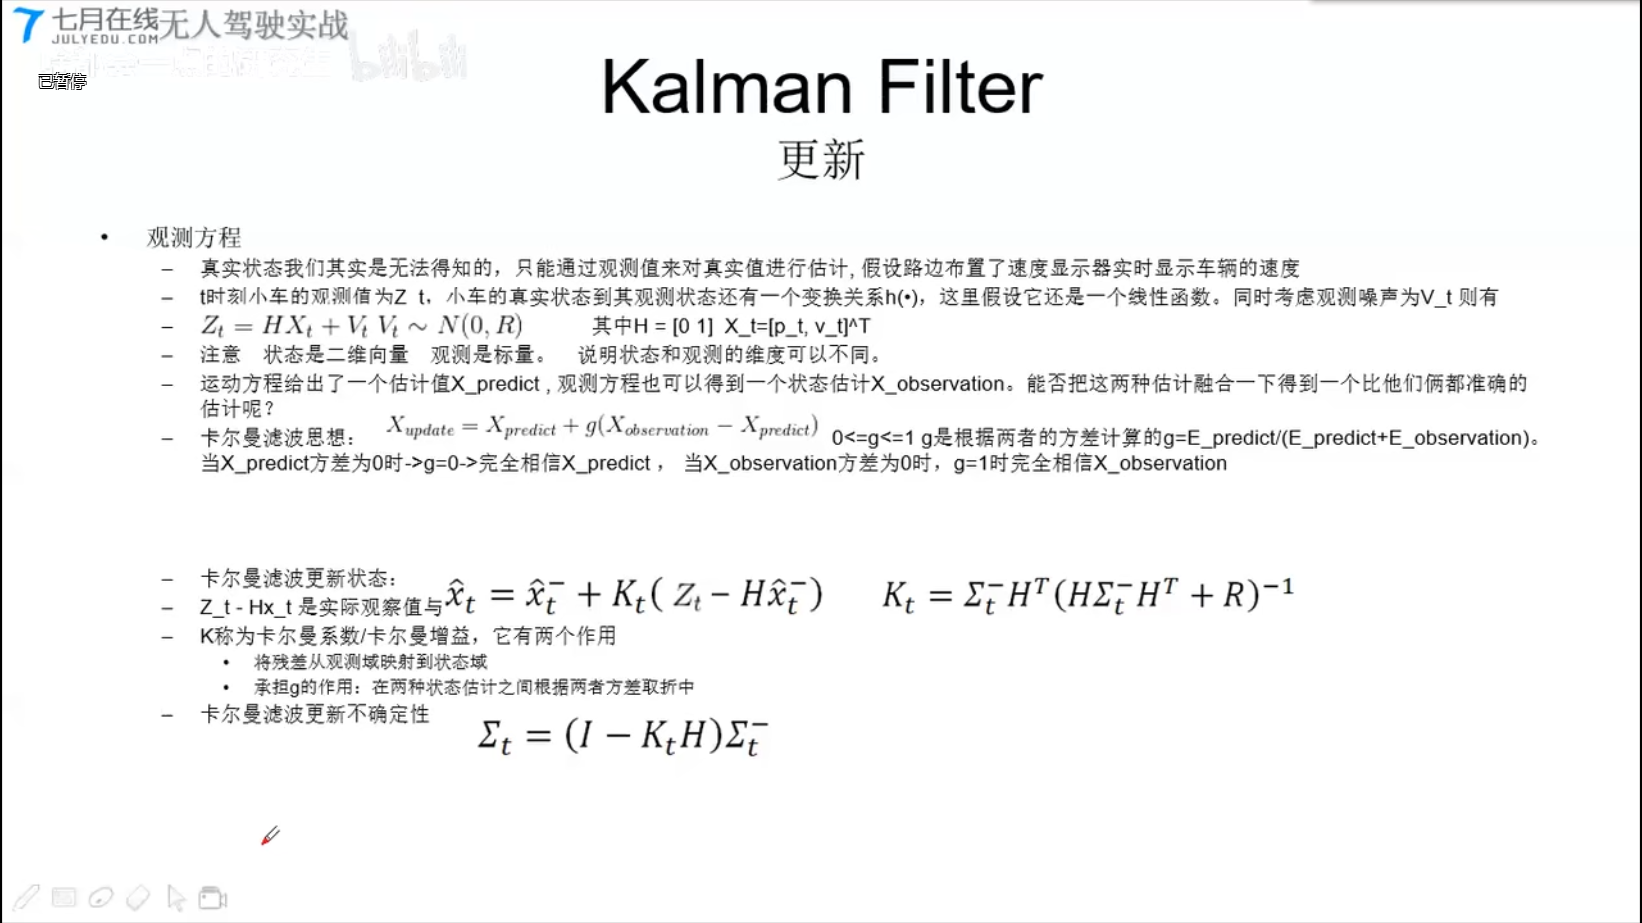
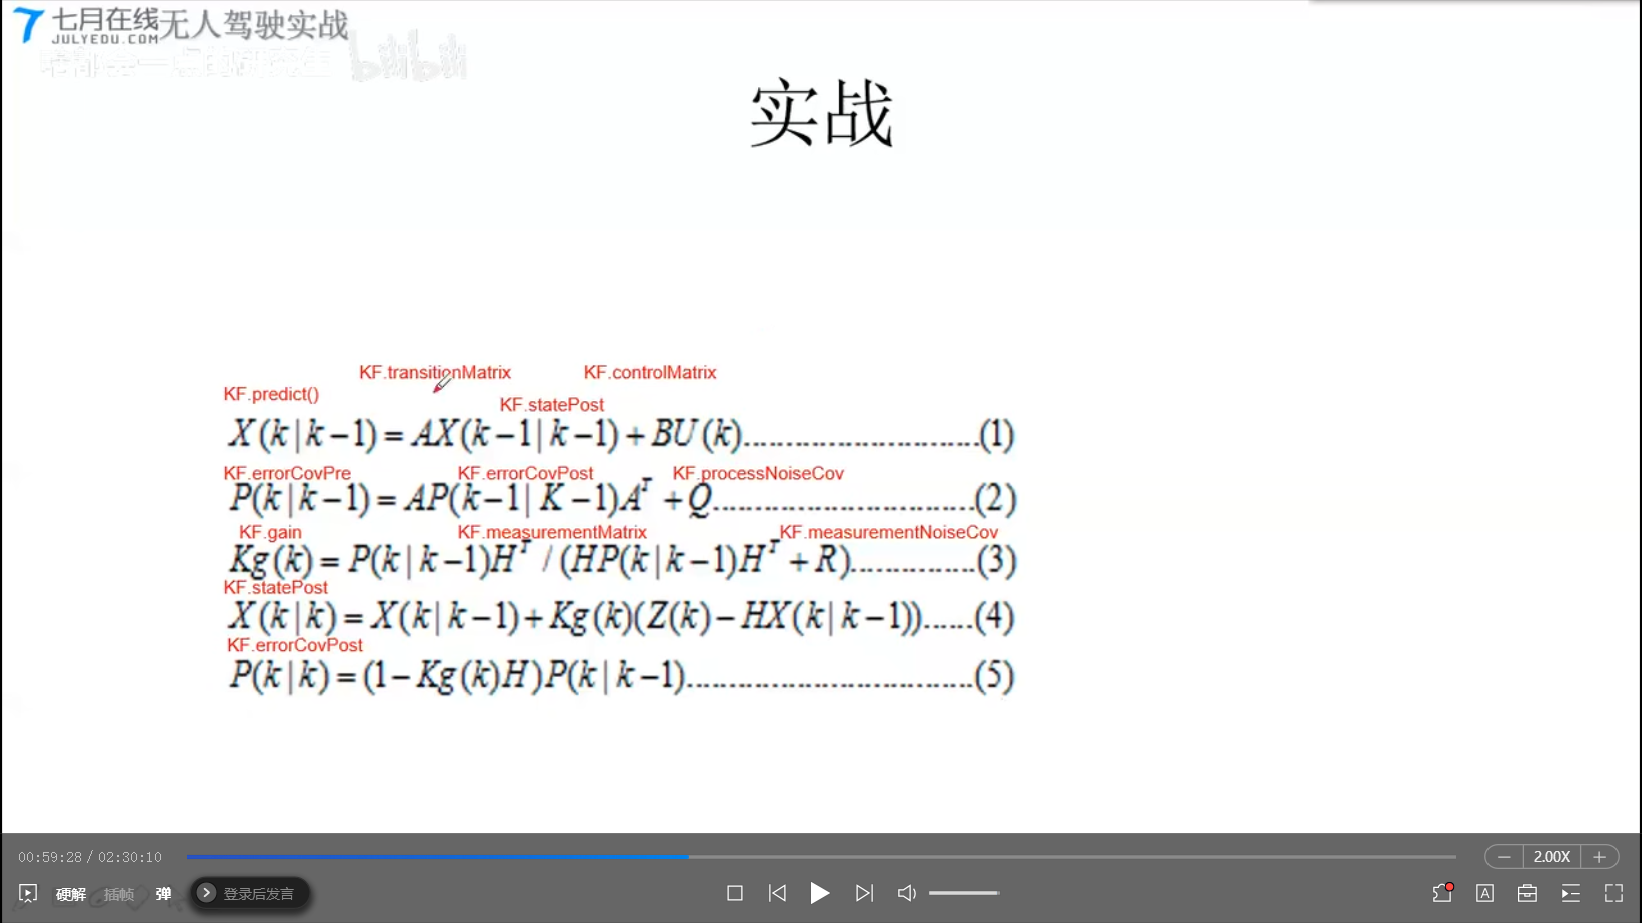
Kalman Filter
code: https://github.com/andylei77/kalman_particle_demo
N(均值,协方差)

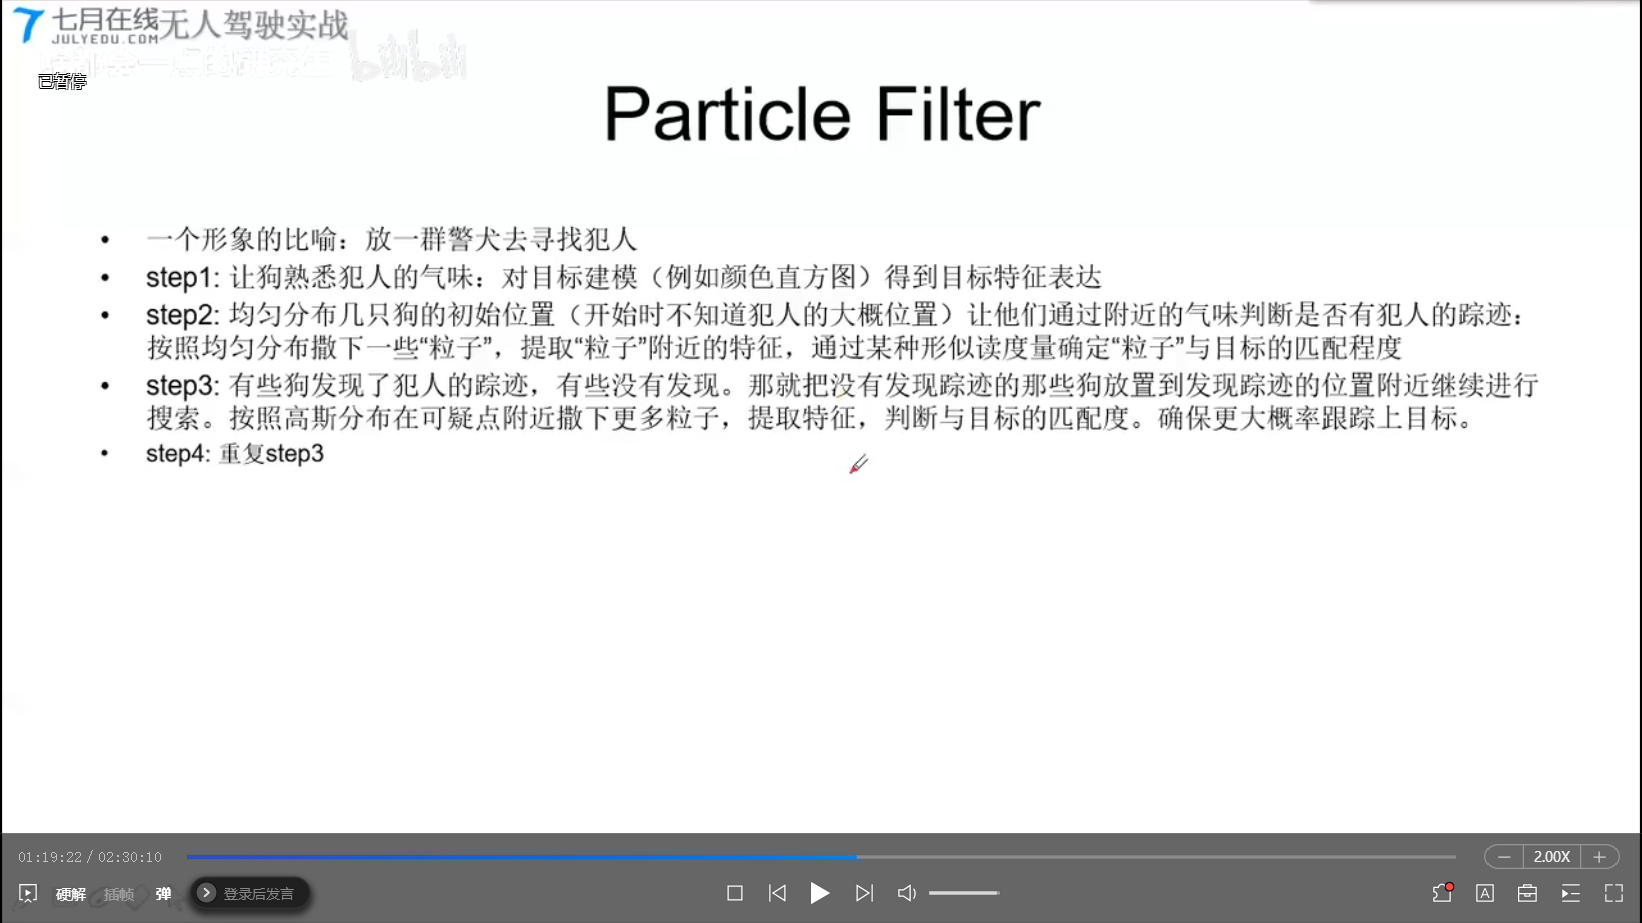
Particle Filter
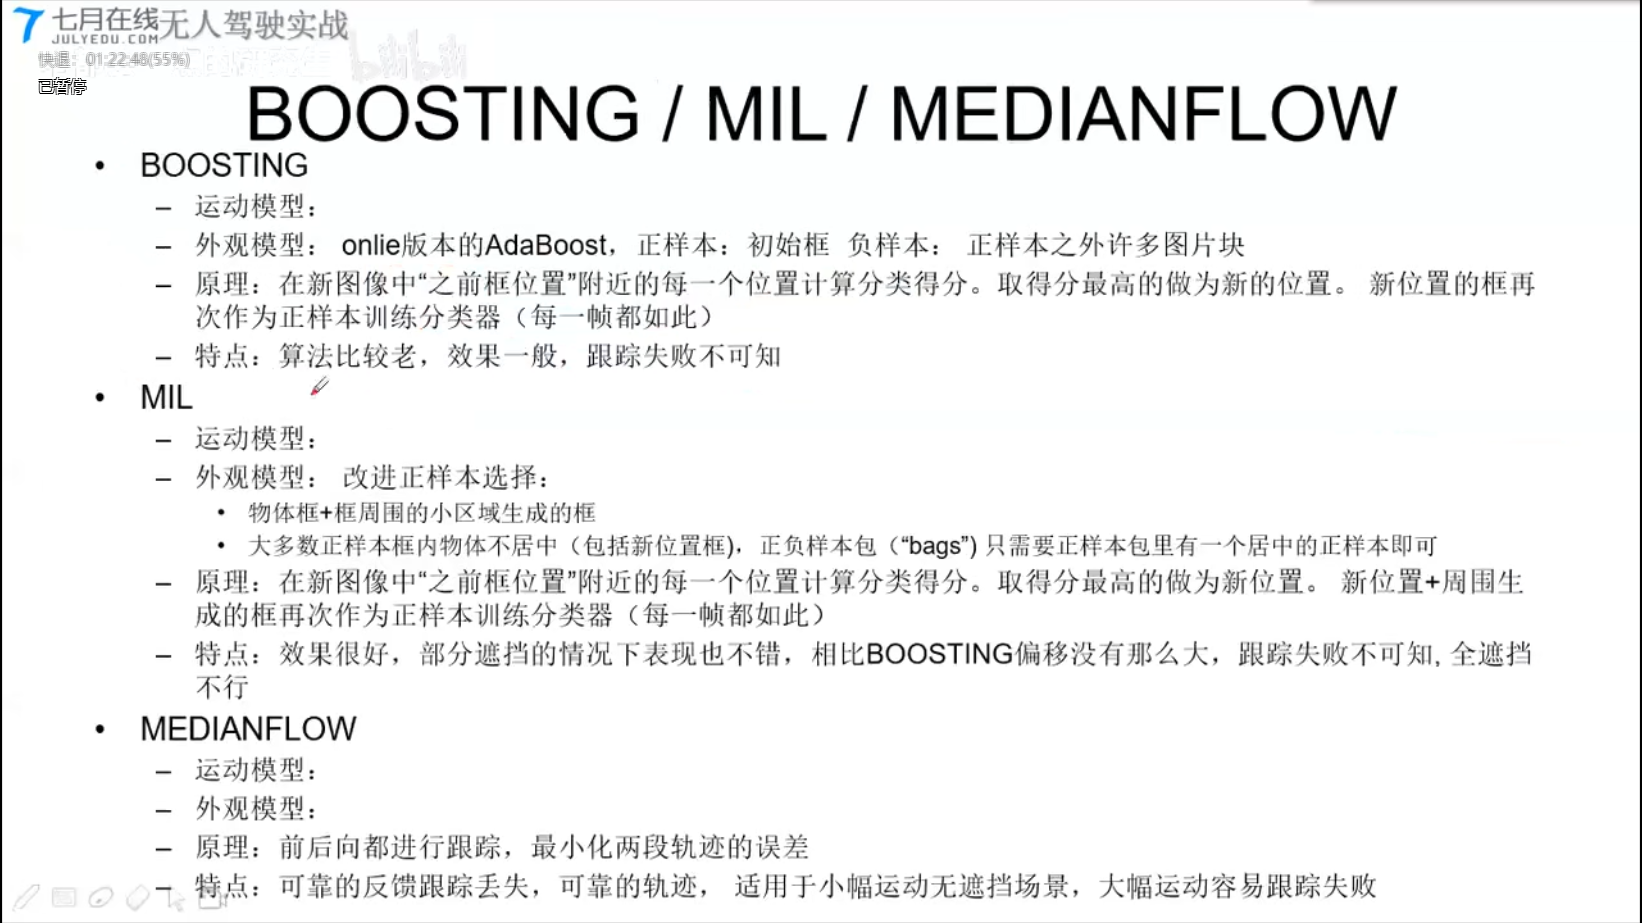
6.2.2 单目标跟踪-鉴别式模型

Boosting
MIL
MEDIANFLOW
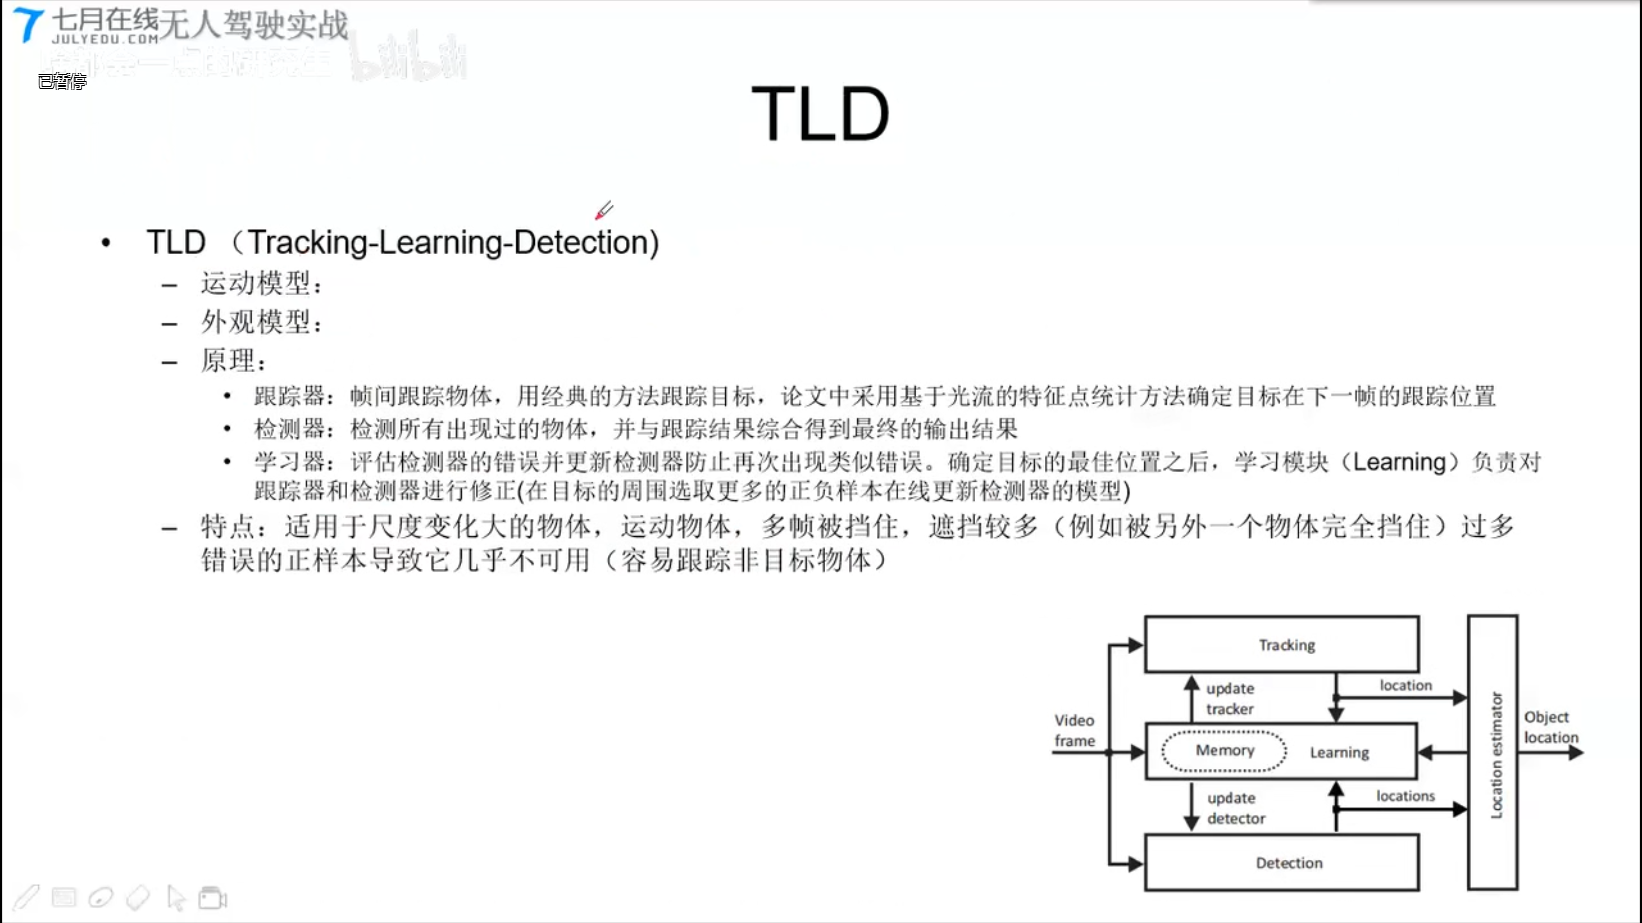
TLD
- 跟踪器: 光流
- 检测器:
OPENCV API
code: https://github.com/andylei77/learnopencv/tree/master/tracking
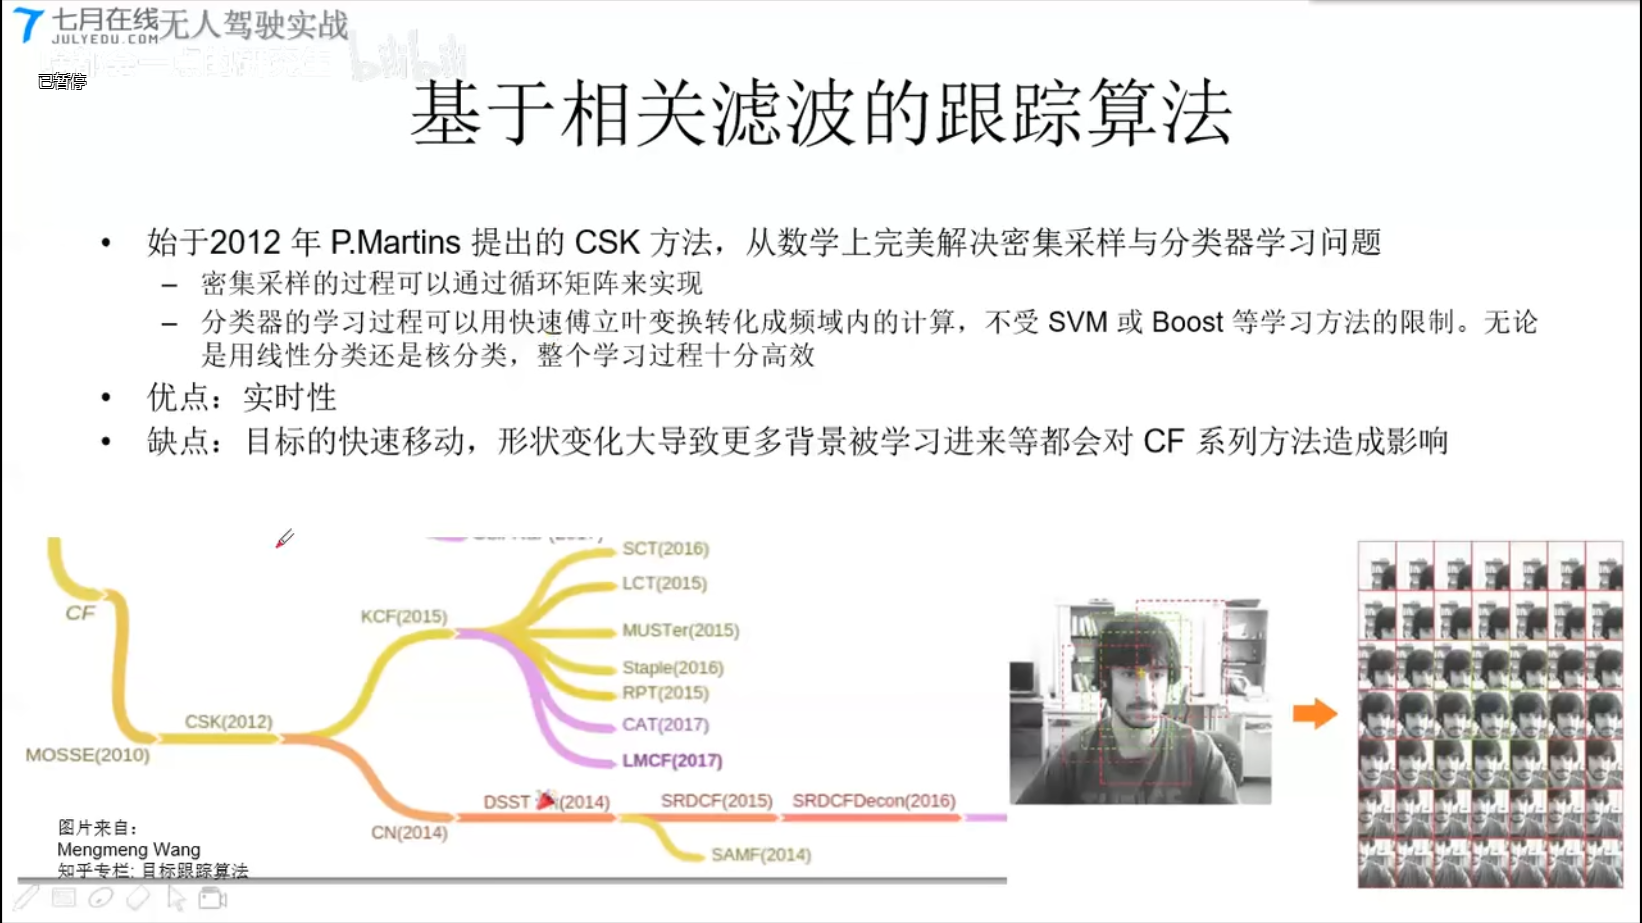
6.2.3 单目标跟踪-基于相关滤波算法
-
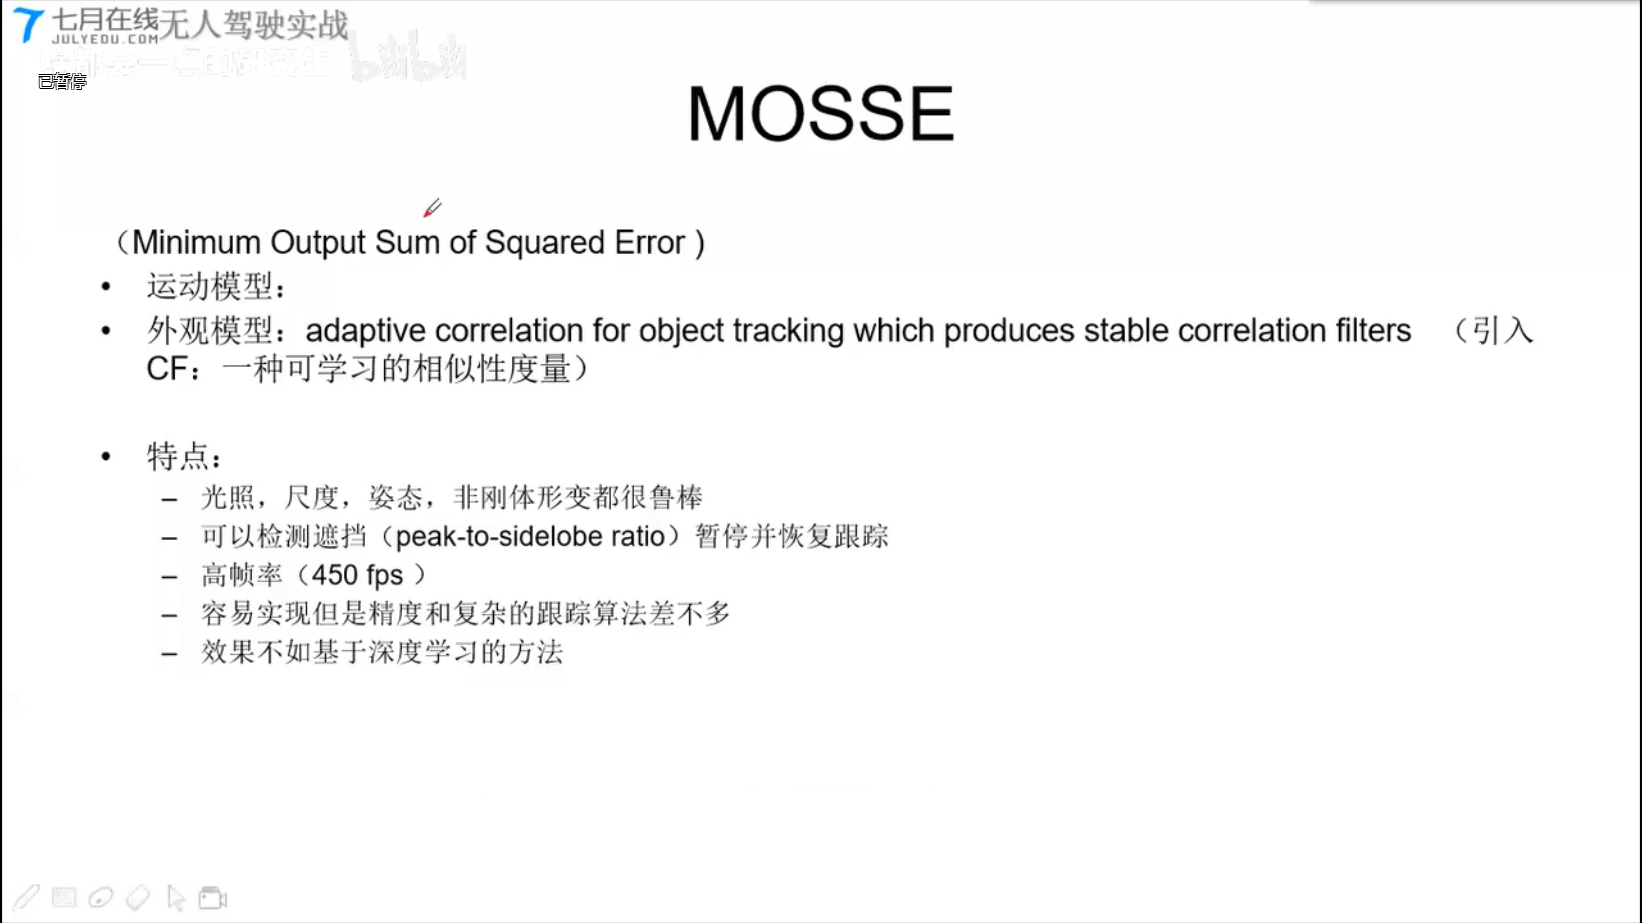
- MOSSE 评价相似性的滤波算法
CSK
- CSK方法
- 密集采样,通过循环矩阵来实现
- 分类器的学习通过快速傅里叶变换成频域内的计算,不受SVM或Boost等学习方法的限制(什么限制??)。无论线性分类还是核分类,整个学习过程十分高效。
- 实时性好
MOSSE
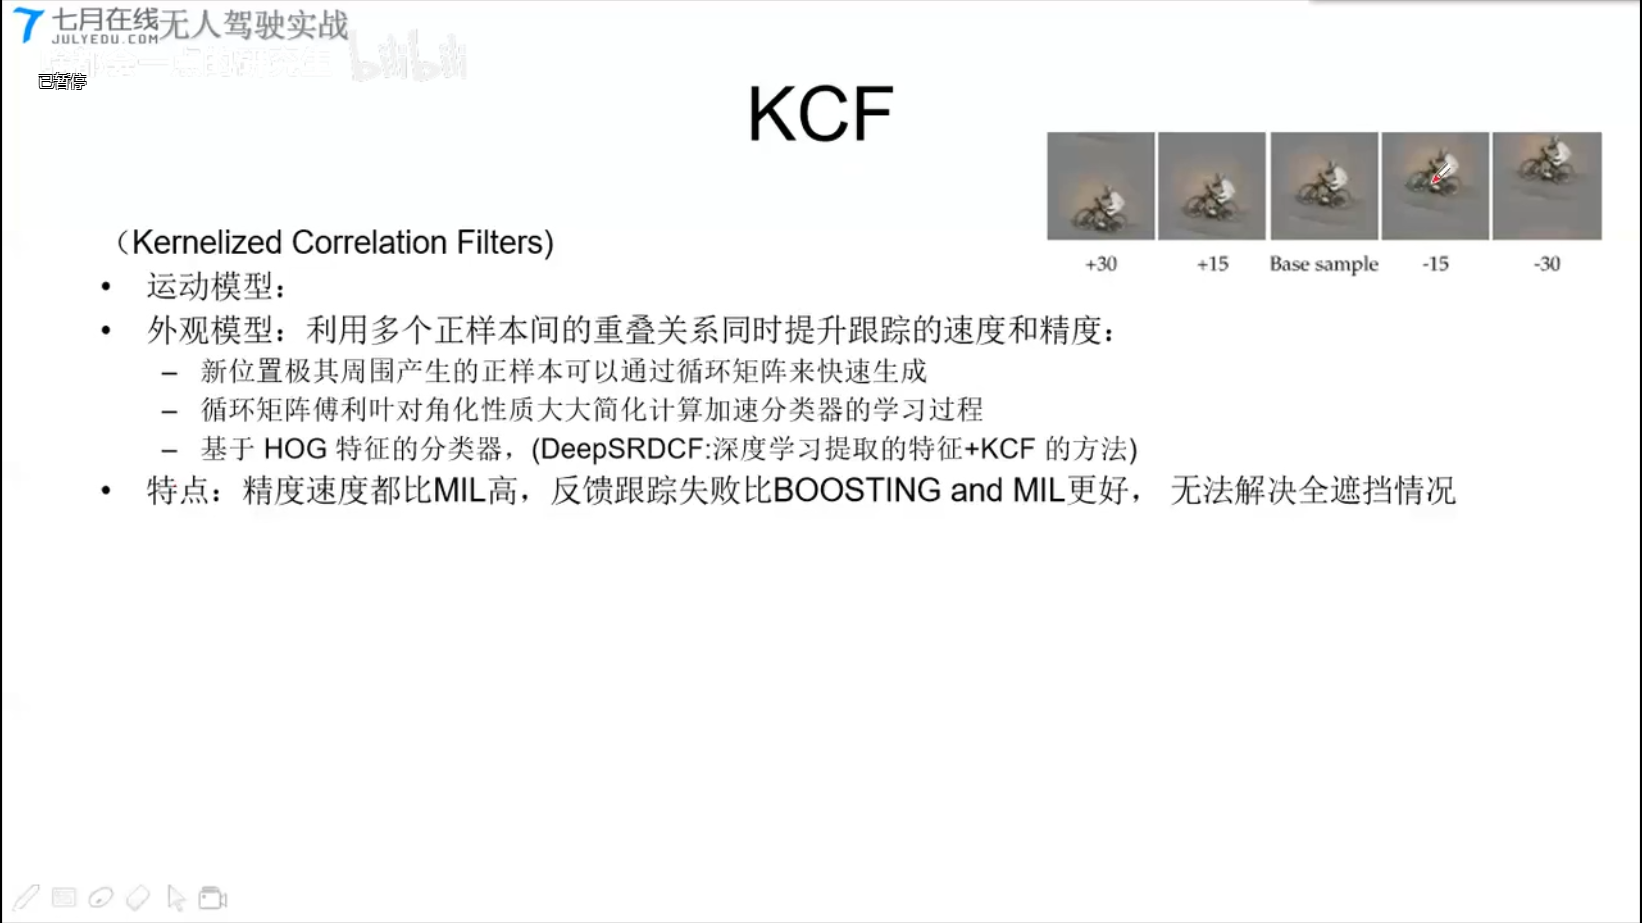
KCF
- 循环矩阵
- 循环矩阵傅里叶对角化性质–简化计算加速分类器的学习过程
- 基于HOG特征的分类器(DeepSRDCF:深度学习提取的特征+KCF方法)
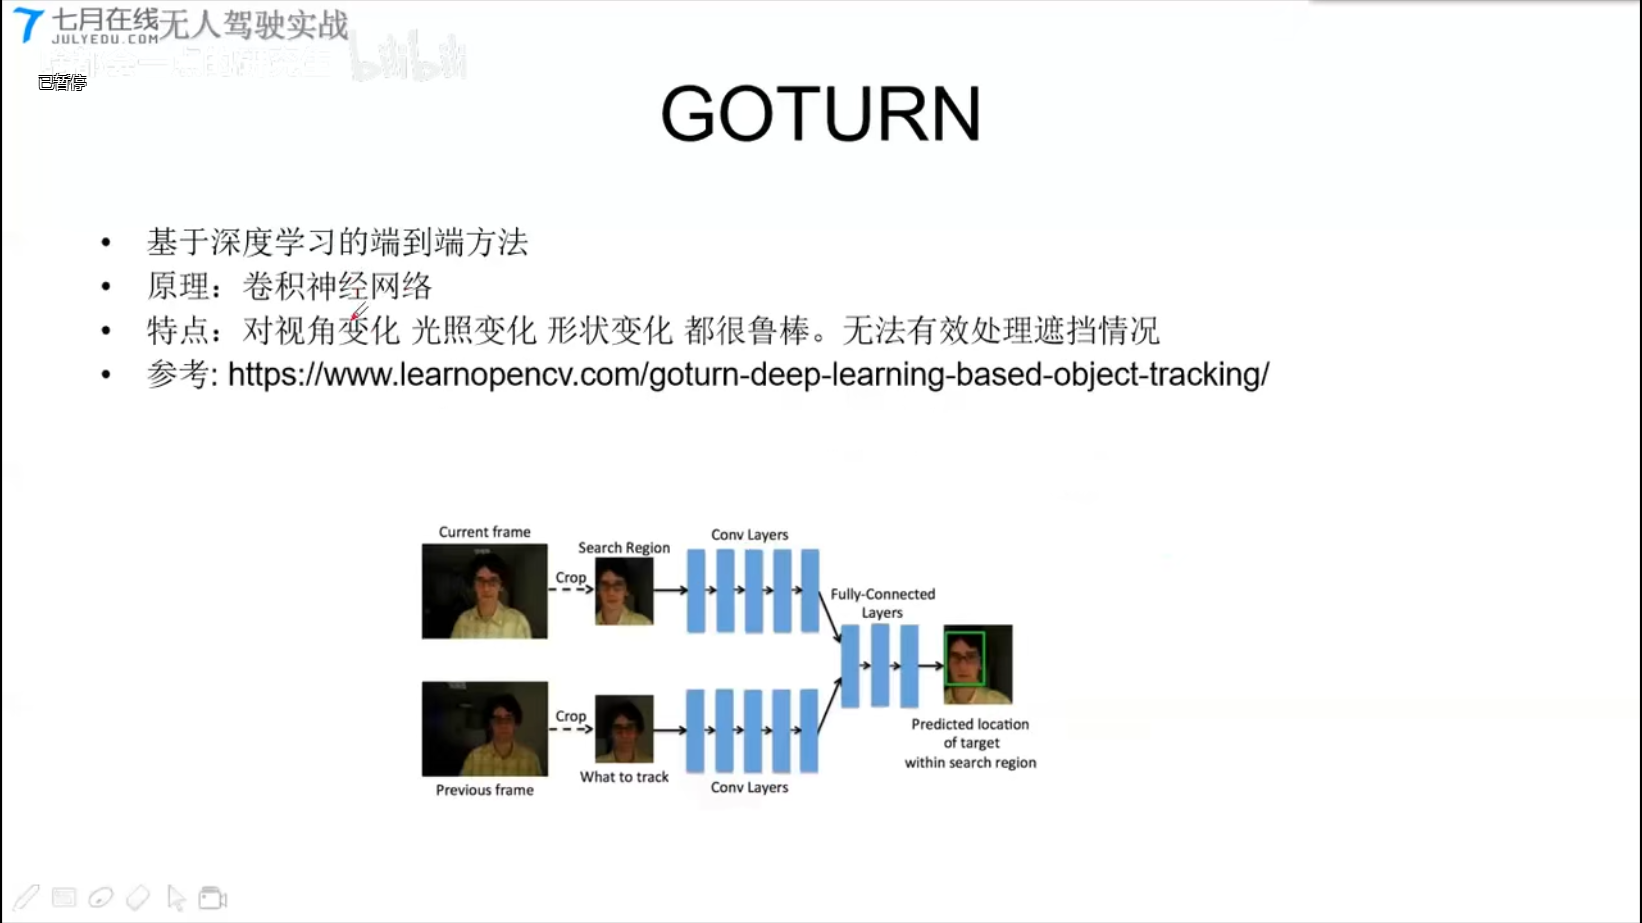
GOTURN (深度学习)
https://www.learnopencv.com/goturn-deep-learning-based-object-tracking/
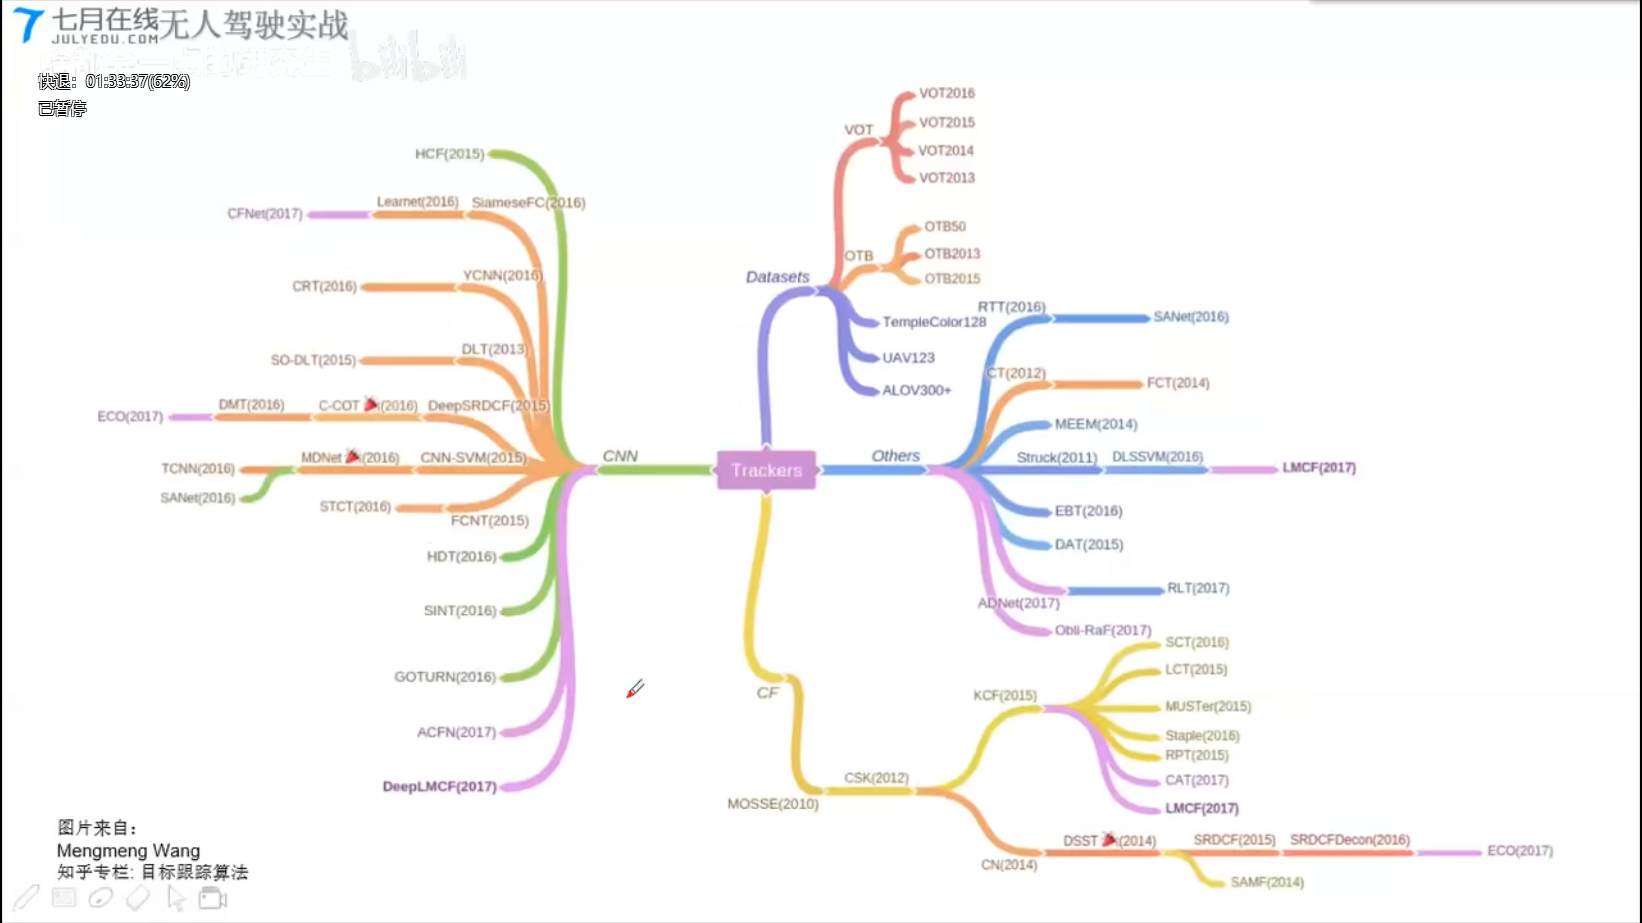
算法综述
数据集;深度学习CNN;CF-相关滤波;其它的
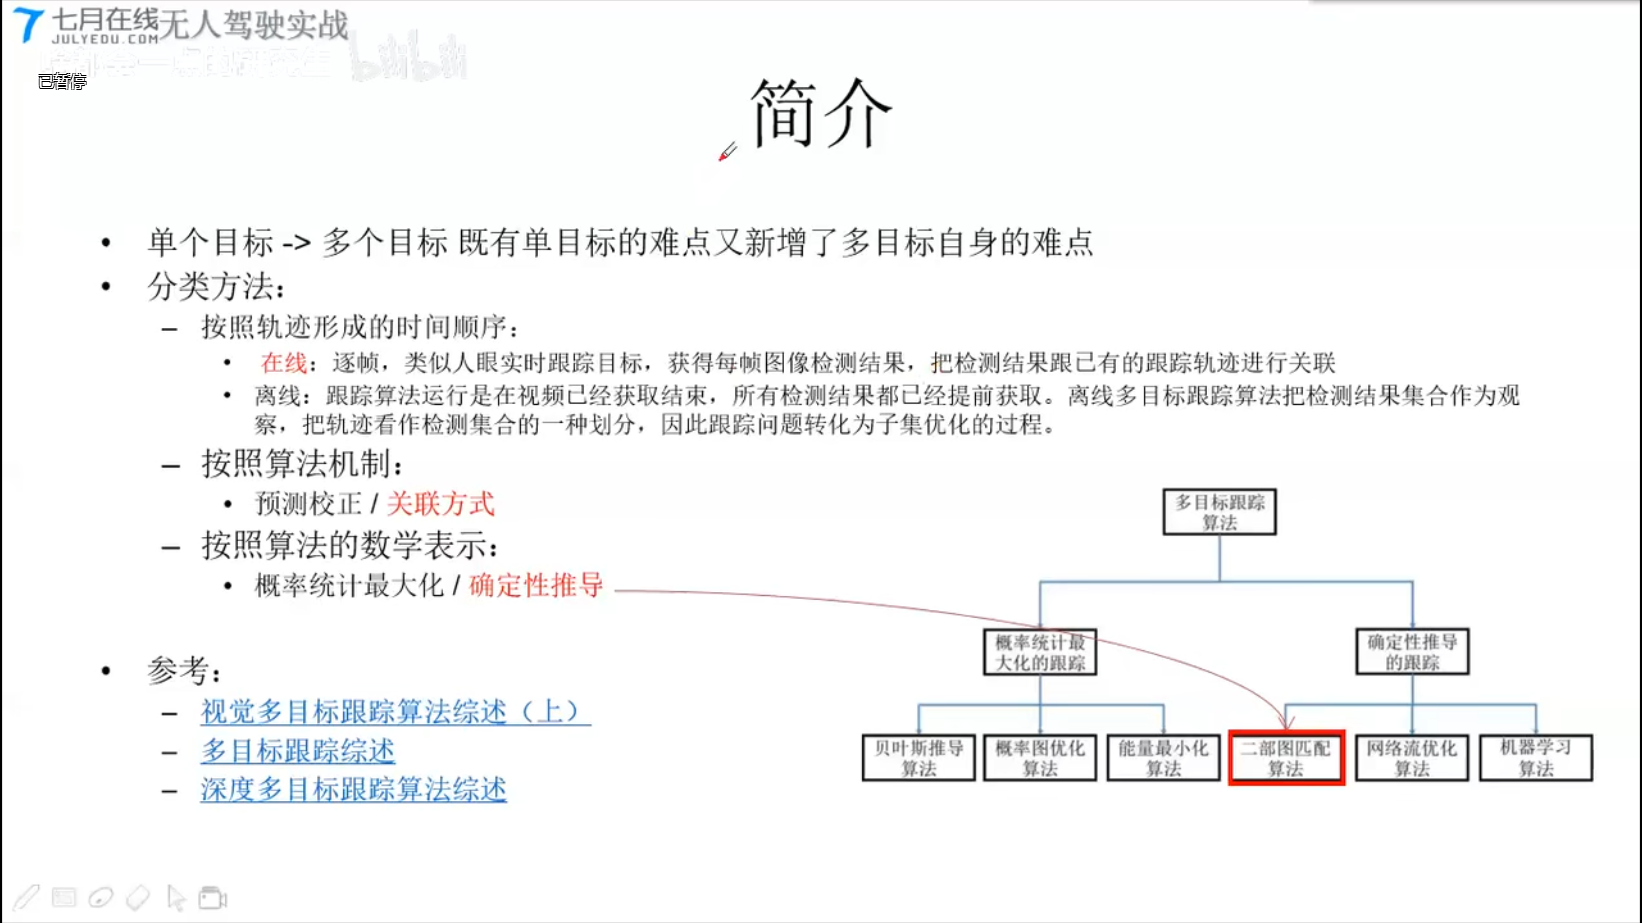
6.3 多目标跟踪
分类方法
- 按照轨迹形成的时间顺序
- 在线
- 离线
- 按照算法机制
- 预测校正 / 关联方式
- 按照算法的数学表示
- 概率统计最大化 / 确定性推导
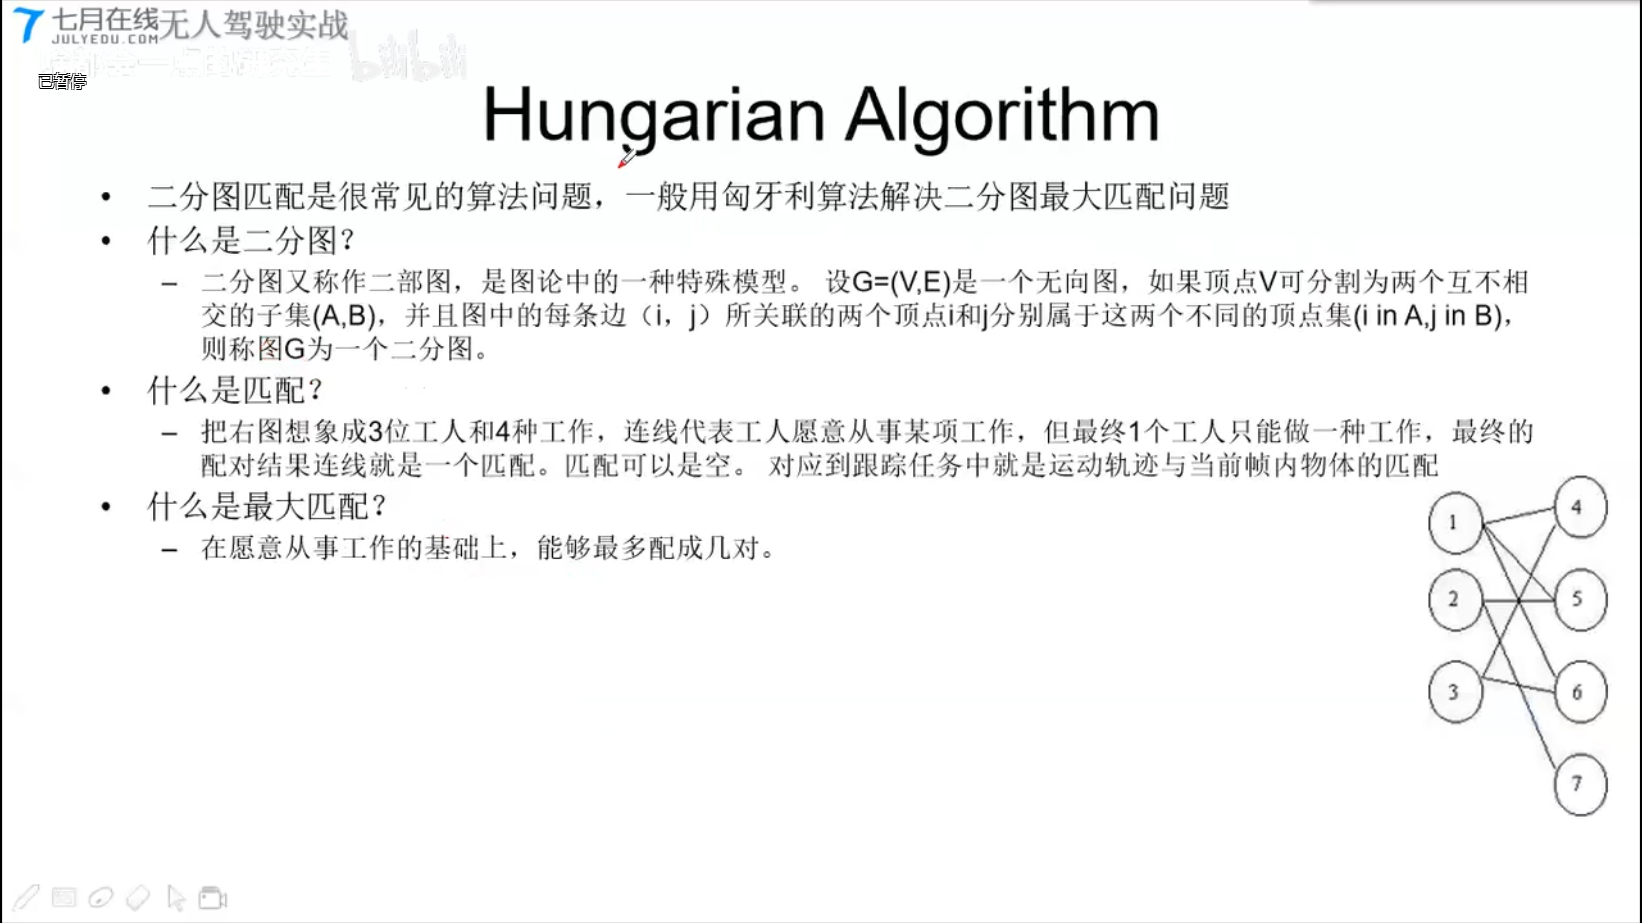
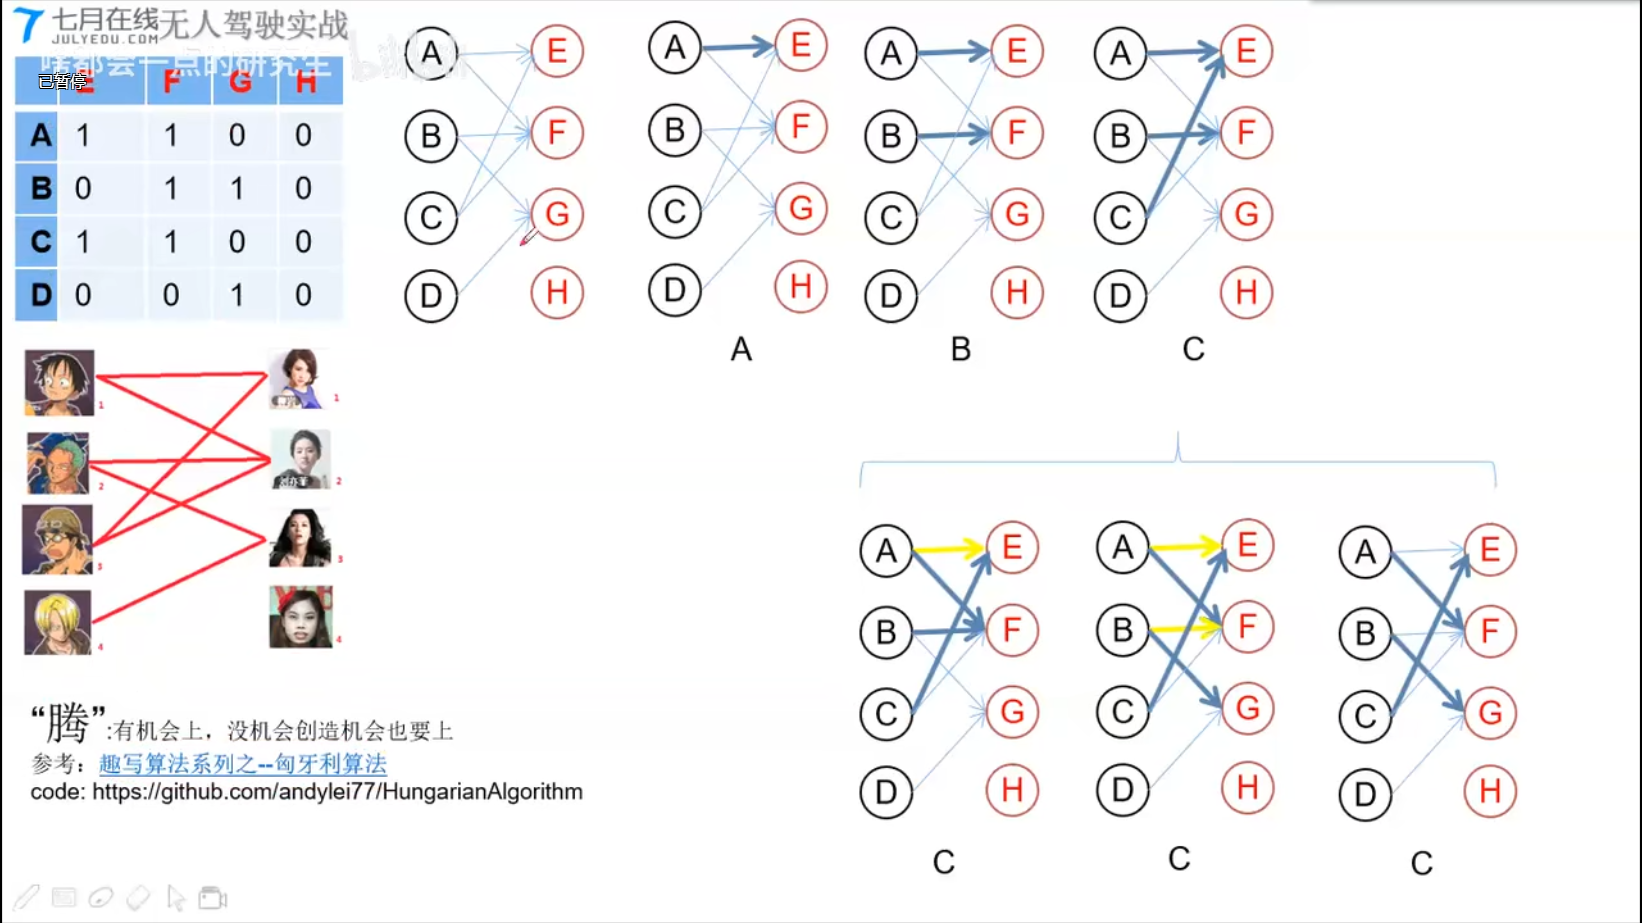
Hungarian Algorithm
https://github.com/andylei77/HungarianAlgorithm
实战
发送端:https://github.com/andylei77/object-detector/tree/ROS
- 基于二分图匹配的多目标跟踪
接受端:https://github.com/andylei77/object-tracker/tree/master/tracker
深度学习编译器之TVM
TVM
[TOC]
训练框架
从训练框架角度来看,Google的TensorFlow和FaceBook的Pytorch是全球主流的深度学习框架,另外亚马逊的MxNet,百度的Paddle,旷视的MegEngine,华为的Mindspore以及一流科技的OneFlow也逐渐在被更多人接受和使用。这么多训练框架,我们究竟应该选择哪个?如果追求易用性,可能你会选择Pytorch,如果追求项目部署落地,可能你会选择TensorFlow,如果追求分布式训练最快可能你会体验OneFlow。
亚马逊的MxNet,
百度的Paddle,
旷视的MegEngine,
华为的Mindspore
ModelScope:阿里达摩院联手中国计算机学会(CCF)
推理框架
前向推理框架,例如在Intel的CPU/GPU上就使用OpenVINO,在Arm的CPU/GPU上使用NCNN/MNN等,在Nvidia GPU上使用TensorRT。
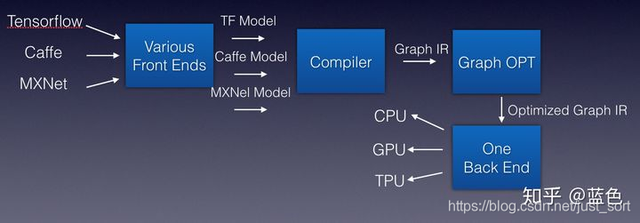
科学家为编译器抽象出了编译器前端,编译器中端,编译器后端等概念,并引入IR (Intermediate Representation)的概率。解释如下:
- 编译器前端:接收C/C++/Java等不同语言,进行代码生成,吐出IR
- 编译器中端:接收IR,进行不同编译器后端可以共享的优化,如常量替换,死代码消除,循环优化等,吐出优化后的IR
- 编译器后端:接收优化后的IR,进行不同硬件的平台相关优化与硬件指令生成,吐出目标文件以LLVM编译器为例子,借用蓝色(知乎ID)大佬的图:

深度学习的IR其实就是计算图,所以可以直接叫作Graph IR
基于上面深度学习编译器的思想,陈天奇领衔的TVM横空出世。TVM就是一个基于编译优化的深度学习推理框架(暂且说是推理吧,训练功能似乎也开始探索和接入了),我们来看一下TVM的架构图。
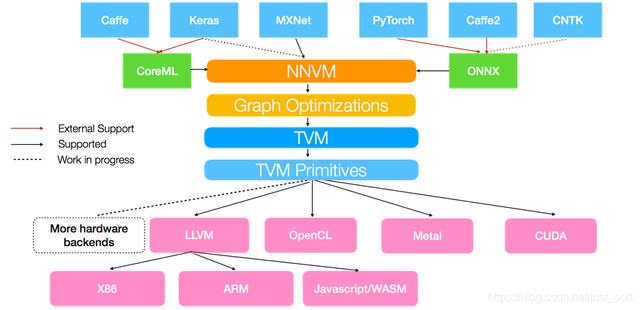
TVM架构图从这个图中我们可以看到,TVM架构的核心部分就是NNVM编译器(注意一下最新的TVM已经将NNVM升级为了Realy,所以后面提到的Relay也可以看作是NNVM)。NNVM编译器支持直接接收深度学习框架的模型,如TensorFlow/Pytorch/Caffe/MxNet等,同时也支持一些模型的中间格式如ONNX、CoreML。这些模型被NNVM直接编译成Graph IR,然后这些Graph IR被再次优化,吐出优化后的Graph IR,最后对于不同的后端这些Graph IR都会被编译为特定后端可以识别的机器码完成模型推理。比如对于CPU,NNVM就吐出LLVM可以识别的IR,再通过LLVM编译器编译为机器码到CPU上执行。
0x04. 样例展示
在展示样例前说一下我的环境配置,pytorch1.7.0 && TVM 0.8.dev0
这里以Pytorch模型为例,展示一下TVM是如何将Pytorch模型通过Relay(可以理解为NNVM的升级版,)构建TVM中的计算图并进行图优化,最后再通过LLVM编译到Intel CPU上进行执行。最后我们还对比了一下基于TVM优化后的Relay Graph推理速度和直接使用Pytorch模型进行推理的速度。这里是以torchvision中的ResNet18为例子,结果如下:
1 | Relay top-1 id: 282, classname: tiger cat Torch top-1 id: 282, classname: tiger cat |
可以看到在预测结果完全一致的情况下,TVM能带来2倍左右的加速。这里简单介绍一下代码的流程。这个代码可以在这里(https://github.com/BBuf/tvm_learn)找到。
0x04.1 导入TVM和Pytorch并加载ResNet18模型
1 | import time |
0x04.2 载入测试图片
加载一张测试图片,并执行一些后处理过程。
1 | from PIL import Image |
0x04.3 Relay导入TorchScript模型并编译到LLVM后端
接下来我们将PyTorch的graph导入到Relay成为Relay Graph,这里输入层的名字可以任意指定。然后将Gpath使用给定的配置编译到LLVM目标硬件上。
参考资料
OCR
Install
1 | pip install easyocr |
usage
1 | import easyocr |