[TOC]
1711.08447 [VITON] An Image-based Virtual Try-on Network.pdf
VITON:基于映像的虚拟试穿网络
CVPR 2018论文“ VITON:基于图像的虚拟试穿网络”的代码和数据集
人像提取
本文中使用的人物表示由2D姿态估计器和人工解析器提取:
数据集
由于版权问题,该数据集不再公开可用。对于已经下载数据集的用户,请注意,使用或分发数据集是非法的!
This dataset is crawled from women’s tops on Zalando.
测试
第一阶段
在Google云端硬盘上下载经过预训练的模型。将它们放在model/文件夹下。
运行test_stage1.sh以进行推断。结果在中results/stage1/images/。results/stage1/index.html可视化结果。
第二阶段
运行matlab脚本shape_context_warp.m以提取TPS转换控制点。
然后test_stage2.sh进行优化并生成最终结果,该结果位于中results/stage2/images/。results/stage2/index.html可视化结果。
培养
准备数据
往里走prepare_data。
首先运行extract_tps.m。这将需要一些时间,您可以尝试并行运行它,也可以直接通过Google云端硬盘下载预先计算的TPS控制点,然后将其放入data/tps/。
然后运行./preprocess_viton.sh,生成的TF记录将位于中prepare_data/tfrecord。
第一阶段
跑 train_stage1.sh
第二阶段
跑 train_stage2.sh
引文
如果此代码或数据集有助于您的研究,请引用我们的论文:
1 | @inproceedings{han2017viton, |
https://github.com/xthan/VITON
Paper Viton[札记]
VITON用一个由粗到细的框架解决了这个问题,并期望通过TPS变形来捕捉布料的变形。
An overview of VITON.
VITON Paper:
VITON 的目标在于,对给定的参考图像(模特)I和目标衣服c,生成合成图像I霸;I霸中c被自然地“穿”到参考图像I中模特对应的区域上,而模特的姿势和其他身体部位特征被保留。最直接的方法是用这样的训练集:同一个模特(姿势和人体特征相同)穿着不同衣服的多张图片和对应的这些衣服的产品图。但是这种数据集是很难大规模得到的。
在实际虚拟试衣场景中,在测试时只有参考图像和目标产品的图像是可以得到的。因此,我们把这种设定同样运用到训练集中来,所以输入的参考图像I中模特穿的衣服就是目标衣服c,这样的数据集是易得的(就像某宝上卖衣服,不仅给产品图还要给卖家秀)。那么现在的重点就是,给定c和模特人体信息,怎么训练一个网络->不仅可以生成合成图像,更重要的是要在测试中能够泛化,用任意所需的服装项目合成感知上令人信服的图像。
3. Person Representation 人体特征表示
3.1 Pose heatmap 姿势热图
人体姿势的多样性导致了衣服不同程度的变形,因此我们使用最先进的姿势估计器明确地建模姿势信息。(用的是CVPR2017的人体姿势估计Realtime Multi-Person Pose Estimation)人体姿势估计包含了18个关键点,为了使Represent表示的各个部分可以空间堆叠,每个关键点被转换成热图heatmap,在关键点附近有一个11×11的邻居填充了1, 在其他地方填充0,然后把这些热图堆叠成一个18通道的姿势热图。
- Realtime Multi-Person Pose Estimation –》姿态信息, 18个关键点
3.2 Human body representation 人体身体部位表示
衣服的外形很大程度上取决于人的形状(高矮胖瘦),因此如何将目标衣服进行变形取决于不同的身体部位(如手臂,躯干)和身体形态。一个先进的人体解析的方法(LIP-SSL,个人感觉LIP-SSP比较难跑,caffe环境配置复杂,建议跑它的另一个版本JPPNet,不过要是想得到.mat要自己改一下输出)输出人体分割图(.mat格式,不同分割区域标记了不同编号)。然后我们把这个分割图转换成一个单通道的二进制掩模,其中1代表身体部分,0表示其他部位。这个二进制掩模呗下采样成一个低分辨率的图(16*12),当身体形状和目标衣服混淆时,避免伪影。
- LIP-SSL 人体解析算法,生成人体分割图.mat文件
- JPPNET(option)
3.3 Face and hair segment 脸部、头发的分割
为了维持人本身的特点,我们在人体表示中融入了身体特征,如脸、肤色、头发之类。我们用Human body representation里一样的人体解析器分离出人脸和头发部分的RGB图,作为新合成图像的身份信息。
- LIP-SLL 分离人脸和头发部分的RGB图
Pose + Body + Face == (18 + 1 + 3)
最后,把以上得到的三个部分转换到统一分辨率,然后堆叠形成与衣物无关的人体表示P(256,192,22),示意图如下。P包含了丰富的人体信息,convNet就是基于这些信息学习它们之间的关系,比以往的person Presentation都精细。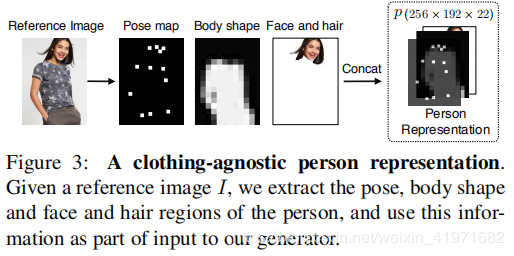
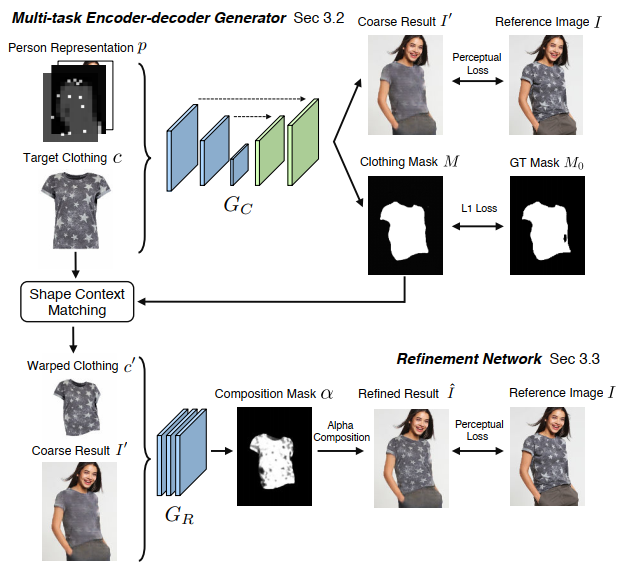
Multi-task Encoder-Decoder Generator -> Gc
输入:Person Representation P和目标衣服Target Clothing C
输出:粗合成I’和对应区域掩模M
Gc:这里用到的编码解码框架是一种包含连接跳跃skip connections的U-net网络结构。
设Gc为编码解码器估计的方程,它将P和C组合作为输入并输出四通道(I‘和M)结果。我们希望得到一个生成器,使得粗合成图I’尽可能接近参考图I,掩模M尽可能接近从参考图I模特上预测得到的伪ground truth掩模M0。一个简单的方法就是用L1损失,使当输出目标是M0这样的二进制掩模时,它会产生不错的结果。但是如果输出要是RGB图像的话,L1 Loss就会使输出图像变模糊。我们还引入了a perceptual loss感知损失。下式是感知损失的和以及LI Loss加和的结果。
网络用ImageNet数据集训练的VGG19权重初始化。超参数lamda_i控制第i层的贡献。第一个Stage的Gc没有学习细节(L1 Loss导致),所以得到的是粗合成图。
Refinement Network -> GR
是为了从目标衣服产品图中学习对应模糊图像区域的细节并恢复。
Warped clothing item 衣服变形
为了运用目标衣服产品图中的纹理细节,要先对衣服进行变形。
a thin plate spline (TPS) transformation
VITON_realtime
Dataset
The dataset can be downloaded on Google Drive.
This dataset is crawled from women’s tops on Zalando. These images can be downloaded on Google Drive. The results of pose estimation and human parsing are also included. Note that number of the images/poses/segmentation maps are more than that reported in the paper, since the ones with bad pose estimations (too few keypoints are detected) or parsing results (parsed upper clothes regions only occupy a small portion of the image).
Put all folder and labels in the data folder:
data/women_top: reference images (image name is ID_0.jpg) and clothing images (image name is ID_1.jpg). For example, the clothing image on reference image 000001_0.jpg is 000001_1.jpg. The resolution of these images is 1100x762.
data/pose.pkl: a pickle file containing a dictionary of the pose keypoints of each reference image. Please refer to this demo for how to parse the stored results, and OpenPose output to understand the output format. (字典文件保存:(pose keypoints, image)pose keypoints of each reference image)
包含每个参考图像的位姿关键点字典的pickle文件。请参考这个演示如何解析存储的结果,和OpenPose输出来理解输出格式。
data/pose/: folder containing the pose keypoints of each reference image.
data/segment: folder containing the segmentation map of each reference image. In a segmentation map, label 5 corresponds to the regions of tops (used as pseudo ground truth of clothing region). label 1 (hat), 2 (hair), 4 (sunglasses), and 13 (face) are merged as the face/hair representation. All other non-background regions are merged for extracting the body representation. The colormap for visualization can be downloaded here. Due to padding operations of the parser, these segmentation maps are 641x641, you need to crop them based on the aspect ratio of the original reference images.
data/tps/: TPS control points between product image and its corresponding reference image.
data/viton_train_images.txt: training image list.
data/viton_train_pairs.txt: 14,221 reference image and clothing training image pairs.
data/viton_test_pairs.txt: 2,032 reference image and target clothing testing image pairs. Note that these pairs are only used for the evaluation in our paper, one can choose any reference image and target clothing to generate the virtual try-on results.
问题1:(人体解析)segment的数据来源
LIP-SSL 人体解析,分离人脸,发等特征
问题2:(姿态评估)pose.pkl 文件格式,如何生成
see ##3.1. Person Representation
reference images的pose keypoints
Realtime_Multi-Person_Pose_Estimation 模型得到的人体姿态评估 18通道
问题3:(人体分割)pose结果的格式
LIP_SSL得到的人体Shape .mat 文件
问题4:pose keypoints文件的来源
见问题3
问题5:tps的数据格式
替代技术选型:
Human Parse: SS-NAN
Pose Estimator: TF-pose-estimation
RUN (How to run?)
- Download related models
Download pretrained SS-NAN model here. Put AttResnet101FCN_lip_0023.h5 under SS-NAN/ folder.
Model of tf-pose-estimation is already in the repo since it could use mobile-net.
Download pretrained VITON models on Google Drive. Put them under model/ folder.
For remote server with GPU support, run the below for API server to deal with pose and segmentation inferrence:
1
2
3
conda env create -f environment.yml
source activate MakeNTU
bash run_API_server.shFor local server, run the below to do VITON inferrence and avoid tensorflow session problem for concurrency:
1
2
3
4
conda env create -f environment.yml
source activate MakeNTU
export FLASK_APP=VITON_local_server.py
flask runChange settings in VITON_Demo_post:
Set VIDEO_SOURCE to your webcam number or video path.Finally, run the main app:
1
2
3
4
5
export SEG_SERVER=<IP address ofthe remote server, like http://192.168.0.123:8000>
export POSE_SERVER=<IP address ofthe remote server, like http://192.168.0.123:8000>
export VITON_SERVER='http://localhost:5000'
source activate MakeNTU
python VITON_Demo_post.py
Keyboard controls
1 | q: to exit |
Other files are for running all things locally or without concurrency.
One could also run python post_viton.py to run without local VITON server.