OpenVINO基础
OpenVINO是英特尔推出的视觉推理加速工具包。应用在Intel的CPU及其GPU上。OpenCV 3.4.1版本加入了英特尔推理引擎后端(英特尔推理引擎是OpenVINO中的一个组件),为英特尔平台的模型推理进行加速。OpenCV新版本(4.3.0)加入nGraph OpenVINO API(2020.03)。
2018 年5月 Intel 发布了 OpenVINO(Open Visual Inferencing and Neural Network Optimization, 开放视觉推理和神经网络优化)工具包,旨在为Intel 计算平台的(基于神经网络的视觉推理任务)提供高性能加速方案,同时支持Intel CPU、 GPU、FPGA 和 Movidius 计算棒等。
————————————————
原文链接:https://blog.csdn.net/weixin_39956356/article/details/107103244
Libtorch download urls
[TOC]
libtorch_URLs
1 | libtorch 1.0.0 |
Source Build
1 | git clone --recursive https://github.com/pytorch/pytorch # --recursive表示下载子模块,但有些模块很难下载下来,可以先用 git clone https://github.com.cnpmjs.org/pytorch/pytorch |
克隆下来的是最新版本,执行git tag查看分支,然后git checkout branch_name切换到想要的分支,
1 | git checkout v1.7.1-rc3 |
注意:如果下载比较慢或者报错,可以在pytorch目录下查看.gitmodules文件, 切换分支后先把里面网址替换为github加速插件的地址, 然后再执行git submodule sync 和 后面的命令
1 | git config --global --unset http.proxy |
ONNX Infrence
[TOC]
https://stackoverflow.com/questions/65379070/how-to-use-onnx-model-in-c-code-on-linux
pytorch to onnx to tensorRT
mx2onnx
MXNet model to the ONNX model format
onnx2mx
pytorch2onnx
pb2onnx
1 | import tf2onnx |
pytorch Model c++ inference in platform
[TOC]
C++模型调用
模型转换思路通常为:
- Pytorch -> ONNX -> TensorRT
- Pytorch -> ONNX -> TVM
- Pytorch -> 转换工具 -> caffe
- Pytorch -> torchscript(C++版本Torch) [此方式]
- pytorch-> JIT -> TensorRT
https://pytorch.org/cppdocs/api/library_root.html
https://pytorch.org/tutorials/advanced/cpp_frontend.html
最近所里有一个 GUI 项目需要调用 PyTorch 的模型,虽然之前做过一些,但是大部分用的是 Python 接口,这次对实效性有要求,因此做一个 C++的接口,现在把一些配置事项做个记录。
准备工作
下载安装支持库
首先,需要下载安装LibTorch支持库,推荐使用 LibPyTorch
下载后直接解压
1 | wget https://download.pytorch.org/libtorch/nightly/cpu/libtorch-shared-with-deps-latest.zip |
基于已训练的 Torch 模型
追踪原始模型
需要注意的是,如果希望加载 PyTorch 库到 C++中,首先需要基于 JIT 库的 TorchScript 对模型进行转化,这里以简单resnet18模型来作为示例,可以简单的使用torchvision中的模型库进行生成,接着我们生成一个简单的假数据,利用torch.jit.trace让 TorchScript 能够遍历一遍模型,便可完成追踪。
1 | import torch |
对于可能存在依赖于数据输入条件的情况,如以下模型:
1 | import torch |
数据的前向传播有赖于输入的值,那么可以调用torch.jit.script直接进行转换:
1 | my_module = MyModule(10,20) |
区别在于第二种方式实现时可以直接将正在训练的模型调用加载。 在获得上述的traced_script_module后,实际上这是一个序列化的 torch 张量字典,可以直接调用save方法完成保存:
1 | # 保存使用TorchScript遍历的模型 |
加载 Torch 模型
有了保存后的 pt 模型后,在 C++中的调用,即为和 LibTorch 库的交互,这里以官方的例子作说明
新建 C++项目, CMakeList 配置可以参考以下
1 | cmake_minimum_required(VERSION 3.16) |
对应简单加载 C++代码如下:
1 | #include <torch/script.h> // One-stop header. |
同时我们新建一个 build 文件夹以保存编译时文件
至此项目大致结构如下:
1 | ├── build |
进入 build 文件夹执行
1 | (base) ➜ cd build |
可以获得类似输出:
1 | (base) ➜ build cmake .. |
接着前往上级文件夹,执行编译得到的主程序:
1 | (base) ➜ cd .. |
使用CLion等IDE可以更简单的编译管理,而不需要自行build。
注意事项
注意加载模型时,两者必须在同一设备(Device)中。
基于 C++ 前端训练模型
实际上 C++前端提供了训练模型的接口,但是实施难度不低,相比 Python 训练完成后转 TypeScript 调用,这个方式稍显复杂。 官方提供的教程如下:使用 PyTorch 的 C++前端,后续再更新吧。
参考:
Offical Doc Pytorch cpp_export
2019-07 Cnblog 使用C++调用并部署pytorch模型
2020-07 CSDN Ubuntu下C++调用pytorch训练好模型–利用libtorch
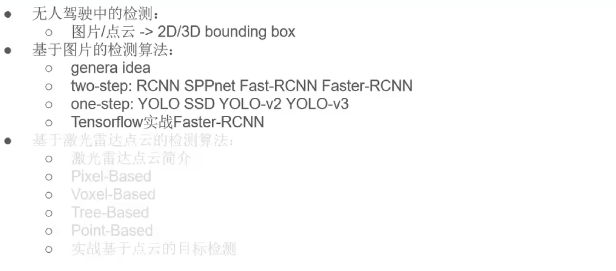
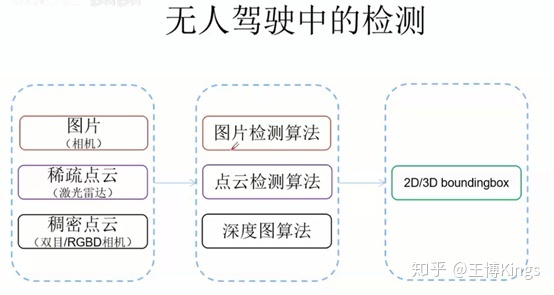
无人驾驶(4)动态环境感知与2D检测
无人驾驶中的动态环境检测-2D检测
[TOC]
2D检测
IDea:
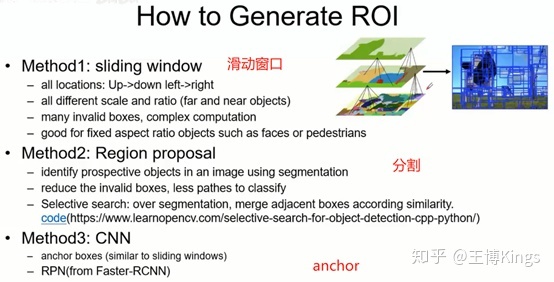
- 位置:先找到所有的ROI
- Sliding Window / Slective Search / … | CNN(RPN …)
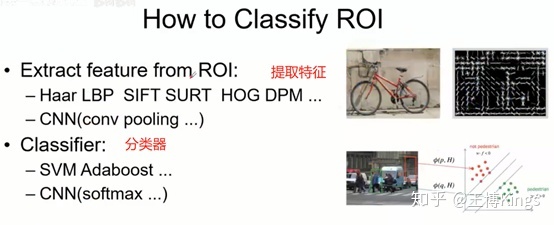
- 类别:对每个ROI进行分类提取类别信息
- HOG/DPM/SIFT/LBP/… | CNN(conv pooling)
- SVM / Adaboost / … | CNN (softmax ….)
- 位置修正:Bounding Box Regression
- Linear Regresion / … | CNN(regression …)
How to Generate ROI
How To Classify ROI
4.1 two-step (基于图片的检测方法)
- RCNN, SPPnet, Fast-RCNN, Faster-RCNN
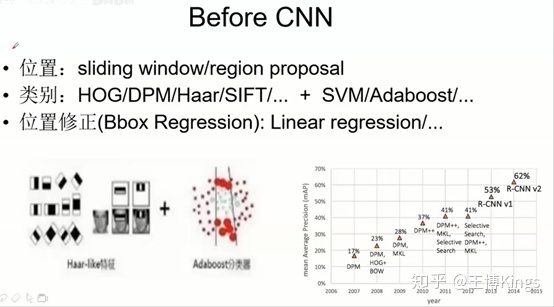
Befor CNN
位置:sliding window / region proposal(候选框)
- 手工特征 + 分类器
- 位置修正
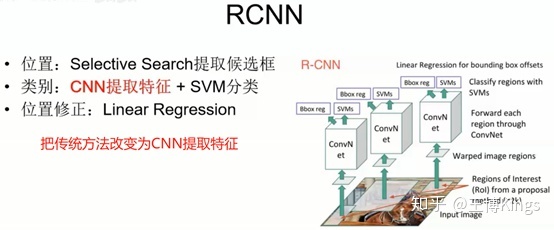
RCNN
- 位置:Selective Search 提取候选框
- 类别:CNN提取特征 + SVM分类
- 每个候选区域都要做一遍卷积,太多重复计算
- 位置修正:Linear Regression
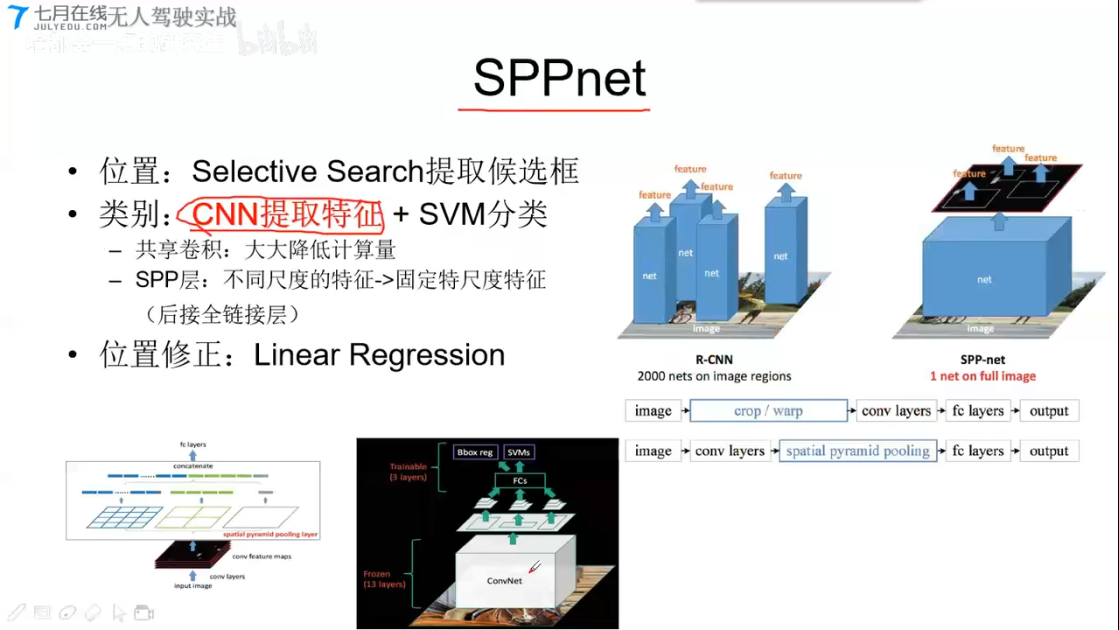
SPPnet
- 位置:Selective Search 提取候选框
- 类别:CNN提取特征 + SVM分类
- 共享卷积,大大降低计算量
- SPP层,不同尺度的特征–>固定特尺度特征(后接全连接层)
- 把原始图片中的box区域mapping映射到CNN提取后的feature的一个box
- 通过金字塔池化,把原本不同大小的box,提取成固定大小的特征
- 输入到FC层
- 位置修正:Linear Regression
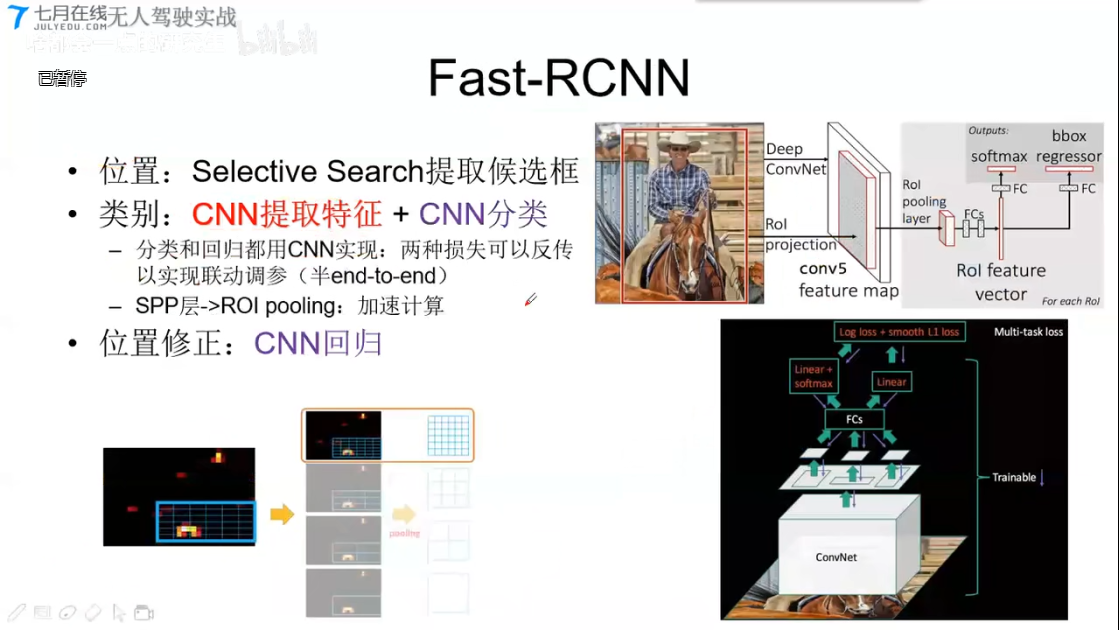
Fast-RCNN
- 位置:Selective Search 提取候选框
- 类别:CNN特征提取 + CNN分类
- 分类和回归都使用CNN实现,两种损失可以反传以实现联动调参(半end-to-end)
- SPP层—换成—>ROI pooling: (可能损失精读)加速计算
- 位置修正:CNN回归
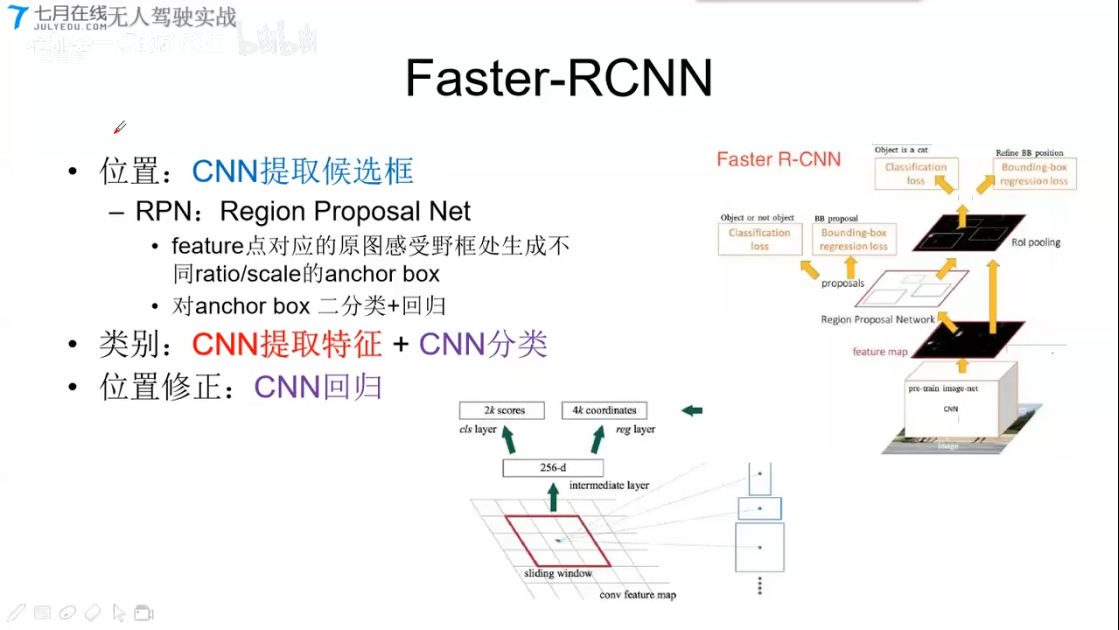
Faster-RCNN
- 位置:CNN提取候选框
- RPN:Region Proposal Net
- feature 点对应的原图感受野框处生成不同ration/scale的anchor box
- 对anchor box (锚点框) 二分类 + 回归
- 2k socre 是否有物体
- 4k coork 回归量,修正位置($\delta{A}$)
- RPN:Region Proposal Net
- 类别:CNN特征提取 + CNN分类
- 位置修正:CNN回归
4.2 one-step
- YOLO,
- SSD
- YOLOv2
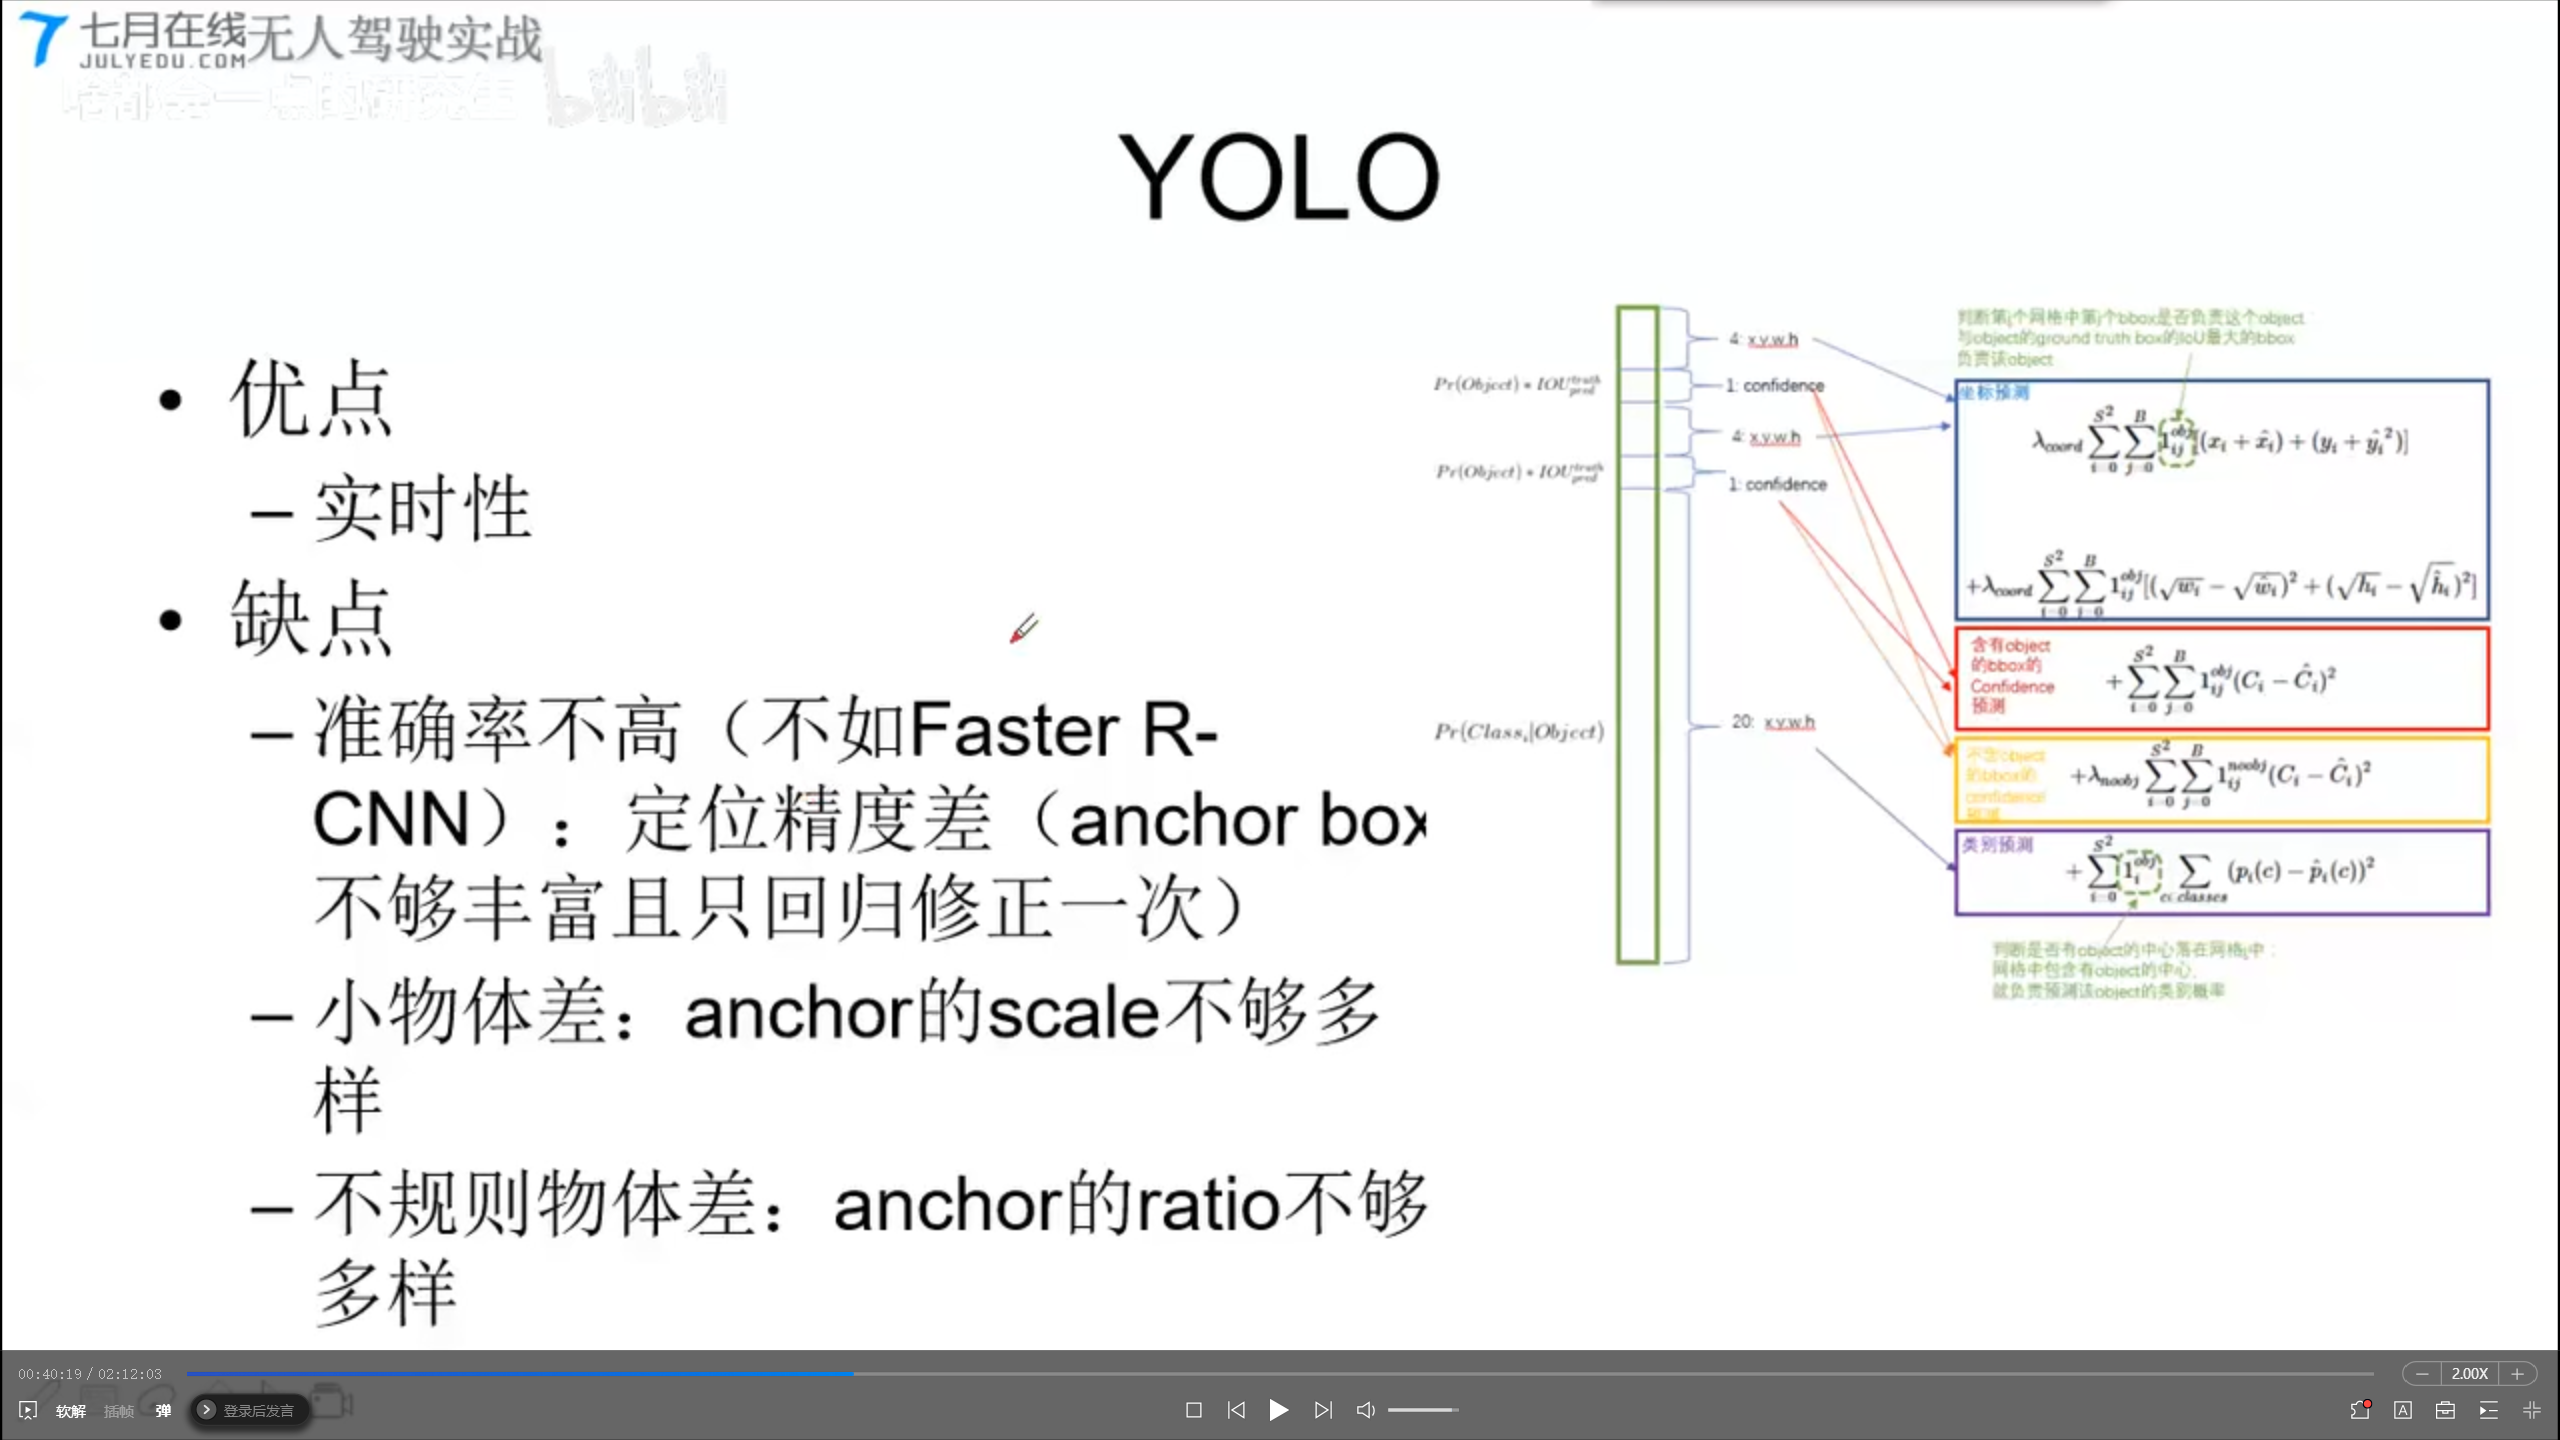
YOLO
- 位置:
- Faster-RCNN
- YOLO
- 全图划分成7x7的网格,每个网格对应2个default box
- 没有候选框,直接对default box做全分类+回归(box中心坐标的x,y相对于对应的网格归一化到0-1之间,w,h用图像的width和height归一化到0-1之间)
- FC1—->FC2{1470x1}–reshape->{7x7x30} ————{1x1x30}
- 类别:CNN提取特征 + CNN分类
- 优点:实时性
- 缺点:
- 准确率不高(不如faster-rcnn);定位精度差(anchor box不够丰富且只能回归修正一次)
- 小物体差:anchor和scale不够多样。
- 不规则物体差:anchor的ratio不够多样。

1x1x30的含义:
两个默认框的预测值
4 xywh (坐标预测), 1, 4 xywh(坐标预测), 1, 20(20个分类预测)
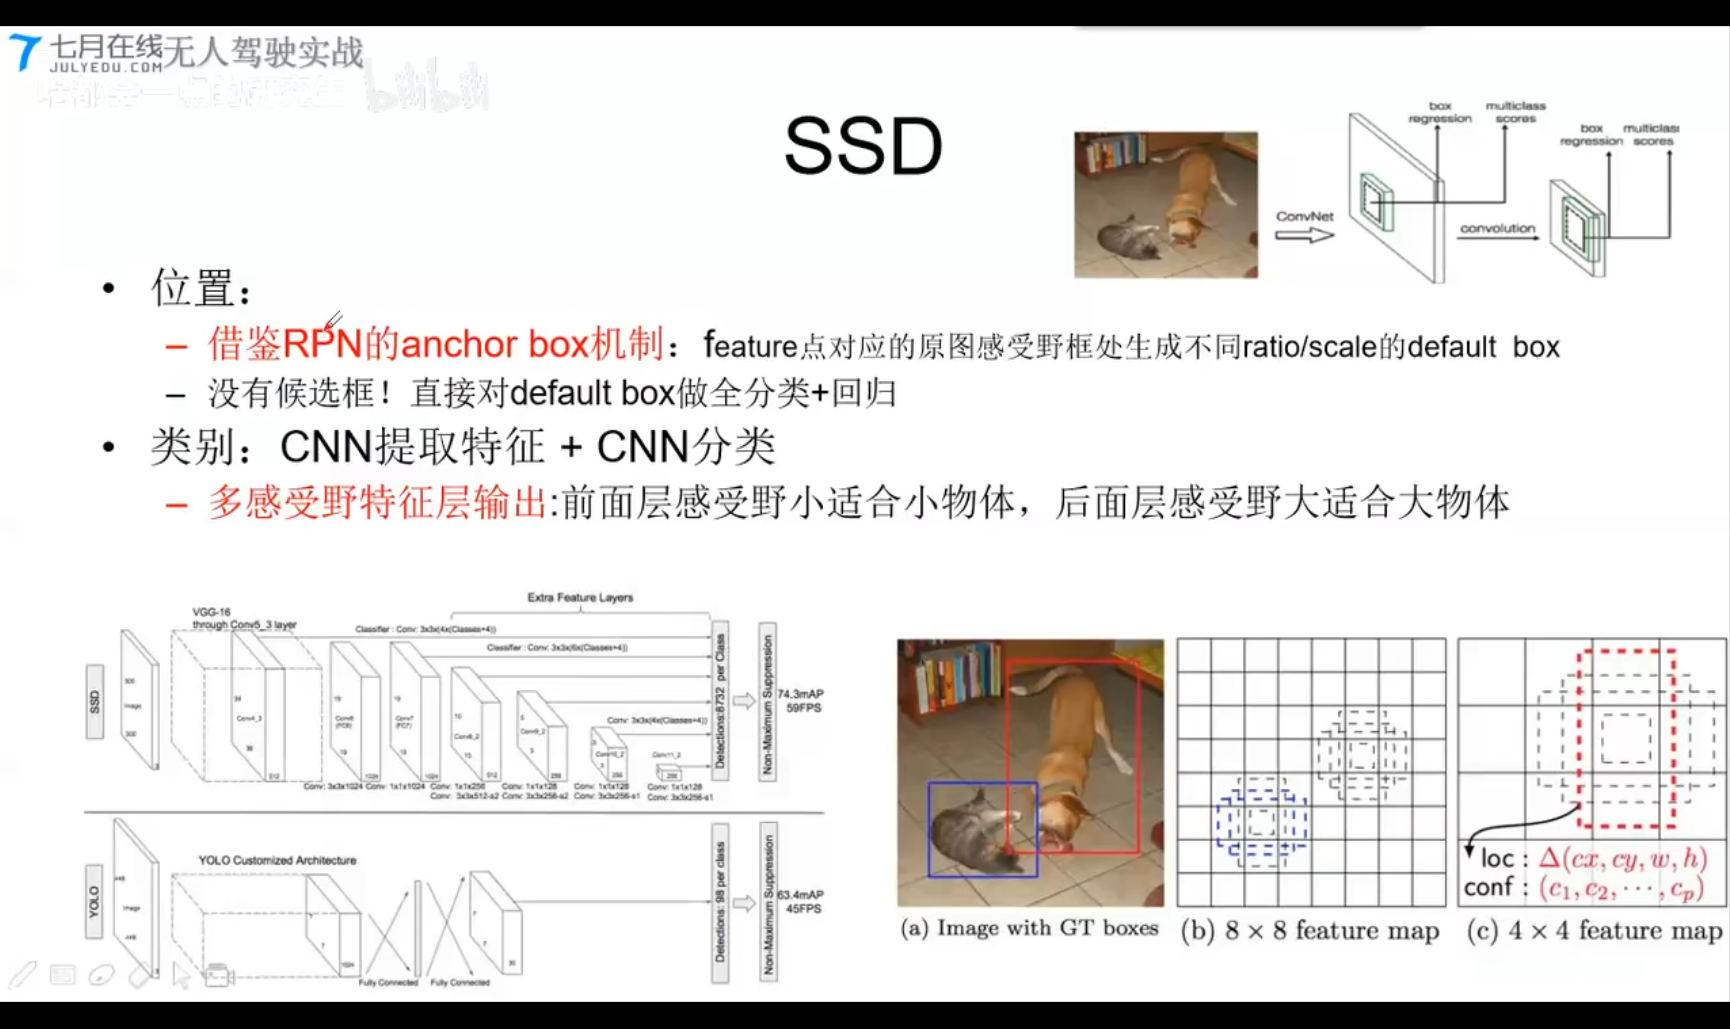
SSD
- 位置:
- 借鉴RPN的anchor Box机制: feature点对应的原图感受野框处生成不同ratio/scale的default box
- 没有候选框!直接对default box做全分类+回归
- 类别:CNN提取特征 + CNN分类
- 多感受野特征词输出:前面层感受野小适合小物件,后面层感受野大适合大物体。
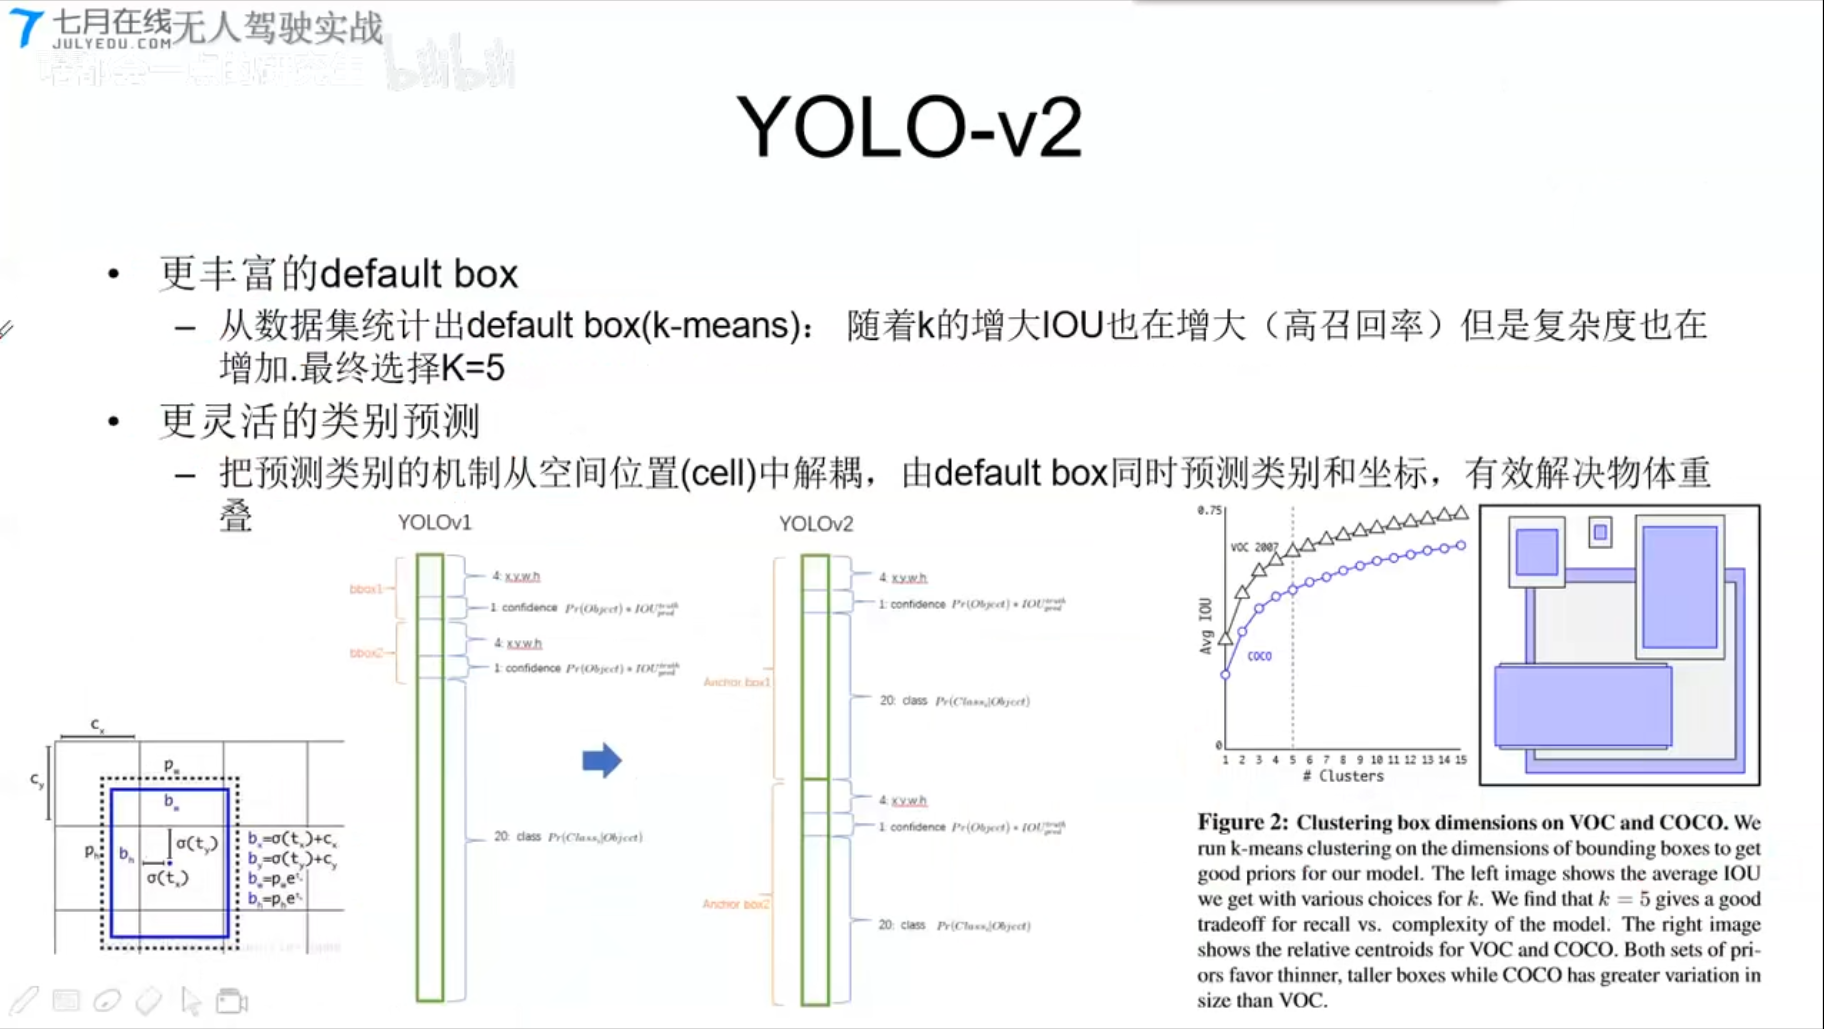
YOLOv2
- 更丰富的default box
- 从数据集统计出default box(k-means);随着k的增大,IOU也增大(高召回率)但是复杂度也在增加,最终选择k=5
- 更灵活的类别预测
- 把预测类别的机制从空间位置(cell)中解耦,由default box同时预测类别和坐标,有效解决物体重叠。
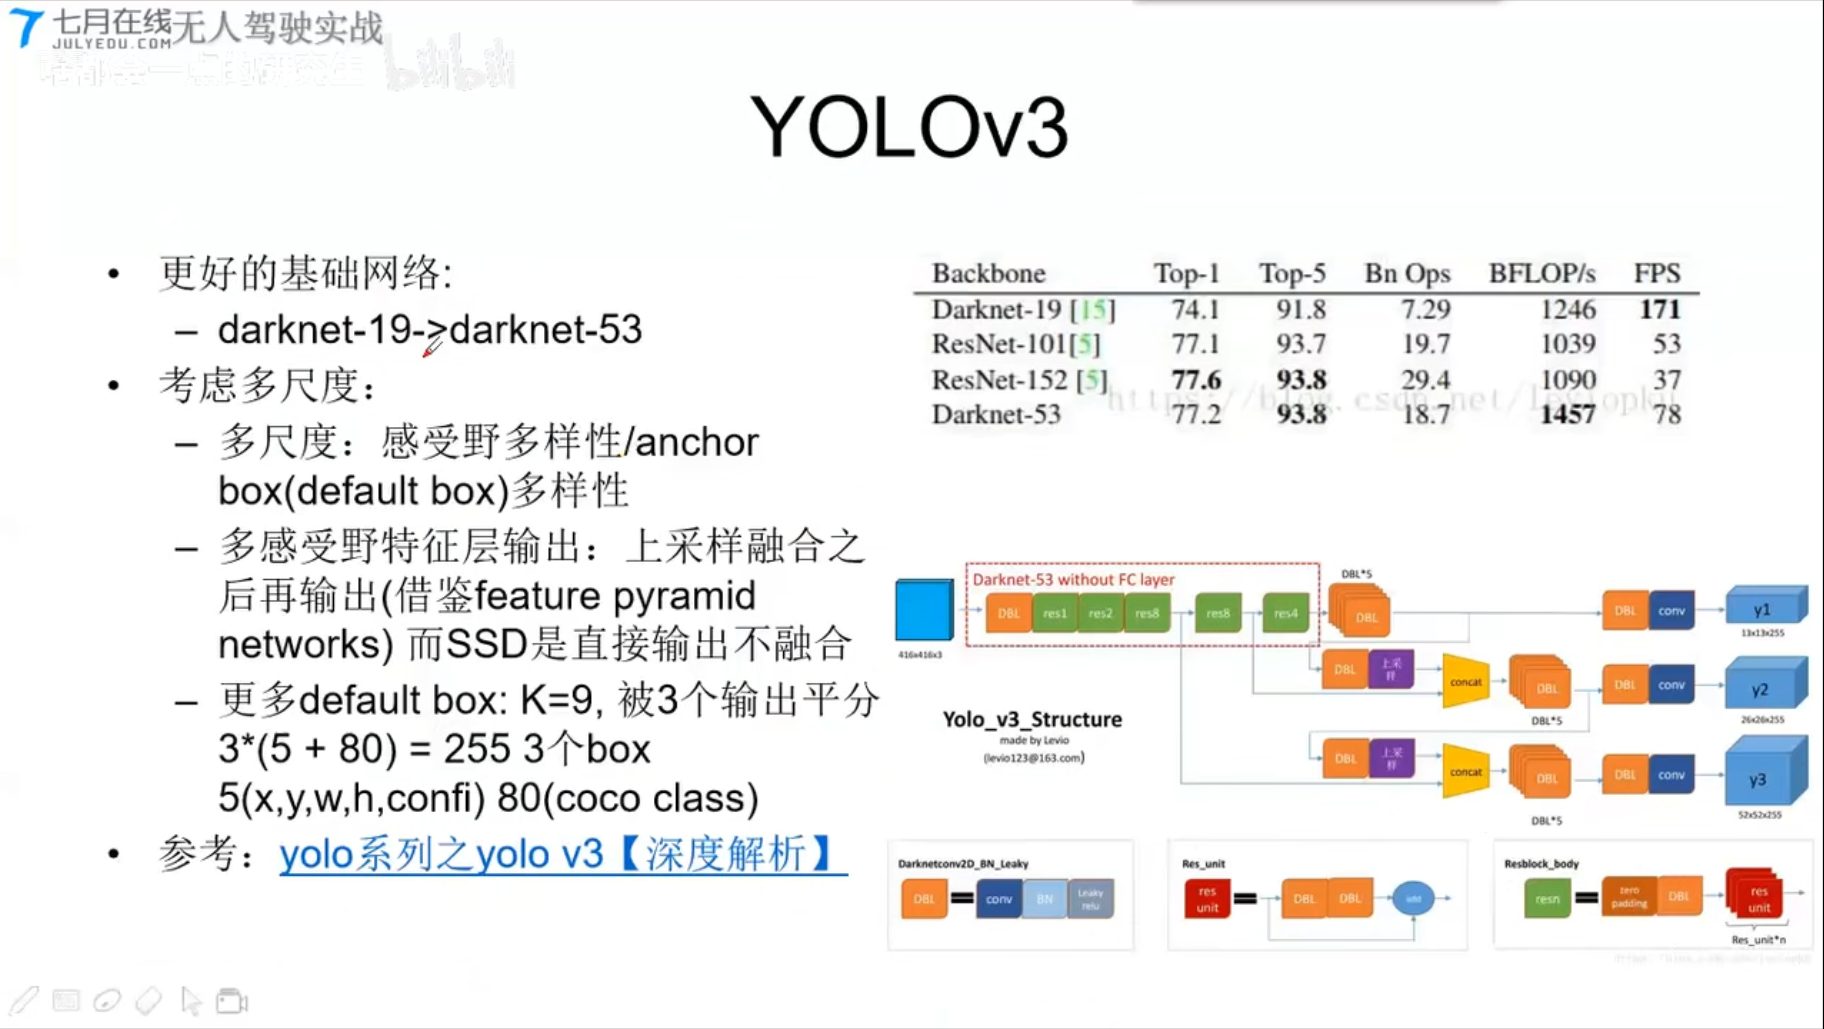
YOLOv3
- 更好的基础网络
- darknet-19 换成darknet-53
- 考虑多尺寸
- 多尺度
- 多感受野特征层输出
- 更多default box:K=9,被3个输出平分3*(5+80)=255;
- 3个box 5(x,y,w,h,confi), 80(coco class)
实战
C++ python Tutorial
[TOC]
环境配置VS Studio
c_cpp_properties.json
1 | { |
tasks.json
1 | { |
0. Test Run
1 |
|
1. C++传参
call python method, set parameter ,return value
常用的有两种方法:
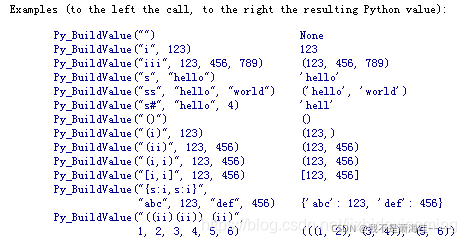
1 | 使用 PyTuple_New 创建元组, PyTuple_SetItem 设置元组值 |
1 | int demo1() |
2.传递List参数
1 | int demo2() |
3 python类操作,类属性,类成员函数 Todo
1 | int demo3() |
4 传递c++数组转python的list
1 | int demo4(){ |
参考:
https://docs.python.org/2/extending/embedding.html
https://wenku.baidu.com/view/01fab1346f175f0e7cd184254b35eefdc8d315cd.html
https://numpy.org/doc/1.17/reference/c-api.array.html
https://numpy.org/doc/1.17/reference/c-api.array.html#importing-the-api
无人驾驶(3)感知基础
无人驾驶感知基础–车道线检测
[toc]
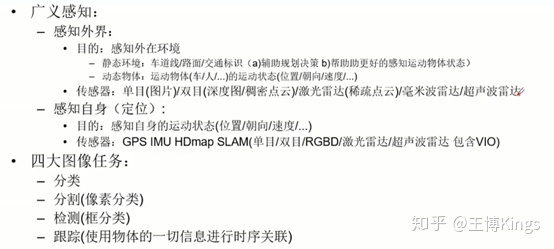
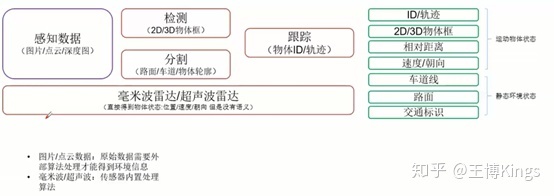
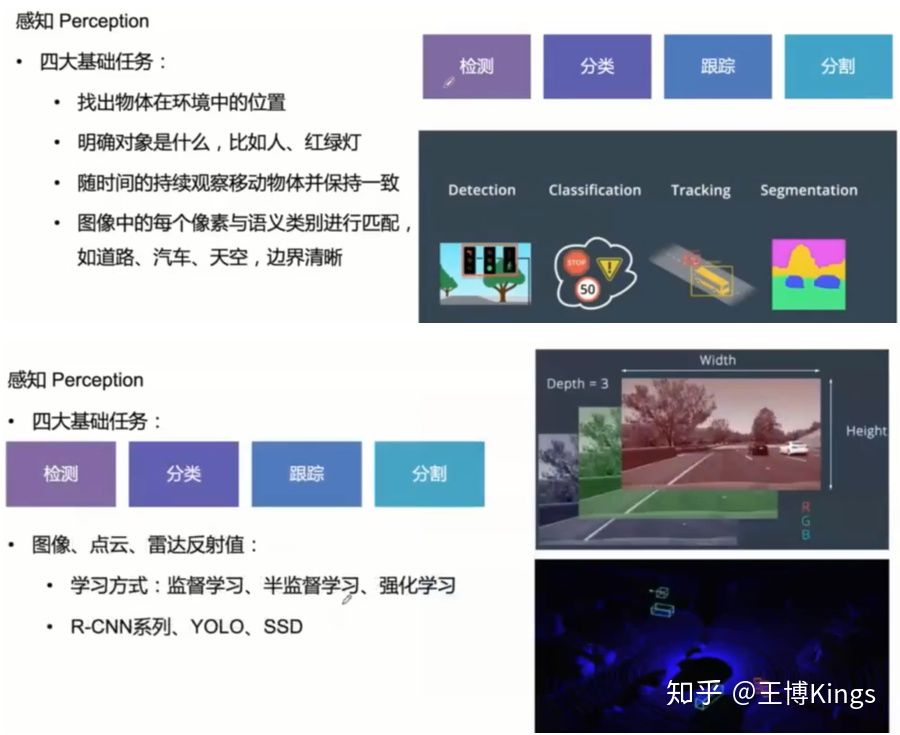
3.1无人驾驶感知系统概述
Preception
Content
- 实战基于传统方法的车道线检测
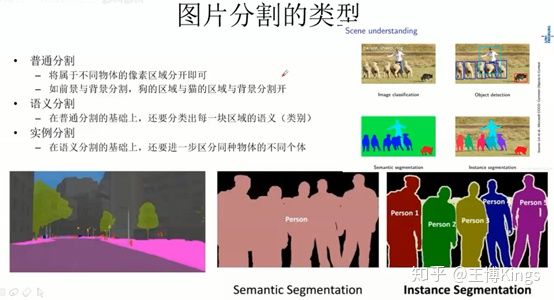
- 图片分割算法综述
- 实战基于深度学习的图片分割算法综述
3.2 实战分割基于传统方法的车道线检测
静态环境感知与分割算法
https://github.com/andylei77/lane-detector
对比算法:
1 | # 该算法利用了OpenCV库和Udacity自动驾驶汽车数据库的相关内容。 |
3.2.2 canny边缘检测
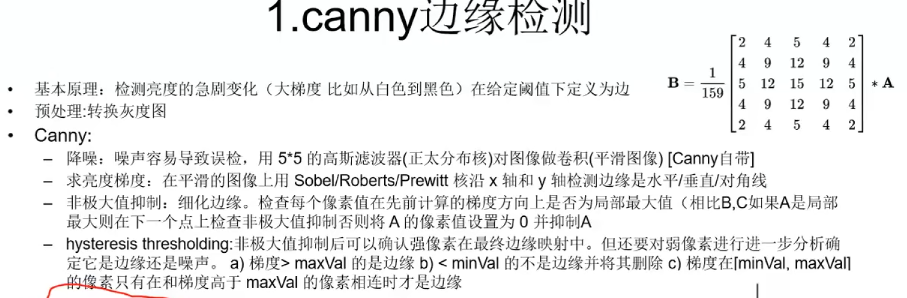
1 | def do_canny(frame): |
3.2.3 手动分割路面区域
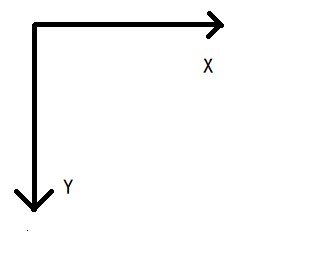
CV坐标系
- polygones=[] # 手动指定三角形的三个点
- mask = zeros_like() 生成mask
- fillpoly(mask, polygones, 255) ; poly 范围内填充255,区域外保留原始值
1 | def do_segment(frame): |
3.2.4 霍夫变换得到车道线
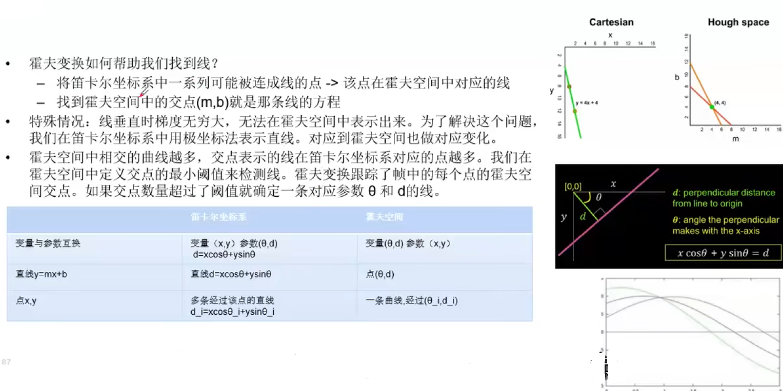
霍夫变换
- 参数和变量互换
图像中的一条线,变换到霍夫空间,就变成一个(霍夫空间的)点
图像中的一个点(有多条线穿过),对应霍夫空间的一条线;
cartesian: 笛卡尔坐标系
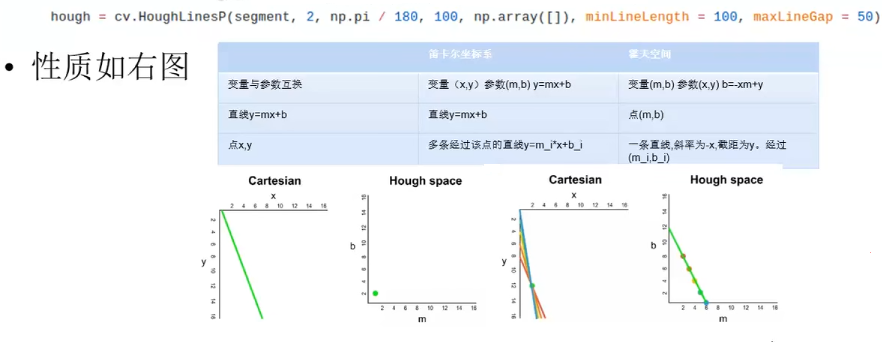
- 将笛卡尔坐标系中一系列的可能的点(连接成线),投影到霍夫空间(应该是一个点)
另一种霍夫空间(极坐标)
- 极坐标法表示直线
HoughLinesP函数在HoughLines的基础上末尾加了一个代表Probabilistic(概率)的P,表明它可以采用累计概率霍夫变换(PPHT)来找出二值图像中的直线。
1 | hough = cv.HoughLinesP(segment, 2, np.pi / 180, 100, np.array([]), minLineLength = 100, maxLineGap = 50) |
3.2.5 获取车道线并叠加到原始图像中
- 综合所有线,求两条车道线的平均斜率和截距
1 | def calculate_lines(frame, lines): |
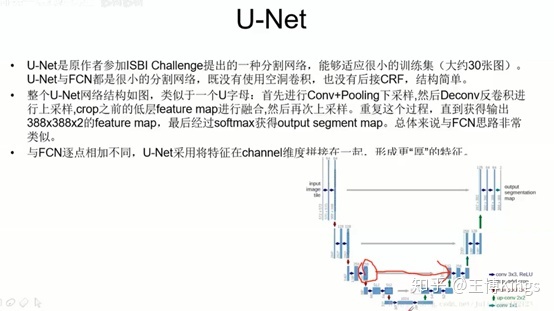
3.3 实战基于深度学习的图片分割算法综述
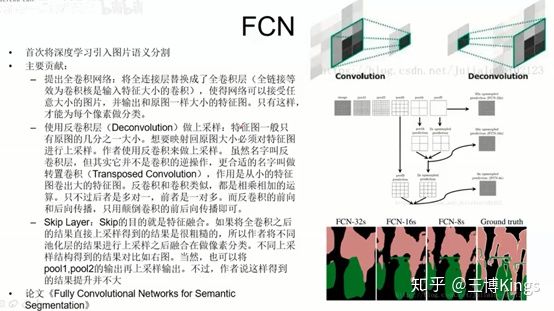
3.3.1 代表算法讲解
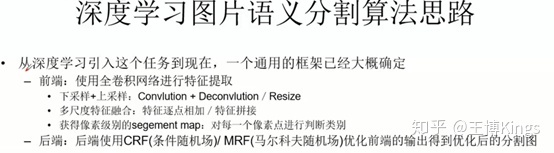
全连接
下采样上采样,池化
融合,上采样的和下采样平行的融合
语义地图,比如输入RGB3通道,最后输出是6个分类,那就是6张图

3.3.2 基于图片分割的车道线检测
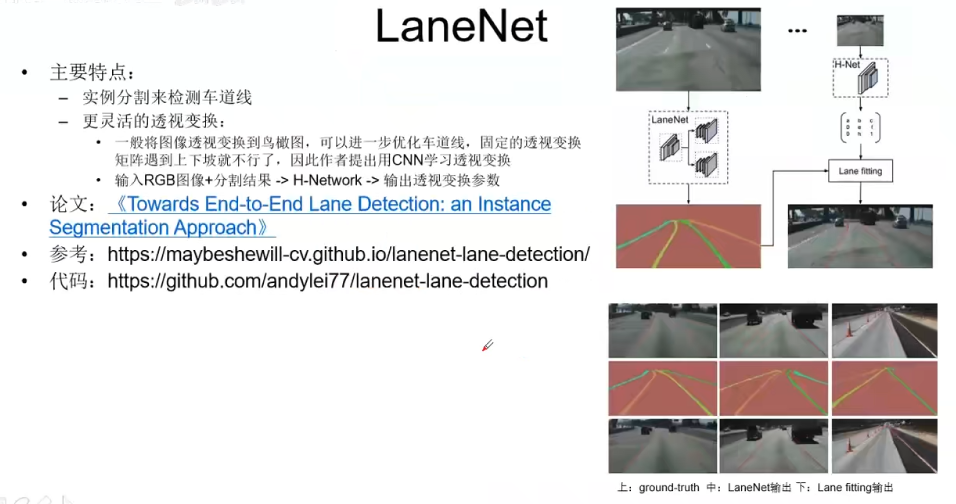
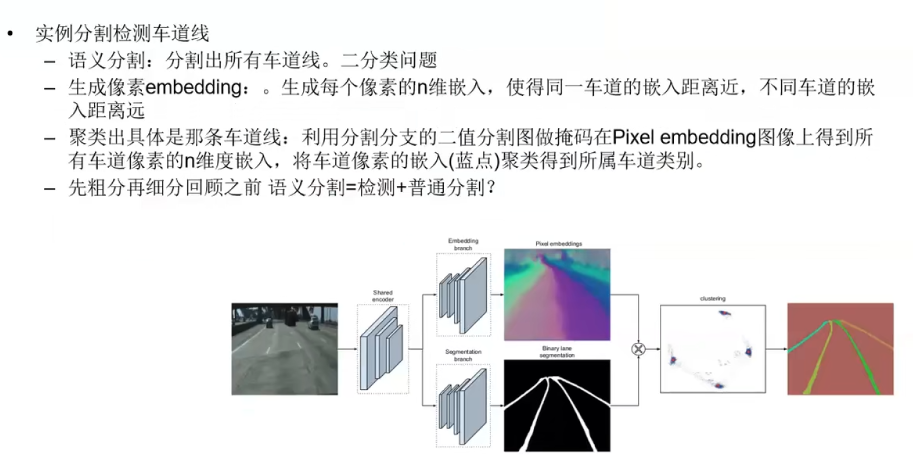
- 语义分割,二值分类,得到车道
- 分类车道-同向,—聚类方法 通向车道在n-dim聚类中,距离很近
源码
1 | # https://github.com/andylei77/lanenet-lane-detection/blob/master/tools/test_lanenet.py |
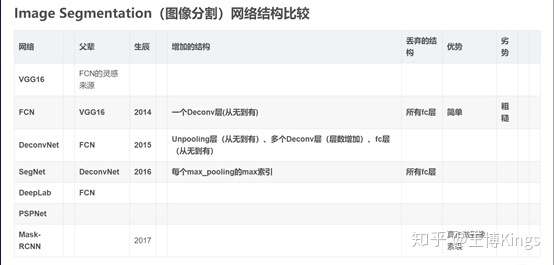
相关算法汇总
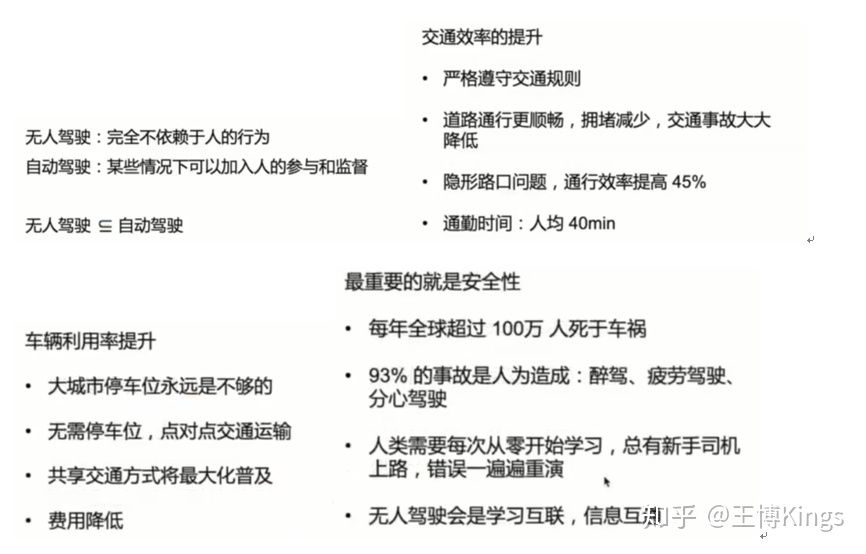
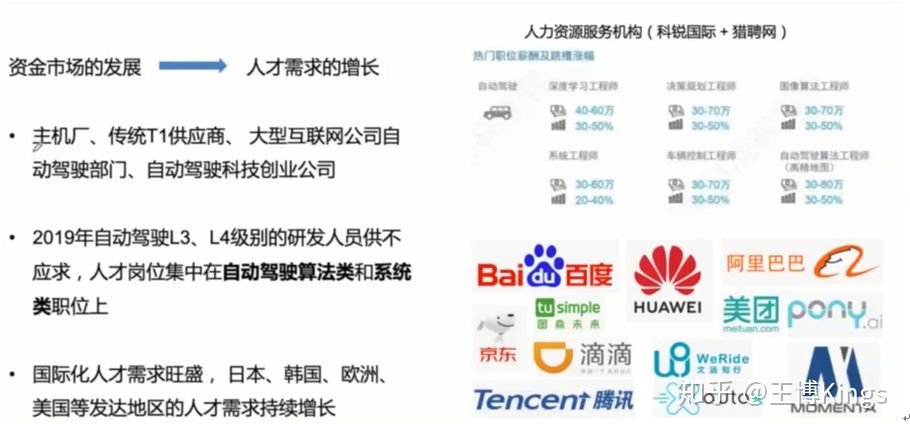
无人驾驶(1)概览--背景介绍

Paper_CV_5 目标跟踪
[TOC]
第一部分:目标跟踪速览
先跟几个SOTA的tracker混个脸熟,大概了解一下目标跟踪这个方向都有些什么。一切要从2013年的那个数据库说起。。如果你问别人近几年有什么比较niubility的跟踪算法,大部分人都会扔给你吴毅老师的论文,OTB50和OTB100(OTB50这里指OTB-2013,OTB100这里指OTB-2015,50和100分别代表视频数量,方便记忆):
Wu Y, Lim J, Yang M H. Online object tracking: A benchmark [C]// CVPR, 2013.
Wu Y, Lim J, Yang M H. Object tracking benchmark [J]. TPAMI, 2015.
顶会转顶刊的顶级待遇,在加上引用量1480+320多,影响力不言而喻,已经是做tracking必须跑的数据库了,测试代码和序列都可以下载: Visual Tracker Benchmark,OTB50包括50个序列,都经过人工标注:
目标跟踪
- 视觉和激光方向
SORT
https://github.com/abewley/sort